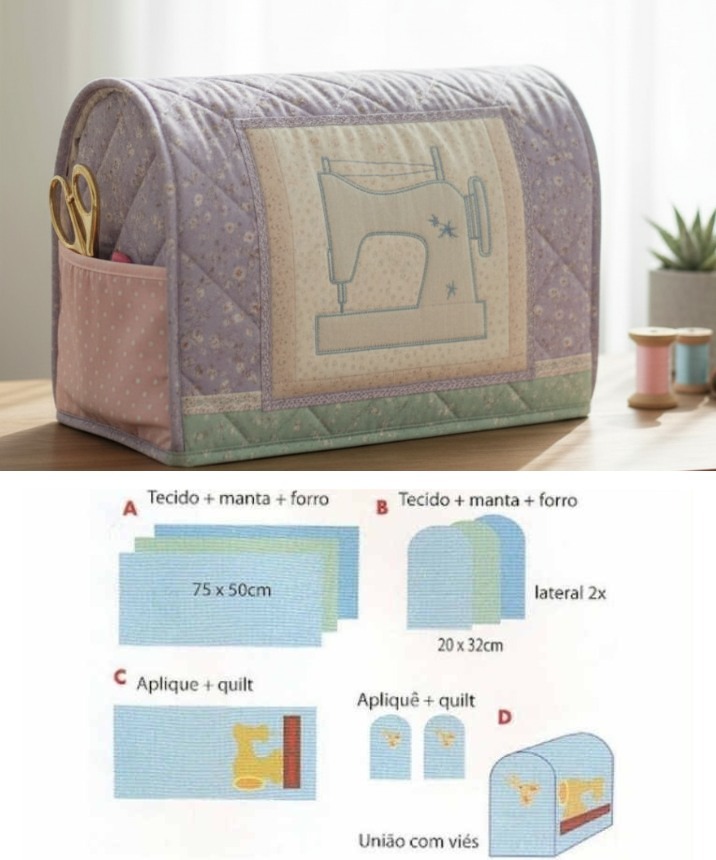
Lake Cabin Quilt Pattern – Tutorial

The Cat Pillow – Tutorial is a wonderful project for anyone who loves quilting and enjoys adding personality to their home decor. This adorable design lets you combine creativity, comfort, and craftsmanship while producing a pillow that warms any room. With its charming feline theme and easy-to-follow steps, the Cat Pillow – Tutorial is perfect for beginners and experienced quilters alike. Throughout this article, you’ll learn essential techniques, discover helpful tips, and get inspired to craft your own beautiful pillow with confidence.
This guide focuses on making your quilting experience relaxing, enjoyable, and successful. Whether you’re sewing for your home, crafting a handmade gift, or exploring new pattern ideas, the Cat Pillow – Tutorial opens the door to a world of creativity. Its friendly structure allows you to learn at your own pace and customize your pillow to match your style or color scheme. Quilters love this pattern because it is both approachable and visually appealing, making it ideal for all skill levels.
In this article, you’ll find valuable insights, four in-depth sections, and plenty of practical details. You’ll learn how to prepare materials, assemble the pillow, design your cat motif, and add finishing touches that make your final quilting project look professional. This Cat Pillow – Tutorial aims to guide you step by step while also being optimized with SEO best practices so your search for inspiration becomes easier and more enjoyable.

Before beginning your Cat Pillow – Tutorial, collecting the right materials is essential. Choosing high-quality fabric helps ensure that your pillow will have durability and a professional look. Quilters often recommend cotton fabrics because they are easy to work with and maintain. You can mix solids, prints, and soft pastel tones to create a lovable and whimsical cat design.
You will also need pillow stuffing or a pillow insert depending on your preference. Many quilters enjoy using premium polyester filling for a soft, plush finish. If you choose a removable insert, remember to measure accurately so the pillow fits snugly and retains its shape. Proper measurements are especially important in a project like this where precision makes a difference in the final appearance.
Other basic materials include scissors, rotary cutter, cutting mat, pins, sewing machine, and matching thread. A quilting ruler is extremely helpful to maintain clean edges and consistent fabric pieces. Following this Cat Pillow – Tutorial, you can prepare everything beforehand, making the sewing phase smoother and more enjoyable.
Selecting coordinating colors for the cat motif is another fun step. You may want a realistic look or something more playful. Some quilters use scrap fabric to form the cat’s ears, eyes, and nose, adding character and charm. No matter your choices, the goal is to make a pillow that reflects your personality.
For beginners, preparing a checklist can help keep the workspace organized. Good organization ensures you won’t miss any essential step while following this Cat Pillow – Tutorial. Once everything is ready, you will be able to move confidently into the assembly process.
Before proceeding, take a moment to press your fabrics to remove wrinkles. This small detail makes cutting and sewing easier and improves the finished look of your pillow. A well-prepared beginning sets the foundation for a successful quilting project.
The first sewing step in this Cat Pillow – Tutorial is assembling the front and back panels. Begin by cutting two equal squares or rectangles, depending on your desired pillow size. Most quilters choose a standard 16-inch or 18-inch pillow size, but you can adjust based on your preferences or available material. Once your panels are cut, set aside the back panel while you work on the decorative front.
For the cat design, place your fabric pieces for the ears and face over the front panel. You can use appliqué techniques to attach the motifs, or you can incorporate piecing methods if you prefer a more classic quilting style. Whichever technique you select, accuracy is key to achieving a clean and polished look.
Pin each piece carefully before sewing to prevent shifting. This step helps maintain symmetry in the cat’s facial features. Many quilters lightly mark placement lines with a disappearing fabric pen to achieve even alignment. This simple technique makes a remarkable difference in the final appearance.
Sewing slowly and steadily around curves or small appliqué pieces provides cleaner edges. This Cat Pillow – Tutorial encourages patience, especially for beginners who are still mastering control of their sewing machine. Taking your time leads to beautiful, smooth results that elevate your project.
After attaching the cat motif, you may add optional embellishments such as hand-stitched whiskers, embroidered eyes, or decorative buttons. These little details contribute to the pillow’s unique charm and make it truly personal. Whether you prefer a minimalist look or a more decorative style, the options are limitless.
Once the front panel is complete, press the entire surface gently with an iron. This helps flatten seams and prepares the piece for the next step. A polished appearance at this stage ensures the pillow will look professionally made once assembled.
With the panels ready, the next step in the Cat Pillow – Tutorial is sewing them together. Place the front and back panels with right sides facing each other. Align all edges carefully and pin the layers in place. A consistent seam allowance, typically around ¼ inch, helps the pillow maintain a uniform shape.
Sew around the edges, but leave a small opening to turn the pillow inside out. This gap is usually left along the bottom edge for easy access. Make sure to backstitch at the beginning and end to reinforce the seam. This prevents the stitches from coming undone when you stuff the pillow.
After sewing, trim the corners to remove excess fabric. This allows the corners to look sharper once turned outward. Carefully turn the pillow right-side out through the opening, using a blunt tool such as a chopstick to push out the corners for a crisp finish.
Now it’s time to stuff the pillow. If you are using loose filling, add small amounts at a time to avoid lumps. Distribute the stuffing evenly throughout the pillow to achieve a smooth, cushioned texture. For those using a pillow insert, simply slide it inside and adjust until it fits perfectly.
Once your pillow is stuffed, close the opening with a neat slip stitch or use your sewing machine if preferred. Hand stitching typically gives a more invisible finish, especially when matching the thread color to the fabric. The pillow should now look full, fluffy, and beautifully shaped.
Give your pillow one final press with the iron, avoiding any embellishments that may melt or warp. This final step enhances the finished look and completes your sewing phase. Congratulations—you now have a cozy and adorable Cat Pillow created with your own hands.
One of the best aspects of the Cat Pillow – Tutorial is how easily you can customize it. Whether you prefer realistic cat designs or abstract artistic styles, your pillow can reflect your creativity. Experiment with different color schemes, fabric textures, and decorative features to make each pillow one-of-a-kind.
You can also personalize the pillow by adding names, monograms, or themed decorations. Quilters often enjoy seasonal variations such as holiday-inspired colors or themed accents. Small additions such as lace, felt patches, or fabric paint can transform the design.
Another fun option is creating a collection of pillows featuring different cat expressions or breeds. These make charming decorative accents for living rooms, bedrooms, or children’s spaces. They also make thoughtful handmade gifts for cat lovers, friends, or family members.
Displaying your pillow is just as enjoyable as creating it. Place it on a couch, chair, reading nook, or bed where it can add warmth and personality. The soft textures and cute design bring comfort and positivity to any corner of your home.
If you enjoy interior decorating, consider pairing the pillow with complementary quilts or blankets. Coordinated textile pieces create a cohesive style that adds depth and coziness to your environment. The Cat Pillow – Tutorial helps you design a piece that seamlessly enhances your decor.
Finally, don’t hesitate to explore new variations and techniques. Quilting is a journey that inspires growth and experimentation. Each pillow you create will help you refine your skills and discover new creative possibilities.
What materials do I need for the Cat Pillow – Tutorial?
You will need cotton fabric, thread, scissors, rotary cutter, cutting mat, pillow stuffing or insert, pins, and a sewing machine. Additional materials for decoration include felt, embroidery thread, or fabric scraps.
Is this pillow suitable for beginners?
Yes, the Cat Pillow – Tutorial is great for beginners. The steps are simple, and the project doesn’t require advanced quilting techniques.
What size should the pillow be?
Most quilters choose 16-inch or 18-inch pillows, but you can adjust the size based on your preference or available fabric.
Can I customize the cat design?
Absolutely! You can change colors, shapes, facial expressions, and embellishments to match your personal style or decor.
Do I need a sewing machine?
A sewing machine makes the project easier and faster, but you can sew the pillow by hand if you prefer, though it will take longer.
Can I wash the pillow once finished?
Yes, if all materials used are washable. For pillows with embellishments, spot cleaning is recommended.
The Cat Pillow – Tutorial offers a delightful and creative quilting experience for beginners and advanced crafters alike. From preparing materials to customizing your final design, this article guided you through each essential step to help you create a charming, comfortable, and personal pillow.
PATTERN VIDEO:
Now that you’ve learned the full process, feel free to leave your sincere opinion and share suggestions for future tutorials. Your feedback helps inspire new ideas and keeps the quilting journey exciting and fun!