Lake Cabin Quilt Pattern – Tutorial

The Cascading Diamond Quilt – PATTERN is a breathtaking design that captures movement, elegance, and modern artistry all in one project. Right from the first glance, the cascading diamonds appear to flow across the quilt top, creating an effect that feels both dynamic and harmonious. Using the term Cascading Diamond Quilt – PATTERN throughout this tutorial ensures clear understanding and enhances SEO visibility for quilters searching for new and inspiring patterns.
This pattern is ideal for quilters who enjoy geometric shapes and want to explore a layout that plays with direction and visual illusion. Even though the finished quilt looks sophisticated, the construction process is approachable and customizable. Whether you choose bold colors, subtle gradients, or soft neutrals, the diamond shapes naturally become the focal point of your quilt.
Before diving into the step-by-step instructions, it’s important to understand that the Cascading Diamond Quilt – PATTERN gives enormous creative freedom. You can modify the size, colors, and layout to create anything from small lap quilts to stunning bed-sized creations. The next sections will guide you through materials, construction techniques, and design variations to help you make your own cascading masterpiece.
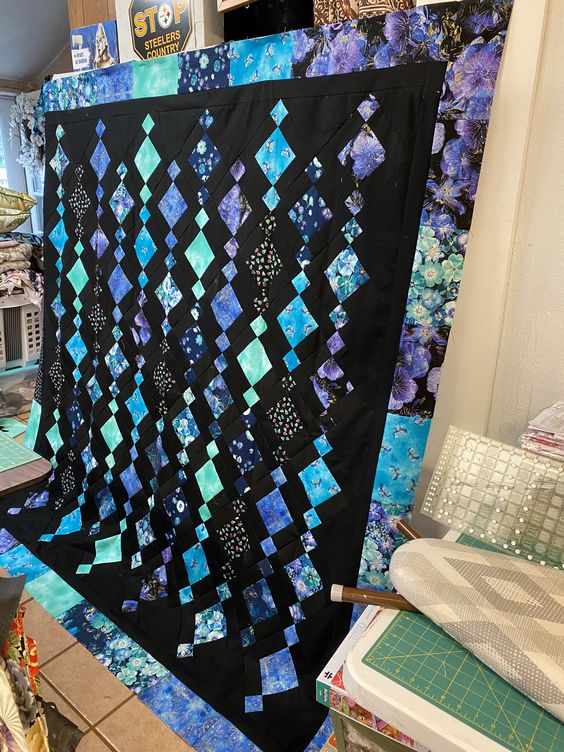
The Cascading Diamond Quilt – PATTERN is based on repeated diamond-shaped units arranged in a flowing, waterfall-like movement. This visual cascade occurs because the diamonds are strategically positioned in diagonal and vertical alignment, making the quilt feel alive and full of motion. This elegant structure is what makes the pattern stand out among geometric quilt designs.
One of the advantages of working with diamond shapes is the wide range of color play they allow. Each diamond acts like a highlight within the quilt, which gives you the opportunity to create gradients, contrasts, or rainbow effects. This makes the pattern perfect for showcasing favorite fabrics or curated color bundles.
Understanding the construction process is essential before beginning. Diamonds are traditionally sewn using either templates or strip-piecing methods. Strip-piecing offers faster assembly, while template cutting provides precise accuracy. Both techniques work beautifully for this particular pattern and help maintain clean points in each diamond.
The cascading layout is built by arranging rows of diamonds in a staggered design. This asymmetry is what gives the quilt its flowing motion. The diamonds can “cascade” from top to bottom, left to right, or even diagonally across the quilt depending on your creative preference.
Another important aspect of this pattern is background fabric selection. The background enhances the diamonds and helps them stand out clearly. Many quilters choose solid fabrics or low-volume prints that allow the cascading shapes to remain the main visual focus.
Finally, the Cascading Diamond Quilt – PATTERN is suitable for confident beginners and intermediate quilters. The pattern offers a satisfying challenge while remaining manageable with careful cutting and consistent seam allowance. With patience and precision, the results are breathtaking.
Creating the Cascading Diamond Quilt – PATTERN begins with selecting the right fabrics. Your color palette dramatically influences the visual flow of the cascading diamonds. Gradient color schemes, ombre fabrics, or coordinated bundles create a smooth transition effect, while contrasting colors create bold standout diamonds.
For the main diamonds, use high-quality quilting cotton. Solid colors work well for a clean, modern look, while prints add character and texture. Small-scale prints are ideal because they maintain clarity when cut into diamond shapes.
The background fabric should complement but not overwhelm the diamonds. Neutral shades like white, cream, gray, navy, or black are popular choices because they allow the cascading shapes to shine. Soft tone-on-tone prints can also add a touch of texture without distracting from the overall design.
You will also need basic quilting supplies: rotary cutter, cutting mat, ruler (a 60-degree ruler is helpful), sewing machine, thread, and iron. These tools are essential for achieving clean lines and accurate piecing when constructing diamond shapes.
Batting is another important element. Choose medium-weight cotton or cotton-blend batting to give your quilt warmth and structure. Lightweight batting works beautifully for quilts that will be used in warmer climates or indoor decor.
Lastly, backing fabric should coordinate with your quilt top. You may choose a single fabric, pieced backing, or a design that complements the diamond colors. With the Cascading Diamond Quilt – PATTERN, the backing provides another opportunity to enhance your overall aesthetic.
To begin constructing the Cascading Diamond Quilt – PATTERN, start by cutting your fabric into diamond shapes. You can use a diamond template, a 60-degree ruler, or strip-piecing techniques. Strip-piecing is efficient because it allows you to sew long fabric strips together and then cut diamonds from the assembled unit.
Once your diamonds are cut, organize them by color and value. Planning the color arrangement beforehand ensures the cascading effect flows smoothly. Lay out your diamonds on a design wall or large table to visualize how they connect to each other.
Next, begin sewing your diamonds into rows. Each diamond must be joined with accurate ¼-inch seam allowance to maintain point alignment. Take your time pressing the seams gently after each step, as crisp seams significantly improve the quilt’s final structure.
After assembling the rows, sew them together in the cascading arrangement you planned earlier. Because the diamonds stagger across the quilt, seam alignment might require careful pinning. Work slowly and check alignment frequently to preserve clean points.
Once the quilt top is complete, prepare your quilt sandwich: backing fabric, batting, and quilt top. Smooth each layer carefully and secure them with pins or temporary adhesive spray. This ensures your layers remain aligned during quilting.
Finally, quilt the layers. Straight-line quilting, diagonal stitching, or echo quilting around the diamonds all complement this pattern beautifully. Bind your quilt with a coordinating fabric, and your Cascading Diamond Quilt – PATTERN is finished and ready to display.
One of the best features of the Cascading Diamond Quilt – PATTERN is its versatility. You can adjust color, scale, and layout to create endless design variations. Whether you prefer bold modern aesthetics or soft traditional palettes, this pattern adapts beautifully.
Color gradients create a dreamy waterfall effect. Arrange colors from dark to light to mimic a cascading fade. This method is especially effective when using ombre fabrics or multi-shade bundles.
If you enjoy a bold, dramatic look, choose high-contrast fabrics. Pair black background fabric with bright diamonds in red, turquoise, or yellow for a powerful statement piece. This combination makes each diamond appear to glow against the dark surface.
For a softer, more traditional style, use pastel colors and floral prints. These fabrics create a delicate, gentle cascade that is perfect for bedroom decor or baby quilts. A light background like cream or blush enhances the effect.
Another creative twist is enlarging the diamond units. Larger diamonds create a modern, minimalist design while reducing the number of pieces required. Smaller diamonds, on the other hand, create intricate detail and depth.
Finally, personalization can add sentimental value. Add embroidered initials, a date, or a special message stitched into the quilt back. This transforms the Cascading Diamond Quilt – PATTERN into a meaningful gift that carries emotional significance.
1. Is the Cascading Diamond Quilt suitable for beginners?
It is ideal for confident beginners who are comfortable with accurate cutting and sewing.
2. What ruler is recommended for cutting diamonds?
A 60-degree ruler ensures clean, consistent diamond shapes.
3. Can I use scraps for this pattern?
Yes, scraps work beautifully, especially for colorful cascading effects.
4. What quilting method works best?
Straight-line, echo, or diagonal quilting enhances the geometric flow.
5. Should I press seams open or to the side?
Pressing seams open usually helps reduce bulk in diamond points.
6. Can I make a bed-sized version?
Absolutely—just increase the number of diamond rows and columns.
7. Is strip-piecing recommended?
Yes, it speeds up construction and improves accuracy.
8. What is the best background fabric color?
Neutrals or solid colors that allow the diamonds to stand out.
The Cascading Diamond Quilt – PATTERN offers quilters an exciting opportunity to combine precision, creativity, and movement in a single project. This article guided you through understanding the diamond structure, selecting fabrics, sewing each section, and exploring beautiful variations. With thoughtful planning and attention to detail, you can create a quilt that feels both artistic and full of life.
If you enjoyed this tutorial, please leave a sincere opinion and share your suggestions. Your feedback helps inspire future quilting guides and creative patterns!