DIY Adorable Bunny Doll - Tutorial

The Bunny Butt Pillow – TUTORIAL is a fun and creative quilting project that adds a playful touch to your home decor. With its adorable design featuring a bunny’s back and fluffy tail, this pillow is perfect for springtime decoration, Easter themes, or simply bringing a bit of charm into your living space.
Quilting projects like the Bunny Butt Pillow – TUTORIAL are becoming increasingly popular because they combine functionality with personality. This project allows you to create a cozy and decorative pillow while exploring patchwork and appliqué techniques in a lighthearted and enjoyable way.
In this complete guide, you’ll learn how to create your own Bunny Butt Pillow – TUTORIAL, including the materials needed, step-by-step instructions, and customization ideas. Whether you are a beginner or an experienced quilter, this project is both approachable and rewarding.
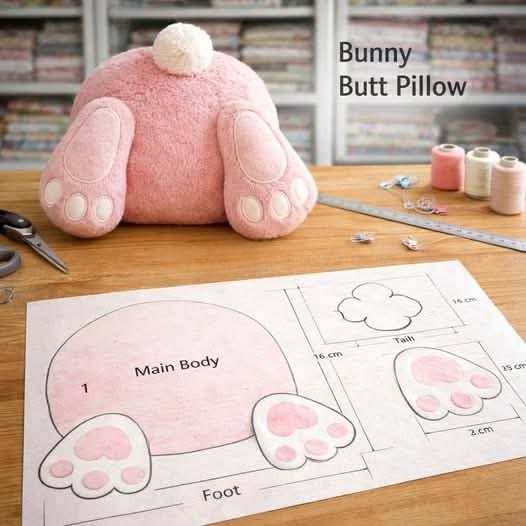
The Bunny Butt Pillow – TUTORIAL is a quilting project that features a stylized bunny design, typically showing the back of a bunny with its tail and feet. The design is often created using appliqué and soft textures.
One reason this project is so popular is its playful and seasonal appeal. It is especially loved during spring and Easter, making it a great addition to holiday decor.
Another advantage is its versatility. The pillow can be used on sofas, beds, or chairs, adding a cozy and whimsical touch to any room.
The Bunny Butt Pillow – TUTORIAL is also beginner-friendly. It uses simple sewing techniques that are easy to follow and adapt.
Additionally, it offers plenty of room for creativity. You can experiment with fabrics, colors, and textures to create a unique design.
Finally, handmade pillows make thoughtful gifts, adding a personal and heartfelt touch that store-bought items often lack.
To begin your Bunny Butt Pillow – TUTORIAL, you will need cotton fabric for the pillow base. Soft, neutral colors work well as a background.
You will also need fabric for the bunny design. Plush or textured fabric can be used for the tail to create a fluffy effect.
Basic sewing tools are essential, including a sewing machine, scissors, pins or clips, and a measuring ruler.
Batting or interfacing can be used to add structure to the pillow front, giving it a more polished look.
Thread that matches your fabric is important for clean and secure stitching.
Finally, you’ll need a pillow insert or stuffing to complete your Bunny Butt Pillow – TUTORIAL.
Start your Bunny Butt Pillow – TUTORIAL by cutting your base fabric into the desired pillow size. Make sure the edges are straight and even.
Next, prepare the bunny design using a template. Cut out the body, feet, and tail pieces from your chosen fabrics.
Arrange the appliqué pieces on the front panel and adjust their placement until you are satisfied with the layout.
Secure the pieces using pins or fusible web, then stitch around the edges to attach them firmly.
Once the design is complete, place the front and back fabric pieces together, right sides facing inward, and sew around the edges, leaving an opening.
Turn the pillow right side out, insert the stuffing or pillow form, and close the opening. Your Bunny Butt Pillow – TUTORIAL is now finished.
The Bunny Butt Pillow – TUTORIAL can be customized in many ways. You can use pastel colors for a soft, seasonal look or bold tones for a modern twist.
Adding texture to the tail using faux fur or fluffy yarn can enhance the design and make it more realistic.
You can also adjust the pillow size depending on your needs, from small decorative cushions to larger statement pieces.
Consider adding details like embroidery or quilting stitches to give your pillow more depth and character.
For those creating online content, using SEO techniques is essential. Include the keyword Bunny Butt Pillow – TUTORIAL naturally throughout your article.
Use clear headings, well-structured paragraphs, and engaging descriptions to improve readability and search engine ranking.
1. Is the Bunny Butt Pillow – TUTORIAL suitable for beginners?
Yes, it is beginner-friendly and uses basic sewing and appliqué techniques.
2. What type of fabric should I use?
Cotton fabric is ideal for the base, while textured fabric works well for the bunny details.
3. Can I use scrap fabric?
Yes, this project is perfect for using leftover fabric creatively.
4. How do I make the tail fluffy?
You can use faux fur, pom-poms, or soft yarn to create a fluffy effect.
5. Can I wash the finished pillow?
Yes, but it’s best to use gentle washing methods or make a removable cover.
6. Can I sell items made from this tutorial?
Yes, as long as you follow any pattern usage guidelines if applicable.
The Bunny Butt Pillow – TUTORIAL is a fun and creative quilting project that combines comfort with playful design. Throughout this article, you’ve learned about the materials, step-by-step instructions, and customization ideas that make this project so enjoyable.
By following this guide, you can create a charming handmade pillow that adds personality and warmth to your home. It’s also a wonderful gift idea that showcases your creativity and effort.
PATTERN VIDEO:
If you enjoyed this tutorial, feel free to share your honest opinion and leave your suggestions. Your feedback is important and helps inspire more creative quilting projects in the future.