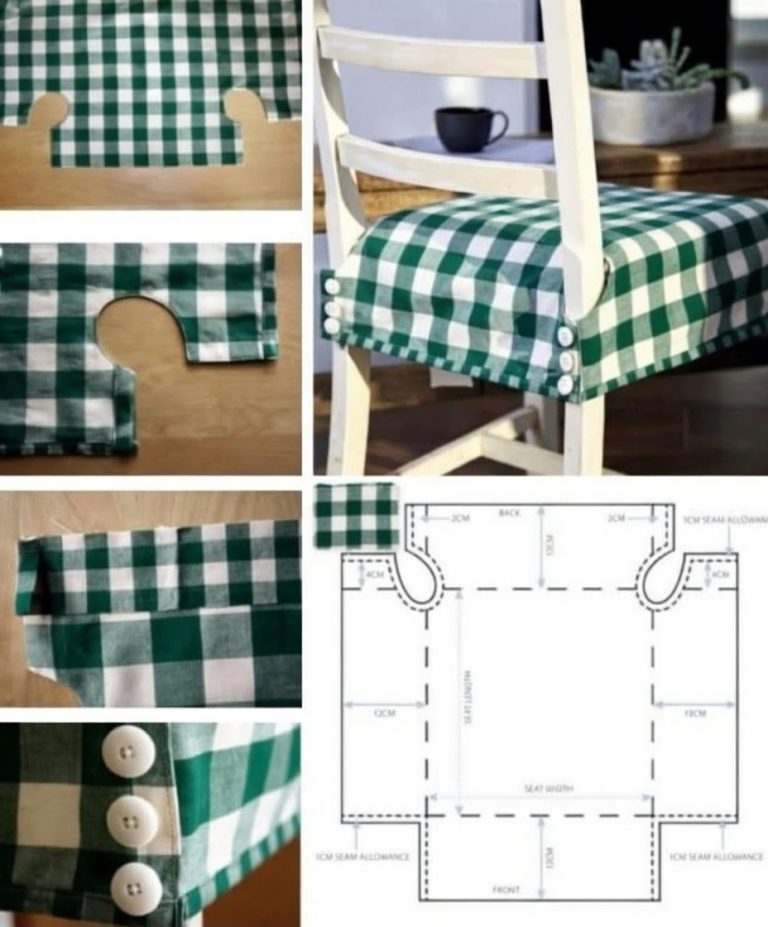
Sewing a Chair Cover - PATTERN

The Bear’s Paw Quilt Block – Pattern is a beloved traditional design that has stood the test of time for generations. Its bold geometric shapes, strong symbolism, and beautiful layout make it an essential pattern for any quilting enthusiast. Whether you’re a beginner looking for a first project or a seasoned quilter revisiting a favorite classic, this guide will walk you through everything you need to know.
Dating back to the 1800s, the Bear’s Paw Quilt Block – Pattern has roots in American folk history and is thought to symbolize strength, guidance, and direction—much like the bear itself. The distinct layout of squares, rectangles, and half-square triangles creates a block that looks intricate but is surprisingly approachable once broken into steps.
This tutorial is designed to offer a friendly and comprehensive approach to constructing your own Bear’s Paw Quilt Block – Pattern. With just a few basic materials and a clear understanding of piecing techniques, you’ll be stitching beautiful, timeless quilt blocks in no time.
Before you begin your Bear’s Paw Quilt Block – Pattern, take a moment to gather everything you need. Preparing your materials will make your quilting process smoother and more enjoyable.
Start with two contrasting fabrics—one light (background) and one dark (the paw). Traditional color combinations include cream and navy, white and burgundy, or soft beige with forest green.
You’ll need a rotary cutter, cutting mat, and acrylic quilting ruler to cut your fabric accurately. Precision is key when assembling quilt blocks with multiple small components.
A sewing machine with a 1/4” quilting foot is ideal for consistent seam allowances. You can also hand-piece your blocks if preferred, especially for a heritage or heirloom-style quilt.
Use cotton thread in a neutral color, along with a good iron and ironing board for pressing seams throughout the process.
Optional but helpful tools include pins or clips, a seam ripper (just in case!), and a marking pencil or chalk to guide triangle cuts.
Finally, print or sketch a template of the Bear’s Paw Quilt Block – Pattern to keep track of your layout and measurements as you go.
The Bear’s Paw Quilt Block – Pattern is made of four identical “paw” units arranged around a central square. Each paw consists of a large square and three half-square triangles.
Begin by cutting your pieces: for a 12” finished block, you’ll need four 3.5” squares (background), four 3.5” dark squares, eight 4” squares (four background, four dark) for half-square triangles, and one 3.5” square for the center.
To make the half-square triangles (HSTs), pair one light and one dark 4” square, place right sides together, and draw a diagonal line across the lighter fabric.
Sew 1/4” away from both sides of the drawn line. Then cut on the line to yield two HSTs. Press seams to the darker side and trim each unit to 3.5” square.
Repeat until you have twelve trimmed HSTs. Lay them out with one 3.5” dark square and one 3.5” background square to form a paw. Make four paw units total.
Sew the units together row by row, pressing your seams flat as you go. Try chain-piecing for efficiency if you’re making multiple blocks for a larger quilt.
Assemble each paw block and check for accuracy in size (should be 6.5” unfinished). Precision at this stage ensures your full Bear’s Paw Quilt Block – Pattern comes together beautifully.
Now that your paw units are complete, it’s time to bring your Bear’s Paw Quilt Block – Pattern to life by assembling the center and outer pieces into a full 12” block.
Lay out your block: place the center square in the middle, and arrange the four paw units around it in a clockwise or counterclockwise rotation—either is fine, depending on your aesthetic preference.
Make sure the claws of each paw (the HSTs) face outward, radiating from the center. This creates the classic “bear paw” appearance.
Sew the top row: paw, background square, paw. Then sew the middle row: background square, center square, background square. Finish with the bottom row: paw, background square, paw.
Press each row’s seams in alternating directions to help them nest together when assembling the final block. This technique creates flatter seams and better alignment.
Sew the rows together carefully, matching corners and points. Pin before stitching to avoid shifting and ensure accuracy.
Press the finished block from the back first, then give it a final press from the front. Congratulations! You’ve completed your Bear’s Paw Quilt Block – Pattern.
Now that you’ve mastered the Bear’s Paw Quilt Block – Pattern, it’s time to think about how to use your blocks creatively in larger quilt projects or individual pieces.
Join multiple blocks together to form a full quilt top. You can alternate block colors or use sashing strips between blocks for contrast and definition.
Try a modern twist by using bold prints, low-volume backgrounds, or negative space around each block. The geometric design works well with both traditional and contemporary styles.
Make a quilted wall hanging by using just one or four blocks. Add a border, layer with batting and backing, and finish with binding to complete the piece.
For a cozy throw or lap quilt, combine nine to twelve blocks with coordinating fabrics. You can even alternate blocks with plain fabric squares to speed up the process.
Want a beginner-friendly challenge? Make a Bear’s Paw Quilt Block – Pattern into a decorative pillow. Add batting, quilt the top, and finish with an envelope back or zipper closure.
Don’t forget to label your quilt! Add a personal touch by signing or dating the back of your finished piece to preserve the story of your creation.
Is the Bear’s Paw Quilt Block suitable for beginners?
Yes! Though it involves half-square triangles, the Bear’s Paw Quilt Block – Pattern is a beginner-friendly design once you understand the piecing process.
What size can I make the Bear’s Paw block?
It can be scaled up or down. Common sizes include 6″, 9″, and 12″ blocks. Adjust your cutting measurements accordingly.
Do I need special tools to make this block?
A rotary cutter and quilting ruler help with precision, but the block can also be made with hand-cut templates and scissors if needed.
How many blocks do I need for a full quilt?
That depends on your quilt size. A throw may need 12–20 blocks, while a queen quilt may need 36 or more. Add borders to reach your desired size.
Can I use scraps for this pattern?
Absolutely! The Bear’s Paw Quilt Block – Pattern is great for using up fabric scraps, especially for the paw units and backgrounds.
What’s the historical meaning behind this block?
Traditionally, the Bear’s Paw symbolized guidance and safe passage, often linked to the Underground Railroad and early American folklore.
The Bear’s Paw Quilt Block – Pattern is more than just a beautiful design—it’s a celebration of heritage, craftsmanship, and creativity. With its striking layout and meaningful history, this pattern continues to inspire quilters around the world. Whether you’re piecing your first block or building a full quilt, this guide has given you all the tools to bring the Bear’s Paw to life.
PATTERN VIDEO:
We’d love to hear your thoughts on this tutorial! Share your feedback, tell us how your project turned out, and feel free to offer suggestions for future quilt patterns you’d like to see. Happy quilting! 🧵🐾