Embroidered Patchwork Coaster – Tutorial

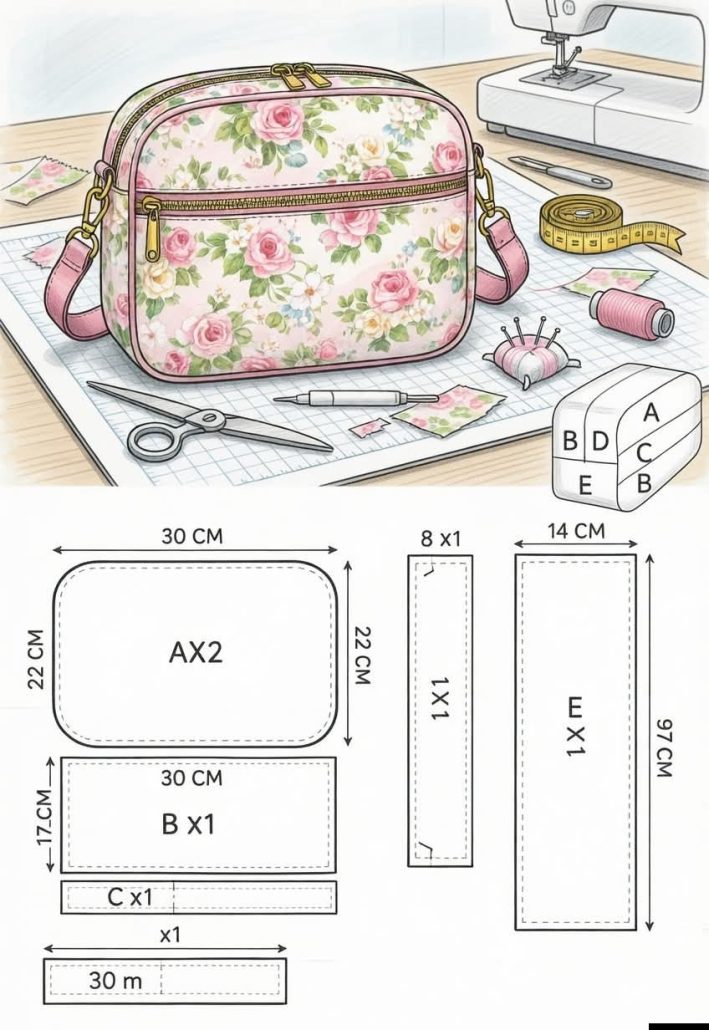
If you’ve been looking for a creative and sustainable way to use leftover materials, this Bag Made from Scraps of Fabric – PATTERN is the perfect project for you. It combines the joy of quilting with practical functionality, turning your small pieces of fabric into something stylish and useful. Making a bag from fabric scraps not only helps reduce waste but also allows you to create a one-of-a-kind accessory that reflects your personal style. Every piece tells a story, making the finished product unique and full of character.
Creating a Bag Made from Scraps of Fabric is an excellent project for both beginner and advanced quilters. It’s simple enough for newcomers to learn basic quilting techniques, yet flexible enough for experienced crafters to experiment with different layouts, colors, and textures. This project invites creativity while keeping the focus on sustainability—transforming leftover fabric pieces into a functional and fashionable bag.
Whether you use bright, bold prints or soft, subtle tones, this Bag Made from Scraps of Fabric – PATTERN can be adapted to match any outfit or occasion. You can design it for everyday use, as a gift, or even as a reusable shopping bag. No matter your approach, you’ll enjoy every step of the process, from arranging the fabric pieces to the final stitches that bring your creation to life.
Before you begin your Bag Made from Scraps of Fabric – PATTERN, gather all your leftover fabric pieces. Look for cotton or quilting-weight fabrics since they’re easy to work with and durable. Collect pieces of different colors and patterns—florals, stripes, solids, and polka dots all blend beautifully when balanced thoughtfully.
Next, decide on the size and shape of your bag. You can make a small tote, a medium handbag, or a large market-style bag depending on your needs. Measure and cut a base fabric piece for the lining and structure of your bag. Then, cut your fabric scraps into even squares, rectangles, or random patchwork shapes to piece together on the outer surface.
Arrange your fabric pieces in a way that pleases your eye before sewing. Consider color placement, contrast, and texture. Some quilters prefer an organized look with matching tones, while others embrace a spontaneous, patchwork feel.
Sew your scraps together using a ¼-inch seam allowance. Press the seams open or to one side with an iron to ensure the outer layer remains flat. Once all your scraps are joined, you’ll have a beautifully textured quilted panel ready for assembly.
Add batting or interfacing behind your patchwork to give the bag structure. This layer helps the bag keep its shape while adding a quilted, cushioned texture. Then, quilt over the layers using straight lines, zigzags, or even free-motion stitching for extra flair.
Finally, prepare the lining and straps for your bag. You can use coordinating or contrasting fabric for the inside lining, depending on your desired style. Sew the lining to the outer layer, leaving an opening to turn the bag right side out.
Once your quilted panels are complete, it’s time to assemble your Bag Made from Scraps of Fabric. Start by placing the outer panels right sides together, aligning the edges carefully. Sew along the sides and bottom, leaving the top open. For added strength, double-stitch the seams or reinforce them with topstitching.
To give your bag a boxed bottom, pinch each bottom corner and sew a straight line across, about an inch or two from the tip. This step adds depth and allows your bag to stand upright when set down. Trim any excess fabric after sewing.
Prepare the straps or handles next. Cut two long strips of fabric or repurpose old belts or sturdy ribbons. Fold the fabric strips in half lengthwise, right sides together, sew along the long edge, and turn them right side out. Press the straps flat and topstitch for extra durability.
Attach the straps to the outer layer, spacing them evenly and ensuring they’re strong enough to carry weight. Pin them securely before sewing them in place. If you want an adjustable strap, consider adding D-rings or metal slides.
With the outer bag complete, insert the lining inside, right sides together. Sew along the top edge, leaving a small opening to turn the bag right side out. Once turned, tuck the lining inside neatly and topstitch along the top edge for a polished finish.
Now your Bag Made from Scraps of Fabric – PATTERN is taking shape beautifully. The vibrant mix of textures and colors gives it charm and personality that can’t be found in store-bought bags.
The best part about this Bag Made from Scraps of Fabric – PATTERN is its flexibility—you can add all kinds of features to suit your needs. Adding pockets, buttons, or zippers turns a simple bag into a highly practical accessory.
If you’d like internal pockets, cut small rectangles of fabric and sew them to the inside lining before attaching it to the outer layer. You can make a few smaller pockets for keys or pens, and one larger one for your phone or wallet.
A magnetic snap or button closure at the top can help keep your belongings secure. You can also sew a drawstring casing for a more casual, pouch-like look.
For an artistic touch, consider adding applique, embroidery, or fabric paint to personalize your bag even more. Each detail transforms your creation into something uniquely yours.
If you prefer a more structured bag, use fusible interfacing or foam stabilizer between the layers. This adds firmness and a professional-quality finish.
Finally, reinforce the straps and top edges of the bag with extra stitching. This step ensures durability, especially if you plan to carry heavier items. A well-constructed Bag Made from Scraps of Fabric can last for years with proper care.
Once you master the basic Bag Made from Scraps of Fabric – PATTERN, there’s no limit to what you can create. You can modify the size, shape, and design to make different types of bags such as crossbody purses, tote bags, or storage pouches.
Try making seasonal variations—use pastel fabrics for spring, bright florals for summer, or warm tones for autumn. Holiday-themed versions also make thoughtful gifts for friends and family.
For an eco-friendly lifestyle, create reusable grocery or produce bags using the same method. This helps reduce plastic waste while showcasing your sewing skills.
Another creative idea is to coordinate your bag with matching accessories like wallets, makeup pouches, or even fabric keychains. These small details add a cohesive and handmade charm to your collection.
If you sell handmade crafts, bags made from fabric scraps are an excellent addition to your product line. They appeal to people who appreciate sustainable fashion and love supporting eco-conscious artisans.
Each bag becomes a statement piece—an example of how creativity and sustainability can coexist beautifully. It’s a project that rewards both your imagination and your values.
1. Do I need quilting experience to make this bag?
Not necessarily. This Bag Made from Scraps of Fabric – PATTERN is beginner-friendly and can be done with basic sewing skills.
2. What types of fabric work best for this project?
Cotton or quilting-weight fabrics are ideal because they’re easy to sew and provide a sturdy structure.
3. Can I use old clothes instead of fabric scraps?
Absolutely! Repurposing old shirts, jeans, or dresses is a great way to make your bag sustainable and meaningful.
4. How can I make my bag stronger?
Add interfacing or batting for stability, and double-stitch the seams, especially where the straps are attached.
5. Can I wash the bag after it’s made?
Yes, but use gentle washing methods and air dry to preserve the fabric and stitching.
6. How long does it take to complete the bag?
Depending on size and design complexity, it usually takes about 3 to 5 hours.
The Bag Made from Scraps of Fabric – PATTERN is a rewarding and environmentally friendly project that combines creativity, craftsmanship, and practicality.
PATTERN HERE:
You’ve learned how to transform leftover fabric into a functional accessory while reducing waste and expressing your unique style. Whether for personal use or as a handmade gift, this project celebrates the art of quilting in its most creative form. We’d love to hear your feedback—please leave a sincere opinion and share your suggestions below!