
Crocheted Wreath on a Hoop


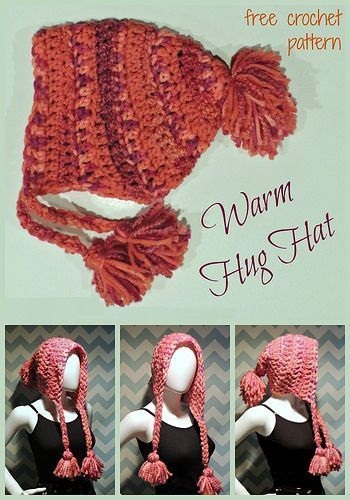
If you’ve been searching for the perfect quilt pattern that combines coziness and charm, look no further than the Warm Hug Hat. This tutorial will guide you through every step of creating a hat that feels just like its name — a warm, comforting hug for your head. Using this quilt pattern, you’ll learn to blend textures, fabrics, and careful stitching into a stylish and practical accessory perfect for chilly days. Whether you’re a beginner or an experienced quilter, this project offers the right balance of creativity and relaxation.
The Warm Hug Hat is not just another quilt project; it’s a small piece of wearable comfort. Handmade with love and attention to detail, this quilted hat can be customized with your favorite fabrics and colors, making it a wonderful way to express your personal style. Plus, it’s a fantastic way to use up fabric scraps from your previous quilt patterns — nothing goes to waste! Before diving into the steps, prepare your materials and get ready to experience the joy of crafting something both beautiful and functional.
So, grab your quilting tools, set aside some quiet time, and let’s create a piece that will keep you warm and stylish all season long. Here’s how to make your own Warm Hug Hat with this easy-to-follow tutorial.
When making your Warm Hug Hat, start by choosing soft, cozy fabrics that will provide comfort and warmth. Cotton, flannel, and fleece work perfectly for this pattern, and mixing them adds extra texture and charm. Pick complementary colors or patterns that match your personal style or wardrobe.
Once you’ve chosen your fabrics, cut them into panels according to your desired hat size. For a traditional adult size, you’ll typically need six to eight panels, depending on the width of your pieces. Make sure each piece is even and neatly pressed before sewing.
You’ll also need batting to give your hat that signature quilted look and feel. Cut the batting slightly smaller than your fabric panels to avoid bulk in the seams. The batting will add warmth and structure, making your hat more durable.
Don’t forget to prepare your lining fabric — something smooth like cotton or satin works best. The lining adds comfort and gives your hat a professional finish.
Gather all your essentials: sewing machine, pins, thread, and scissors. Having everything ready ensures your sewing process flows smoothly from start to finish.
Lastly, prewash and iron your fabrics to prevent shrinking later. This is a small but crucial step that keeps your quilt pattern looking polished after every wash.
Now that your materials are ready, it’s time to start sewing the hat panels together. Begin by pinning two panels with right sides facing each other. Stitch along one edge with a ¼-inch seam allowance, and repeat the process until all panels form a circular shape.
Press the seams open carefully. Ironing as you go helps your hat take on its proper shape and gives it a smoother finish. Once your outer layer is complete, do the same with your lining fabric.
To add quilting detail, place your batting between the outer fabric and the lining. Stitch through all three layers using your preferred quilting design — diagonal lines, curves, or even free-motion quilting if you’re feeling creative.
As you sew, make sure the quilting stitches are evenly spaced to maintain a consistent look throughout the quilt pattern.
Trim any excess batting or threads after quilting. Keeping the inside neat will make assembly easier later.
By this stage, you’ll start to see your Warm Hug Hat take shape, and the satisfaction of watching your handmade project come to life will make every stitch worth it.
With the quilted panels complete, it’s time to assemble the hat. Place the lining inside the outer quilted layer, ensuring right sides are facing each other. Align the seams and pin them securely in place.
Sew around the bottom edge, leaving a small opening to turn the hat right side out. After turning, carefully hand-stitch the opening closed for a clean, invisible finish.
If you’d like, add decorative stitching or a bias tape trim around the edge to give your hat a touch of extra flair. You can also attach a small button or fabric flower for personalization.
Try the hat on for size. If it feels snug or loose, make minor adjustments by adding or removing small seams. The great thing about handmade quilting projects is how easy it is to customize them to your liking.
For an extra cozy effect, consider adding a small layer of fleece around the inside band. It provides extra warmth and helps the hat fit comfortably.
Once finished, give your Warm Hug Hat a final press with the iron to smooth any wrinkles and set the seams.
Now that your Warm Hug Hat is ready, it’s time to wear it proudly! Pair it with a matching quilted scarf or gloves for a complete handmade winter look. This project also makes a heartfelt gift — everyone loves a cozy, handmade accessory.
To care for your quilted hat, wash it gently in cold water and air dry. Avoid using high heat, as it may cause shrinking or damage to the fabric layers.
If your hat gets wrinkled, a light press with an iron on low heat will bring it back to shape. Store it in a cool, dry place to preserve the fabric and color.
You can also make multiple versions of this pattern in different colors and fabrics for each season. Try lighter cotton for spring or heavier flannel for winter.
By experimenting with fabrics, you’ll discover endless variations of the Warm Hug Hat quilt pattern, keeping your creativity flowing year-round.
And remember, handmade pieces like this hold sentimental value — they represent care, patience, and artistry.
Q: Can beginners make the Warm Hug Hat?
A: Absolutely! This quilt pattern is beginner-friendly. The steps are simple, and the results are beautiful even if you’re new to quilting.
Q: What fabrics work best for this project?
A: Soft, warm materials like flannel, cotton, or fleece are ideal for the Warm Hug Hat. Mixing textures also gives it a unique look.
Q: Do I need a sewing machine to make this hat?
A: While it’s faster with a machine, you can also sew it by hand with patience and sturdy stitching.
Q: Can I make the hat reversible?
A: Yes! Use coordinating fabrics for the lining and outer layer, and you’ll have two looks in one hat.
Q: How do I adjust the hat size?
A: Simply increase or decrease the width and height of your panels to make a custom fit for adults or children.
Creating a Warm Hug Hat is not only a fun and relaxing project but also a rewarding one. You’ve learned how to prepare fabrics, stitch panels, assemble the hat, and add your personal touches. This tutorial shows how even a small quilt project can bring comfort, warmth, and creativity into your life.
We’d love to hear your thoughts — share your experience making this quilt pattern, and tell us what other tutorials you’d like to see next. Your feedback helps inspire more beautiful handmade creations!

