Chunky Skulltopus Crochet - Tutorial

If you love stylish and functional crochet projects, this Tile Square Tote Bag Crochet Pattern will be your next favorite make. It’s the perfect blend of creativity and practicality, allowing you to craft a handmade accessory that’s both fashionable and useful. Whether you’re heading to the market, beach, or a casual outing, this crochet tote bag adds a personal handmade touch to your outfit. With its charming tile-square design and sturdy structure, this pattern is a fun way to transform simple yarn into a statement piece.
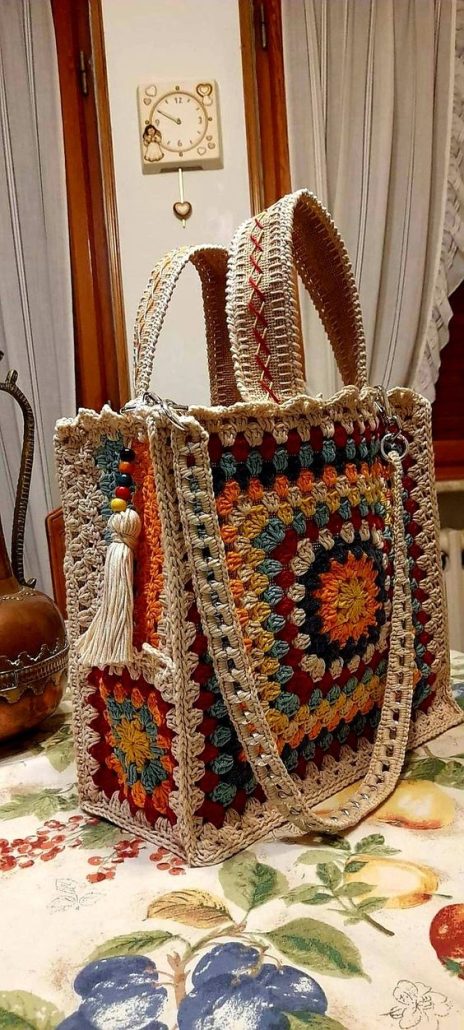
The Tile Square Tote Bag Crochet Pattern is inspired by the geometric beauty of tile art, turning colorful motifs into a modern, eye-catching bag. It’s a great way to use up leftover yarn while experimenting with different color combinations and textures. Each square can be made separately, making it an excellent portable project that you can work on anywhere. Once all your squares are complete, they’re joined together to create a unique tote that’s as functional as it is beautiful.
This tutorial will walk you through everything you need to know—from materials and stitch techniques to assembly and finishing touches. The Tile Square Tote Bag Crochet Pattern is beginner-friendly but also enjoyable for experienced crocheters who love experimenting with patterns. By the end, you’ll have a gorgeous handmade bag that showcases your creativity and skill.
Before starting your Tile Square Tote Bag Crochet Pattern, gather all your materials to make the process smoother. You’ll need medium-weight yarn in your preferred colors—cotton yarn is highly recommended for its durability and shape retention. A 4mm or 4.5mm crochet hook works well for this project, giving you firm, neat stitches that help the bag hold its form. You’ll also need scissors, a yarn needle for weaving in ends, and optional lining fabric for added sturdiness.
Choosing your color palette is one of the most exciting steps. The beauty of the Tile Square Tote Bag Crochet Pattern lies in its mosaic-inspired look, so mix and match colors that complement each other—think pastels for a soft look or bold shades for a modern aesthetic.
Before you start crocheting the squares, it’s a good idea to test your tension. The squares should be firm, not floppy, to ensure the finished bag has a good structure. Adjust your hook size if needed to achieve the perfect tension.
Organize your yarn before starting. Having your colors wound into small balls makes it easier to switch shades without tangling. Keeping your workspace neat saves time and reduces frustration during color changes.
If you plan to add a lining, choose a fabric that matches your bag’s colors and cut it slightly smaller than the finished size of your tote. You’ll sew it in after crocheting, giving your bag extra strength and a professional finish.
Once all materials are ready, you’re set to begin crocheting your first tile square. Each one will come together beautifully to form your unique Tile Square Tote Bag Crochet Pattern creation.
Start your Tile Square Tote Bag Crochet Pattern by making the first square. Begin with a magic ring or chain four and slip stitch to form a loop. Crochet three chains to serve as your first double crochet, then continue working groups of stitches around to form the base. Depending on your chosen pattern, you can alternate between single, half-double, and double crochet stitches to add texture and depth.
Each square can follow the same color scheme or be a unique combination. Working with multiple colors adds dimension and turns your tote into a true mosaic masterpiece. Fasten off each color cleanly and weave in ends before joining to maintain a tidy appearance.
Once you’ve made the desired number of squares—typically 12 to 16 for a medium-sized tote—it’s time to join them. You can use the slip stitch or whip stitch method to connect the squares edge to edge. Arrange your squares before joining to ensure the color placement looks balanced.
After joining, crochet around the edges to form a smooth border. This step strengthens the structure and gives your Tile Square Tote Bag Crochet Pattern a cohesive finish. You can use one color for the border or alternate between your chosen palette.
Next, work on the bag’s sides and handles. Crochet additional rows in single or half-double crochet to build up the height. For sturdy handles, create long strips using tight stitches and sew or crochet them securely to the bag’s top.
Finally, if you’re adding a lining, sew it inside the bag using a needle and thread. Make sure to align the corners neatly. This not only enhances durability but also gives your tote a professional look.
One of the best things about the Tile Square Tote Bag Crochet Pattern is how easily it can be customized. You can experiment with different stitch combinations, square sizes, and color patterns to suit your personal style. For a minimalist tote, use neutral shades like cream, beige, and brown. For a vibrant and artistic look, choose contrasting colors or gradient yarns.
Adding embellishments can also elevate your design. Consider sewing small beads, tassels, or buttons onto the squares for a boho-inspired finish. You can also crochet small flowers or motifs and attach them as decorative accents.
If you prefer a more structured bag, use a thicker yarn or line the inside with interfacing fabric. This will help your Tile Square Tote Bag Crochet Pattern maintain its shape even when filled with heavier items.
You can adjust the size of the bag by increasing or decreasing the number of squares. Fewer squares will create a smaller purse, while more squares will make a roomy beach or shopping tote.
Try experimenting with different joining techniques, such as the flat join or join-as-you-go method, to achieve various textures and visual effects. These methods also reduce the amount of sewing needed.
Lastly, personalize your bag by adding a small label or tag with your name or initials. It’s a lovely finishing touch that makes your crochet project uniquely yours.
To ensure the best results with your Tile Square Tote Bag Crochet Pattern, always maintain consistent stitch tension. Uneven tension can cause your squares to vary in size, making assembly more difficult.
Blocking your squares before joining helps achieve uniformity. Lightly spray them with water, pin to shape, and let them dry flat. This step makes a huge difference in the final look of your tote.
When joining squares, take your time to align edges perfectly. Crocheting them together loosely can help prevent puckering. A clean join enhances the overall appearance and durability of your bag.
If you’re planning to use your tote frequently, consider reinforcing the handles. You can crochet them with double layers or sew a fabric strip underneath for extra strength.
To keep your tote looking new, avoid overloading it with heavy items. Handwashing and air-drying are recommended to preserve the yarn’s color and shape.
Above all, enjoy the creative process. Every stitch in the Tile Square Tote Bag Crochet Pattern reflects your craftsmanship and attention to detail. The satisfaction of carrying a handmade bag that you’ve designed and created yourself is truly special.
FAQ
1. What is the best yarn for the Tile Square Tote Bag Crochet Pattern?
Cotton yarn is the best choice because it’s sturdy, easy to clean, and holds shape well.
2. Can beginners make this tote bag?
Yes! The pattern uses basic stitches and simple construction, making it great for beginners.
3. How many squares are needed for the tote?
Typically, 12 to 16 squares are used, but you can adjust the number depending on the desired size.
4. Should I line the bag?
Lining is optional but recommended for added strength and a more polished look.
5. Can I use leftover yarn for this project?
Absolutely! This pattern is a great way to use up yarn scraps while creating something practical and stylish.
Conclusion
The Tile Square Tote Bag Crochet Pattern is more than just a craft project—it’s an expression of creativity and style. Each square you make adds to a unique piece that’s both functional and beautiful.
With simple stitches, endless color possibilities, and room for customization, this pattern is perfect for all crochet lovers. Try it out, enjoy every stitch, and share your thoughts or suggestions below—we’d love to hear about your experience with this handmade masterpiece!