Chicken Crochet - Pattern

The Granny Triangle is a charming and versatile design in the crochet world. This pattern allows you to create triangular granny squares that can be used in various projects like shawls, blankets, bags, and even garments.
The triangular shape adds a unique twist to traditional granny squares, and it’s a fun way to experiment with colors and textures. In this tutorial, we’ll guide you through the process of creating these delightful Granny Triangles from start to finish.
Whether you’re a beginner or an experienced crocheter, this Granny Triangle pattern is easy to follow and adaptable for many different projects. Let’s get started!
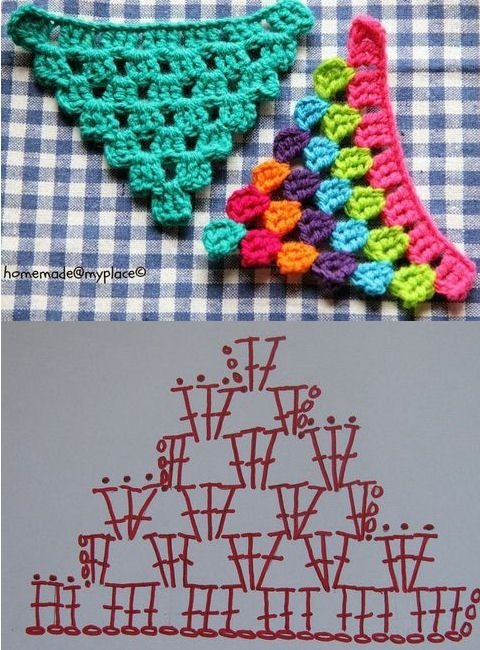
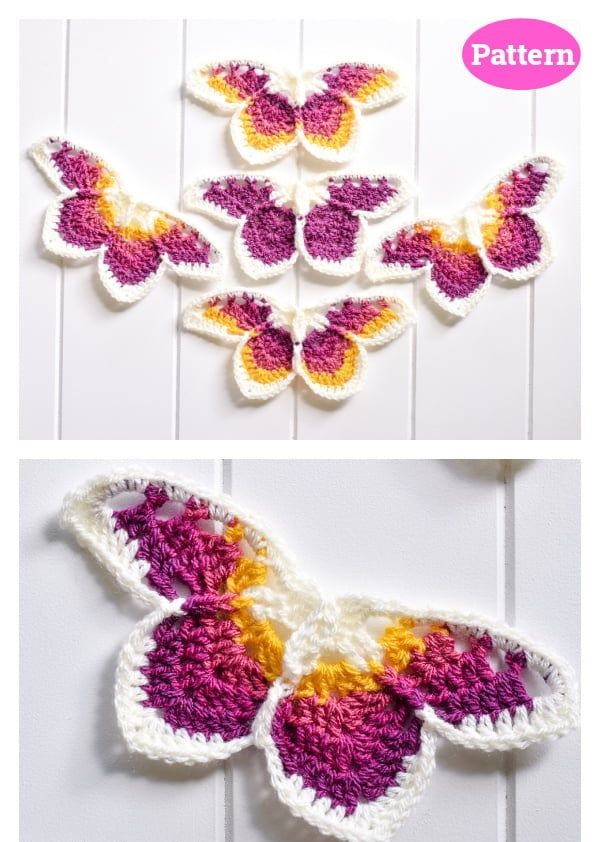
Image From Pinterest
Before beginning your Granny Triangle project, make sure you have the necessary materials ready. The following list will help you gather all the essentials for crocheting these beautiful triangles:
DISCOVER MORE FREE PATTERNS HERE!
Once you have everything ready, it’s time to start your Granny Triangles!
The foundation of the Granny Triangle is built in rounds, just like the traditional granny square. Here’s how to start the first round and shape the triangle:
At this point, you have created a basic triangle with three double crochet sides and two chain-2 spaces. It’s time to move on to the next round!
Now that the foundation of your Granny Triangle is in place, it’s time to expand the triangle by adding more rounds. Each round builds upon the previous one, and you’ll continue to add double crochets and corner spaces as you go:
Repeat the process for additional rounds to continue expanding your Granny Triangle. The number of rounds will depend on how large you want your triangle to be. To make larger triangles, simply add more rounds, and be sure to maintain the same pattern of 3 double crochets in each corner and chain-2 spaces between them.
After you’ve reached the desired size for your Granny Triangle, it’s time to finish it up. Follow these steps to secure the end and ensure that your triangle holds its shape:
At this point, your Granny Triangle is complete and ready to be used in a project!
1. How do I join multiple Granny Triangles together?
To join multiple Granny Triangles together, you can use a whip stitch or a slip stitch to join the edges. You can also join them as you go, working the final round while joining the triangles to one another.
2. Can I make a larger Granny Triangle?
Yes! To make a larger Granny Triangle, simply continue adding rounds. Each round will add more stitches to the sides and corners, making the triangle progressively larger. Just keep in mind the pattern of 3 double crochets per side with chain-2 corner spaces.
3. How do I change colors in the Granny Triangle pattern?
Changing colors in the Granny Triangle is easy. Simply join the new color at the beginning of any corner space and continue crocheting with the new color. When you reach the end of the round, join with a slip stitch, cut the yarn, and begin the new round with your new color.
4. Can I use this pattern for a project like a shawl or blanket?
Absolutely! The Granny Triangle is a versatile pattern that can be used in many projects, such as shawls, blankets, or even garments. You can join multiple triangles together to create larger projects or use them individually for smaller items like coasters or bag appliqués.
5. How can I make my Granny Triangles uniform in size?
To keep your Granny Triangles uniform, try to use the same yarn and crochet hook size for all your triangles. Additionally, be sure to keep your tension consistent as you crochet, and use a measuring tape to check that your triangles are the same size as you go.
6. What can I make with Granny Triangles?
You can use Granny Triangles for a wide variety of projects, such as shawls, blankets, pillow covers, bags, and even garments. They can be joined together to create a stunning, cohesive piece or used individually to add a pop of color to smaller projects.
In this tutorial, we’ve shown you how to create the beautiful Granny Triangle, a simple and versatile crochet pattern that can be used in countless projects. Whether you use them for a blanket, a shawl, or any other creative endeavor, these triangles will add a lovely, unique touch. With clear instructions and a simple approach, you can easily master this pattern and create stunning pieces for your crochet collection. We hope you enjoyed this tutorial, and we’d love to hear your feedback and ideas for future patterns. Happy crocheting!