Crochet Bunny Basket - TUTORIAL

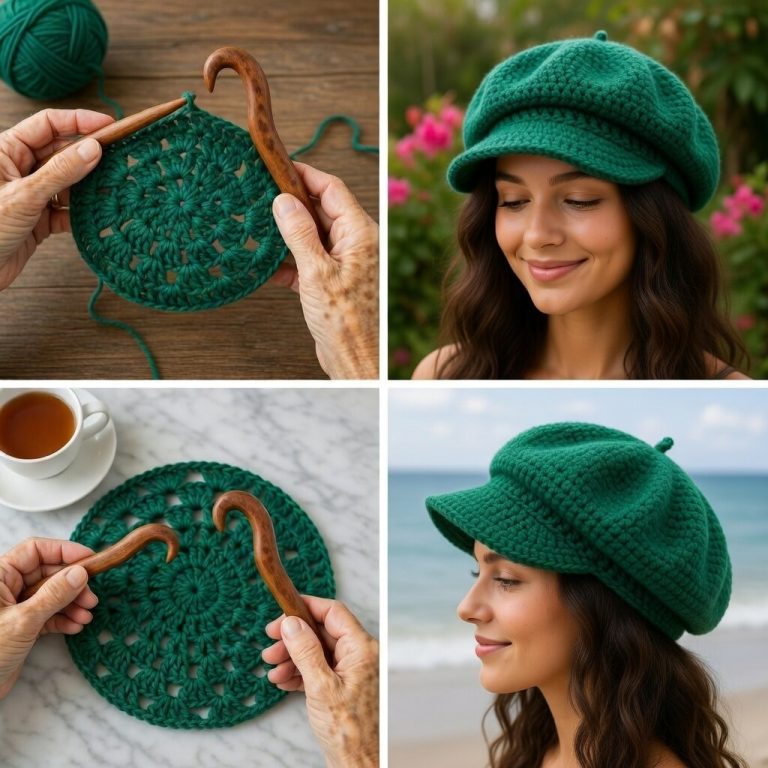
Stylish Crochet Cap – TUTORIAL is a modern and versatile crochet project that allows you to create a fashionable accessory with your own hands. Learning the Stylish Crochet Cap – TUTORIAL is a great way to combine creativity with functionality, resulting in a cap that not only looks great but also provides comfort and style for everyday wear.
One of the most appealing features of the Stylish Crochet Cap – TUTORIAL is its adaptability. You can easily customize the design by choosing different yarns, colors, and stitch patterns. Whether you prefer a minimalist look or a bold statement piece, this crochet cap can be tailored to match your personal style.
In this complete Stylish Crochet Cap – TUTORIAL, you will learn how to select the right materials, crochet the crown, shape the body, and finish the cap with clean and professional details. This project is suitable for beginners and intermediate crocheters who want to expand their skills.
The first step in the Stylish Crochet Cap – TUTORIAL is gathering all the necessary materials to ensure a smooth crocheting process.
Yarn choice plays a major role in the final result. Cotton yarn is great for breathability, while acrylic yarn offers softness and flexibility.
You can also use wool yarn if you want a warmer cap for colder weather.
A crochet hook that matches your yarn weight is essential for maintaining proper tension.
You will need scissors and a yarn needle for finishing and weaving in ends.
Stitch markers can help track rounds, especially when working in continuous circles.
A measuring tape is useful to ensure the cap fits comfortably.
The crown is the starting point of the Stylish Crochet Cap – TUTORIAL and forms the top part of the cap.
Begin with a magic ring to create a tight and adjustable center.
Work in rounds, gradually increasing stitches to form a flat circular shape.
In the Stylish Crochet Cap – TUTORIAL, even stitch distribution is important to avoid uneven shaping.
Continue increasing until the crown reaches the desired diameter.
The size of the crown determines how fitted or relaxed the cap will be.
Once completed, move on to building the body of the cap.
After finishing the crown, the next step in the Stylish Crochet Cap – TUTORIAL is shaping the body.
Stop increasing and continue working in rounds to create height.
This section defines the overall fit and style of the cap.
You can experiment with different stitch patterns such as ribbing or textured stitches.
In the Stylish Crochet Cap – TUTORIAL, creativity in stitch choice adds uniqueness to your cap.
Check the fit regularly to ensure it sits comfortably on the head.
The body should be snug but not too tight.
The final stage of the Stylish Crochet Cap – TUTORIAL focuses on finishing touches and refinement.
Create a band at the bottom using tighter stitches for a secure fit.
You can add ribbing to enhance elasticity and comfort.
In the Stylish Crochet Cap – TUTORIAL, the finishing details greatly impact the overall appearance.
Weave in all loose ends carefully for a clean finish.
Optional decorations such as pom-poms, patches, or embroidery can be added.
Light blocking can help improve the shape and structure of the cap.
Is this pattern beginner-friendly?
Yes, the Stylish Crochet Cap – TUTORIAL is suitable for beginners with basic crochet knowledge.
What yarn is best for this cap?
Cotton, acrylic, or wool yarn can be used depending on the desired look and season.
How long does it take to complete?
Most caps can be finished within a few hours.
Can I adjust the size?
Yes, you can modify the number of increases and the length of the body.
Do I need to block the cap?
Blocking is optional but can improve the final shape.
Can I customize the design?
Absolutely, you can experiment with colors, stitches, and embellishments.
The Stylish Crochet Cap – TUTORIAL is a practical and creative project that allows you to craft a fashionable accessory while improving your crochet skills. It is a perfect combination of style and functionality.
In this tutorial, you learned how to choose materials, crochet the crown, shape the body, and finish the cap with professional details. Each step contributes to a comfortable and stylish final piece.
Projects like the Stylish Crochet Cap – TUTORIAL demonstrate how crochet can be both useful and expressive. A handmade cap is not only functional but also a reflection of your creativity.
PATTERN VIDEO:
If you enjoyed this tutorial, feel free to leave your honest opinion and share your suggestions. Your feedback helps inspire more creative crochet patterns and ideas.