
Turtle Baby Blanket – Tutorial


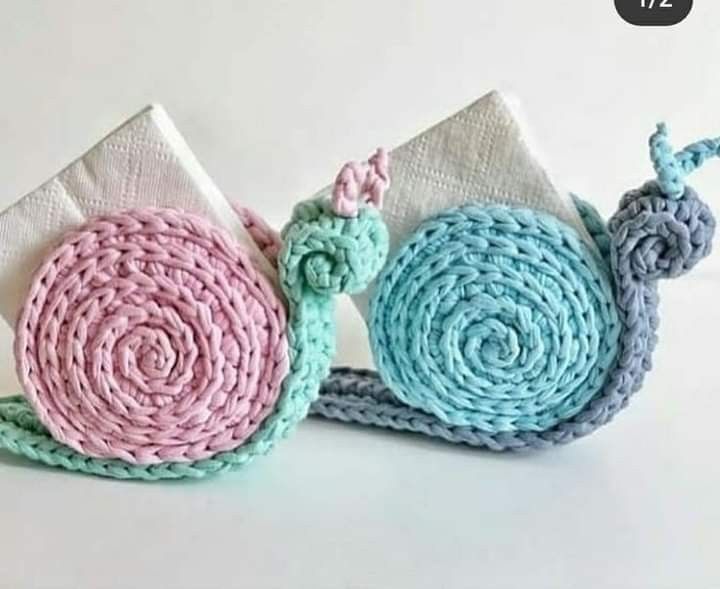
The Snail Napkin Holder – Crochet Pattern is a charming and functional project that adds personality and a touch of handmade artistry to your dining table. This pattern is perfect for crochet lovers of all skill levels, offering a delightful way to practice stitches while creating a unique home accessory. Whether you’re preparing for a special dinner, a seasonal celebration, or simply adding everyday beauty to your meals, this project is a quick and rewarding make.
In this tutorial, we will guide you through each step of the process so you can create your very own snail-inspired napkin holder. The combination of whimsical design and practical purpose makes this crochet pattern a perfect choice for gifts, craft fairs, or personal use. You’ll also have plenty of room for customization—change yarn colors to suit your décor, adjust the size, or even add decorative details to make it truly one of a kind.
If you’ve been looking for a crochet project that’s fun, useful, and bound to impress your guests, the Snail Napkin Holder – Crochet Pattern is the ideal pick. Let’s dive in and learn how to bring this adorable little snail to life while keeping your napkins neat and stylish.
To get started, it’s important to gather all the necessary materials and tools. This will ensure a smooth and enjoyable crochet experience from beginning to end. The Snail Napkin Holder – Crochet Pattern requires only basic supplies that most crocheters already have at home.
You will need medium-weight cotton yarn for durability and easy cleaning. Cotton works well because it holds its shape and stands up to frequent handling. Choose two or more colors—one for the snail body and another for the shell.
A crochet hook size recommended for your chosen yarn weight is essential to get the correct tension and structure. Most crafters will use a 3.5 mm to 4 mm hook for this type of project.
You’ll also need a tapestry needle for sewing parts together and weaving in ends.
Scissors are a must for clean cuts and neat finishing touches.
Optional items include safety eyes for a polished look, or you can embroider eyes using black yarn or thread.
Lastly, keep a bit of stuffing on hand for the snail’s body if you prefer a slightly more dimensional figure.
The Snail Napkin Holder – Crochet Pattern is constructed in two main parts: the snail body and the spiral shell. The body is designed to stand upright, while the shell acts as the charming backdrop that also functions as the napkin support.
Start by crocheting the snail’s body in continuous rounds, increasing gradually to shape the base and then narrowing toward the neck. This ensures the structure can stand without tipping over.
Next, work the head portion, adding eyes either with safety eyes or embroidery. For extra cuteness, you can slightly curve the snail’s head forward.
Move on to the spiral shell, which is typically crocheted in a flat spiral and then shaped with subtle increases. The shell can be made as colorful as you like by alternating yarn colors in each round.
Attach the shell to the body with sturdy stitches so it stays secure during use.
Once both main parts are assembled, test the stability by placing a folded napkin behind the snail’s head and in front of the shell. Adjust if necessary.
Finish by weaving in all loose ends and giving your snail a gentle shaping to ensure it stands properly.
One of the most exciting aspects of working with the Snail Napkin Holder – Crochet Pattern is the opportunity to customize it to fit your home décor or seasonal themes.
For a spring look, use pastel yarns with soft pink, mint, and lavender tones.
For a rustic or farmhouse-style table, opt for earthy neutrals like beige, brown, and cream.
You can embellish the snail’s shell with small embroidered flowers, leaves, or beads for added charm.
Try making multiple snail napkin holders in different colors to give each guest at your dinner table their own unique design.
For children’s parties, experiment with bright, playful colors to make the table setting fun and engaging.
Finally, consider matching your snail napkin holders with other crochet table accessories, like coasters or placemats, to create a coordinated set.
The Snail Napkin Holder – Crochet Pattern is not only beautiful but also practical and easy to maintain, especially when using cotton yarn.
To clean, gently hand wash the holder in cold or lukewarm water with mild detergent. Avoid harsh scrubbing to preserve the shape and stitches.
If needed, you can spot clean smaller stains with a damp cloth.
Allow the holder to air dry completely before using it again, reshaping the snail while it’s still damp if necessary.
Store your crochet napkin holder in a cool, dry place when not in use to prevent dust buildup.
Avoid prolonged exposure to direct sunlight, which may cause yarn colors to fade.
With proper care, your handmade snail napkin holder can last for years, bringing joy to countless meals and gatherings.
Q: Is the Snail Napkin Holder suitable for crochet beginners?
A: Yes! This pattern is simple enough for beginners, especially if you have basic skills in crocheting rounds and increasing stitches.
Q: What type of yarn works best for this pattern?
A: Cotton yarn is highly recommended for durability, shape retention, and easy cleaning.
Q: Can I make the snail napkin holder larger or smaller?
A: Absolutely. Adjusting the hook size or yarn weight will naturally change the finished size of your project.
Q: How long does it take to make one?
A: Most crocheters can complete it in 3 to 5 hours, depending on experience and complexity of embellishments.
Q: Can I sell finished snail napkin holders made from this pattern?
A: Yes, as long as you give proper credit to the original pattern designer if required by the pattern’s terms.
The Snail Napkin Holder – Crochet Pattern is a delightful blend of creativity, practicality, and charm. It’s the perfect project to brighten up your dining table and impress your guests while showcasing your crochet skills.
TUTORIAL VIDEO:
With the flexibility to customize colors and decorations, you can create a truly unique piece for any occasion. We hope this tutorial inspires you to try making one yourself. Don’t forget to share your honest thoughts and suggestions after completing your project—we’d love to hear your feedback and ideas for future creations.
