Butterfly Shawl in Crochet – Tutorial

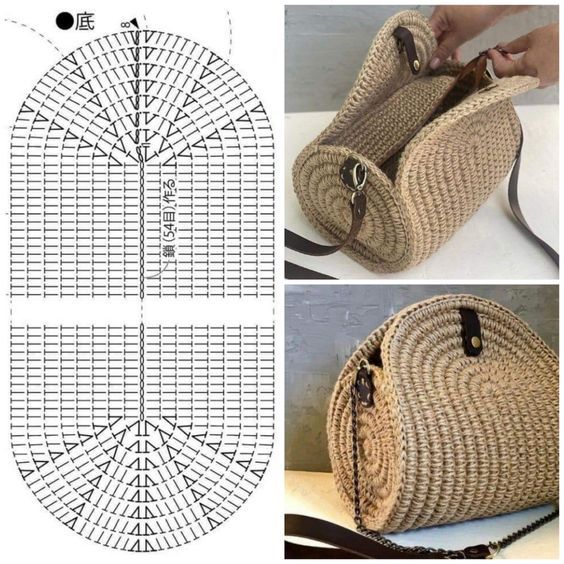
The Rustic Crochet Bag – TUTORIAL is your perfect gateway into creating something both stylish and functional. Whether you’re looking for a cozy accessory, a sustainable market tote, or a charming handmade gift, this crochet project combines rustic charm with practical design. Its textured stitches and natural fibers give it an earthy feel that matches effortlessly with any wardrobe or occasion.
This tutorial is ideal for beginners wanting to explore bag-making, as well as experienced crocheters looking for a quick and satisfying pattern. The structure is easy to follow, and the customization options are endless—you can change the size, add lining, or embellish it with buttons, tassels, or leather straps to make it uniquely yours.
In this guide, we’ll go step by step through creating your very own Rustic Crochet Bag, sharing essential tips, materials, stitch guidance, and ideas for finishing touches. It’s more than just a bag—it’s a handmade expression of creativity and simplicity.
To begin your Rustic Crochet Bag – TUTORIAL, gathering the right materials is essential. The rustic charm of this pattern shines when paired with appropriate yarn and accessories, so choose wisely.
First, select a medium to bulky weight yarn made from natural fibers like cotton, jute, hemp, or linen. These yarns add durability and give your bag that natural, handmade feel. Earth tones such as beige, olive, and soft gray enhance the rustic vibe.
You’ll need a crochet hook that complements your yarn weight—commonly sizes H/8 (5mm) or larger. A tighter gauge will ensure the bag holds its shape better, especially if you don’t plan to line it.
Other supplies may include stitch markers, a tapestry needle for weaving in ends, and handles or straps. You can crochet your own straps, repurpose leather ones, or use wooden rings for a vintage touch.
You might also want to line your bag with fabric for extra durability. A basic cotton or muslin fabric works well. This step is optional but recommended if you plan to carry heavier items.
Finally, make sure you have a good pair of scissors, a measuring tape, and plenty of light while working—especially if you use darker yarn colors.
Let’s dive into the heart of the Rustic Crochet Bag – TUTORIAL. This pattern typically involves working in the round from the bottom up, using basic stitches to build the shape and texture.
Start by creating a sturdy base. This can be an oval or rectangle made with single crochet (sc) or half-double crochet (hdc) stitches. This base gives your bag strength and defines its shape.
Once the base is the size you want, you’ll start crocheting up the sides. Often, this is done with simple stitch repeats—alternating single and double crochet, moss stitch, or waistcoat stitch for texture.
To create a more structured body, you might increase the hook size after the base or add rounds without increases. This lets the bag grow vertically and form a beautiful cylinder or bucket shape.
As you near the top, consider adding decorative elements such as puff stitches or color changes. These details elevate the rustic look and personalize your creation.
Create the handle openings by chaining and skipping stitches, then reinforce the space with additional rounds. For a crossbody style, add longer straps or braided cords.
Finish the bag by edging the top with a clean round of single crochet or reverse single crochet (crab stitch) for a professional touch.
One of the most enjoyable parts of the Rustic Crochet Bag – TUTORIAL is customizing it to fit your personality and needs. This pattern acts as a versatile canvas for creativity.
You can easily alter the dimensions of the bag by adding more rounds to the base or increasing the height. Want a tote? Make it deeper. Prefer a clutch? Keep it compact.
Play with color combinations to change the aesthetic. Use natural tones for a boho-chic look, or bright stripes for something youthful and vibrant.
Experiment with stitch textures. A bag made entirely in the suzette stitch or bobble stitch will look drastically different from one with simple single crochet.
Add functional features like inside pockets, drawstring closures, or snap buttons. These upgrades make the bag more usable for everyday errands.
Decorative elements like fringe, tassels, or leather patches give a handmade artisan feel. Try adding a wooden tag with your name or brand if you sell your creations.
Lastly, consider reinforcing your bag with lining and interfacing if you need it to be extra durable—especially useful for market bags or book totes.
Once you complete your Rustic Crochet Bag, the possibilities are endless! This accessory isn’t just beautiful—it’s highly functional and giftable too.
Use your bag as a market tote. It’s perfect for carrying fruits, veggies, and fresh bread during weekend farmers market visits.
Turn it into a stylish beach bag. The breathable stitches and roomy size make it ideal for towels, sunscreen, and a good book.
Gift the bag to a friend or loved one. Handmade crochet bags are thoughtful, personal presents that feel both useful and heartfelt.
Use it as a daily handbag. Add a magnetic snap or zipper for security and pair it with jeans and a cardigan for the ultimate rustic look.
Crochet mini versions for kids, or large oversized totes for weekend trips. This pattern scales easily and suits all ages and needs.
Finally, if you sell handmade items, consider adding this bag to your shop. Rustic crochet bags are in high demand and offer a great return on time investment.
Is the Rustic Crochet Bag beginner-friendly?
Yes! The pattern uses basic stitches and straightforward construction. It’s an excellent project for new crocheters wanting to level up.
What yarn works best for this pattern?
Natural fibers like cotton or jute work wonderfully. They offer durability, texture, and a classic rustic look.
Can I line the bag with fabric?
Absolutely. Lining is optional but adds strength and structure—especially for larger or heavier-use bags.
What size hook should I use?
Generally, use a hook between 5mm and 6.5mm depending on your yarn. A tighter tension creates a sturdier bag.
How long does it take to make this bag?
On average, crocheters can finish this project in a weekend or less, depending on the size and stitch complexity.
Can I sell the bags I make using this tutorial?
Yes! Handmade bags are perfect for markets, online shops, or gifting. Just credit the original design if using someone else’s pattern.
Creating a Rustic Crochet Bag is a rewarding experience that blends artistry, functionality, and sustainability. This tutorial has guided you through choosing materials, building your base, personalizing your stitches, and imagining all the ways to use or gift your finished bag. Whether you’re making it for yourself, a loved one, or your handmade shop, this project is bound to bring joy.
We’d love to hear from you! Leave a comment below sharing your thoughts, results, or creative twists on the Rustic Crochet Bag – TUTORIAL. Your feedback inspires others and helps grow our crochet-loving community!