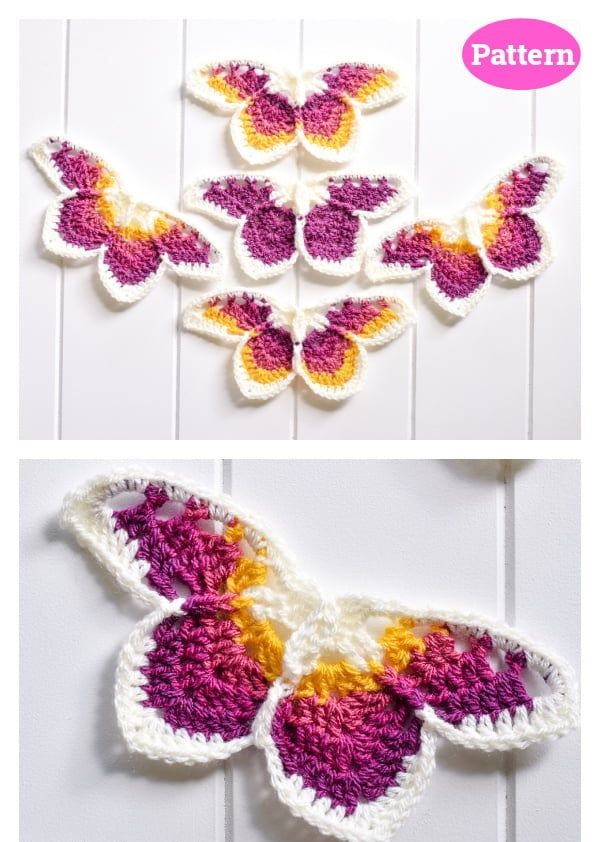
Resilient Butterfly Crochet - Pattern

The Resilient Butterfly Crochet Pattern is more than just a decorative motif — it is a symbol of transformation, hope, and inner strength. Butterflies represent growth, renewal, and the courage to emerge stronger after challenges. When translated into crochet, this delicate creature becomes a meaningful handmade piece filled with intention and artistry.
Whether you are creating appliqués for blankets, embellishing garments, decorating a nursery, or designing wall art, the Resilient Butterfly Crochet Pattern offers versatility and emotional depth. This tutorial-style guide will walk you through the design concept, materials, step-by-step construction, creative uses, and finishing techniques so you can confidently create your own beautiful butterfly.
If you are a beginner looking to practice shaping techniques or an experienced crocheter searching for a symbolic project, this pattern brings both technique and meaning together in perfect harmony.
The beauty of the Resilient Butterfly Crochet Pattern lies in its structure. While butterflies appear delicate, their symmetrical wings and defined body require thoughtful stitch placement and shaping techniques.
Most butterfly crochet patterns include:
A central body worked in rows or rounds
Upper and lower wings shaped using increases and decreases
Textured stitches to add dimension
Optional antennae made from chains or embroidery
The word “resilient” in this pattern reflects strength through structure. Unlike flat appliqués that collapse easily, this design often incorporates layered wings, picot edges, or textured stitches that give it stability and depth.
Common stitch techniques used include:
Chain stitches
Slip stitches
Single crochet
Half double crochet
Double crochet
Treble crochet for dramatic wing curves
Advanced versions may include front post stitches or puff stitches to create raised textures that symbolize strength within softness.
This butterfly can be made small for delicate embellishments or enlarged for statement pieces. The adaptability of the design makes it ideal for multiple crochet skill levels.
Choosing the right yarn and tools dramatically affects the final look of your Resilient Butterfly Crochet Pattern.
Basic Materials Needed
Yarn (cotton, acrylic, or blended)
Crochet hook appropriate for yarn weight
Scissors
Yarn needle
Optional stitch markers
Yarn Weight Suggestions
Lightweight yarn (sport or DK) creates delicate appliqués perfect for baby items.
Worsted weight yarn produces sturdy butterflies for blankets and bags.
Chunky yarn makes bold decorative pieces for wall hangings.
Fiber Choices
Cotton yarn gives crisp stitch definition and is perfect for appliqués.
Acrylic yarn offers softness and durability for blankets.
Blended yarn provides flexibility and subtle sheen.
Color Selection Tips
Butterflies are nature’s artwork, so don’t hesitate to experiment.
Soft pastel combinations create gentle nursery décor.
Bold contrasting colors emphasize wing structure.
Gradient yarn produces natural wing transitions.
Monochromatic designs highlight texture rather than color.
To enhance the “resilient” theme, consider using strong contrasting colors for the body and wings. This visually reinforces structure and symbolism.
Before starting, decide your finished size. A common appliqué size ranges from 4 to 6 inches wide, but you can scale the pattern by adjusting yarn weight and hook size.
Step 1: Create the Butterfly Body
Begin with a foundation chain.
Work single crochet or half double crochet rows to form a narrow rectangular body.
Fasten off, leaving a tail long enough for attaching antennae later.
Alternatively, some patterns work the body in the round using tight stitches to create a raised center.
Step 2: Form the Upper Wings
Attach yarn to one side of the body.
Chain several stitches to create the wing base.
Work double and treble crochets into the same stitch to build height and curve.
Use increases to create a rounded top shape.
The upper wings are usually larger and more dramatic. Treble crochets help achieve that airy, sweeping curve.
Step 3: Shape the Lower Wings
Move to the lower section of the body.
Repeat a similar shaping method but with fewer increases.
Use half double or double crochets for a smaller rounded form.
The balance between upper and lower wings is what gives the butterfly its lifelike symmetry.
Step 4: Add Texture and Edging
To enhance the resilient appearance:
Add picot stitches along the edges for delicate detail.
Use puff stitches within the wings for texture.
Create a shell stitch border for dimension.
Step 5: Create Antennae
Use leftover yarn to chain 5 to 8 stitches.
Slip stitch back down the chain.
Repeat on the other side.
Alternatively, embroider thin antennae using a yarn needle.
Step 6: Block Your Butterfly
Blocking is essential for crisp wing definition.
Lightly dampen the butterfly.
Pin wings into desired shape.
Allow to dry completely.
Blocking enhances symmetry and gives the piece a professional finish.
One of the best things about the Resilient Butterfly Crochet Pattern is its versatility.
Home Décor Ideas
Sew multiple butterflies onto a throw pillow.
Create a butterfly wall garland.
Attach to curtains for a whimsical accent.
Frame a collection as textile art.
Fashion Applications
Add to denim jackets.
Sew onto crochet cardigans.
Decorate tote bags.
Create statement hair clips.
Blankets and Baby Items
Attach butterflies to a granny square blanket.
Use as appliqués on baby hats.
Decorate nursery wall hangings.
Gift Ideas
Handmade bookmarks
Personalized greeting cards
Memory quilts
Keepsake shadow boxes
Because butterflies symbolize transformation and resilience, they make meaningful gifts for birthdays, graduations, or life transitions.
Combining multiple butterflies in different sizes can create a dynamic visual effect, almost like they are flying across your project.
FAQ – Resilient Butterfly Crochet Pattern
Is this pattern beginner-friendly?
Yes. Beginners who know basic stitches can complete a simple version. More advanced textures can be added as skills grow.
How long does it take to make one butterfly?
A small appliqué can take 20 to 40 minutes depending on experience.
Can I wash items with attached butterflies?
Yes, but secure them tightly and follow yarn care instructions.
Can I turn this into a 3D butterfly?
Absolutely. Create two identical butterflies and lightly stuff between them before joining.
What is the best yarn for detailed wings?
Cotton yarn provides excellent stitch definition for intricate designs.
Conclusion
The Resilient Butterfly Crochet Pattern is a beautiful combination of symbolism and craftsmanship. It allows you to practice shaping, texture, and color coordination while creating something meaningful and visually captivating.
From simple appliqués to elaborate decorative pieces, this pattern adapts to your creativity and skill level. Each butterfly you make carries a message of growth, strength, and transformation — stitched together with patience and passion.
If you enjoyed this tutorial, share your finished butterfly, leave your feedback, and tell us how you plan to use your design. Your creativity can inspire others to spread their wings through crochet.