Chicken Crochet - Pattern

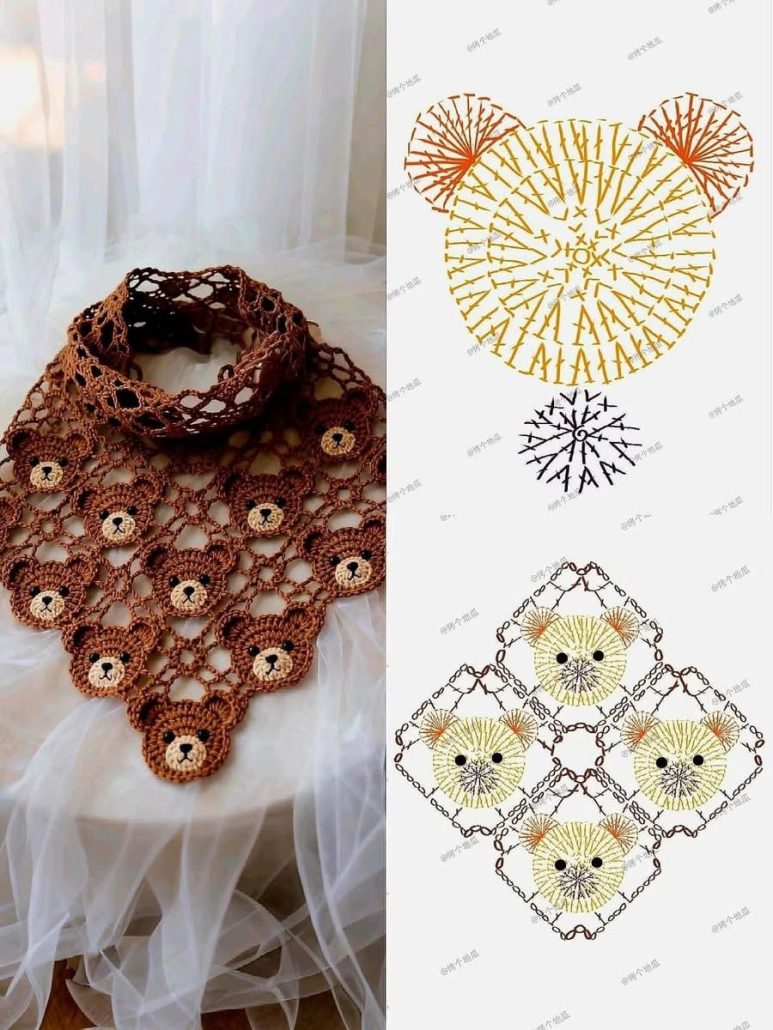
Handmade Crocheted Bear Scarf – Tutorial is a heartwarming and creative project perfect for anyone who loves charming accessories and handcrafted pieces. In this article, you will learn step-by-step how to make an adorable Handmade Crocheted Bear Scarf – Tutorial, combining basic stitches with fun details that bring the bear character to life. This project is great for beginners who want to expand their skills and for experienced crocheters who enjoy making unique, personality-filled accessories. Throughout this guide, you will discover essential techniques, shaping tips, and creative ideas to customize your bear scarf in many different styles.
Creating a Handmade Crocheted Bear Scarf – Tutorial piece is not only fun but also rewarding, as each part of the scarf—from the cozy base to the cute bear face—adds charm and individuality. With simple stitches and clear instructions, you can quickly transform yarn into a warm, delightful accessory perfect for children, teens, and even adults who enjoy whimsical fashion. This tutorial focuses on achieving smooth shapes, expressive details, and a comfortable design suitable for everyday wear.
In addition to the scarf base, you will learn how to create the bear’s ears, snout, paws, and facial expressions, as well as ways to personalize your scarf with different colors and embellishments. Before diving into the detailed steps, let’s explore the materials and methods that will help you achieve a beautiful and professional-looking result.
To begin your Handmade Crocheted Bear Scarf – Tutorial, choosing the right materials is essential for creating a soft, warm, and durable accessory. A medium-weight yarn works best for this project, as it provides a cozy thickness without being too heavy. Acrylic yarn is a popular choice for its warmth and easy care, while cotton blends offer softness and structure suitable for bear features.
The recommended hook size is usually indicated on the yarn label, but you can adjust slightly depending on your tension. Using a slightly smaller hook helps maintain firm stitches, which is especially helpful when shaping the bear’s ears, snout, and paws. A larger hook will give your scarf a looser feel and more flexibility.
Other tools include scissors, a yarn needle, stitch markers, stuffing for shaping the snout or ears, and safety eyes or embroidery thread for facial expressions. These elements are crucial for bringing your bear character to life. Safety eyes give a polished, professional appearance, while embroidered eyes are perfect for children’s scarves.
Choosing the right colors enhances the bear theme. Classic shades like brown, beige, and cream work well, but you can also experiment with playful colors such as pink, gray, or pastel tones to create a cute and modern look.
Before starting, set up a comfortable workspace with good lighting. Keeping your materials organized helps make the crocheting process smoother and more enjoyable.
The first step of the Handmade Crocheted Bear Scarf – Tutorial focuses on building the long, cozy base of the scarf. Begin by creating a foundation chain that determines the length of your final piece. If you prefer a longer scarf, simply increase the number of chains. For a shorter accessory, reduce the starting chain.
Once you establish the base chain, work in simple stitches such as single crochet or half-double crochet for a warm and even texture. These stitches provide structure and comfort, making the scarf durable and soft against the skin. Maintaining consistent tension throughout the rows is important for achieving a clean finish.
Continue crocheting rows until your scarf reaches the desired width. For extra warmth, you may add more rows. To keep the edges neat, you can also create a border around the scarf. A simple single crochet border works well for a clean look, while a decorative border can add charm depending on your style.
After completing the base, leave a long yarn tail on both ends if you plan to attach bear features directly onto them. These tails can be used for sewing parts securely without adding extra bulk.
The scarf base sets the foundation for the rest of the project, so take your time to ensure it looks smooth and even. Once finished, you are ready to move on to the adorable bear details.
The most exciting part of this Handmade Crocheted Bear Scarf – Tutorial is creating the bear’s facial features and details. Start with the ears, which are typically made using small rounds of increases and decreases. You can choose round ears for a classic teddy bear look or slightly pointed ones for a more animated style.
Next, crochet the snout. This element usually involves forming a small oval shape using increases in the round. Stuff the snout lightly before attaching it to give it dimension. Adding a small embroidered nose enhances the bear’s friendly and cute expression.
The eyes can be made in different ways depending on the look you want to achieve. Safety eyes provide a realistic shine, while embroidered eyes can give the scarf a soft, gentle appearance. Whichever method you choose, place the eyes symmetrically on the snout to create a balanced face.
Crochet the bear paws to add extra charm. These small details can be flat or lightly stuffed, giving your scarf a more three-dimensional look. You can also add small stitches to mimic paw pads for added personality.
Optional details such as a bow tie, small scarf, or even blush circles on the bear’s cheeks can make your bear scarf stand out even more. Each feature you add contributes to the overall character and charm of your creation.
Assembling all parts of the Handmade Crocheted Bear Scarf – Tutorial is where the design truly comes to life. Begin by laying the scarf flat and positioning the bear’s face, ears, paws, and snout. Use pins or stitch markers to ensure everything is placed correctly before sewing.
With a yarn needle, carefully sew each piece onto the scarf. Make sure your stitches are secure, especially on pieces like the snout and ears, which may be pulled or stretched during wear. Take your time sewing facial features to ensure the expression looks neat and friendly.
Once the main parts are attached, you can customize your scarf further. Add stripes to mimic a panda or polar bear look, incorporate multiple shades for a patchwork effect, or even create a cartoon-style bear with exaggerated features. These small creative choices make your scarf truly unique.
If gifting the scarf to a child, embroidered eyes and securely stitched pieces are highly recommended for safety purposes. For adult accessories, you can experiment with more detailed embellishments, including buttons or beads.
Finally, weave in all remaining loose ends and gently block the scarf if needed. Blocking helps smooth the stitches and gives the scarf a clean, professional finish.
How long does it take to make a Handmade Crocheted Bear Scarf?
Most crocheters complete this project in 2–6 days depending on the level of detail added.
What yarn works best for this scarf?
Medium-weight yarn is ideal because it is warm, soft, and holds the bear features well.
Is this project beginner-friendly?
Yes! This Handmade Crocheted Bear Scarf – Tutorial is suitable for beginners, especially since the base scarf uses simple stitches.
Can I use safety eyes for the bear?
Yes, but if the scarf is for a child, embroidered eyes are recommended for safety.
Do I need stuffing?
Stuffing is optional but helpful for shaping the snout, ears, and paws.
Can I make the scarf longer or shorter?
Definitely! Adjust the starting chain or add rows to customize the length and width.
This Handmade Crocheted Bear Scarf – Tutorial offered a complete guide to creating a cozy and adorable scarf filled with personality. From crafting the scarf base to adding expressive bear features, each step allows you to personalize your piece and develop new crochet skills.
I hope this tutorial inspires you to create your own charming bear scarf. Please leave a sincere opinion and share your suggestions so we can continue improving and bringing you more creative tutorials!