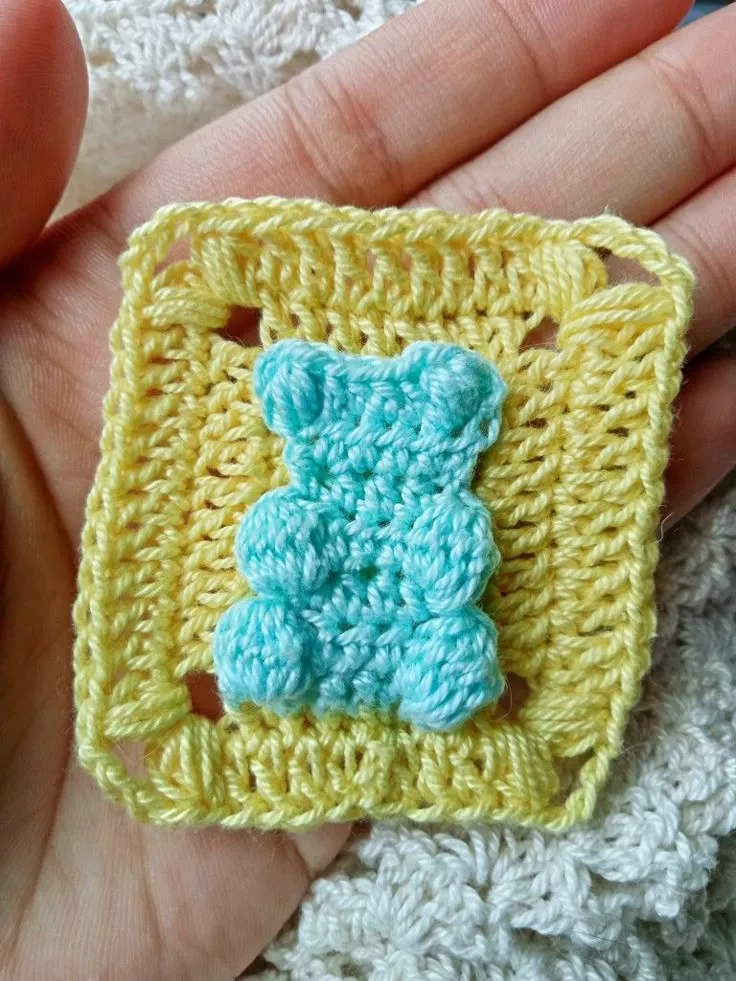
Crochet patterns come in all shapes, sizes, and themes, but few are as delightful and playful as the Gummy Bear Granny Square – Crochet Pattern. Inspired by the popular candy, this pattern brings a burst of fun and color to your crochet projects. Whether you’re a beginner crocheter or an experienced crafter, this quirky and adorable granny square design is a perfect way to add personality to your crochet creations.
The Gummy Bear Granny Square combines traditional granny square techniques with a vibrant, candy-inspired color palette, making it a fun project to work on and a perfect addition to blankets, pillows, bags, and more. This pattern allows you to experiment with different yarns and color combinations while creating something that’s both sweet and charming. In this guide, we’ll take you through the steps to create your own Gummy Bear Granny Square and explore how you can use these colorful squares in various crochet projects.
Advertising
Let’s dive into the world of Gummy Bear Granny Squares and discover how to crochet these colorful and adorable motifs step by step!
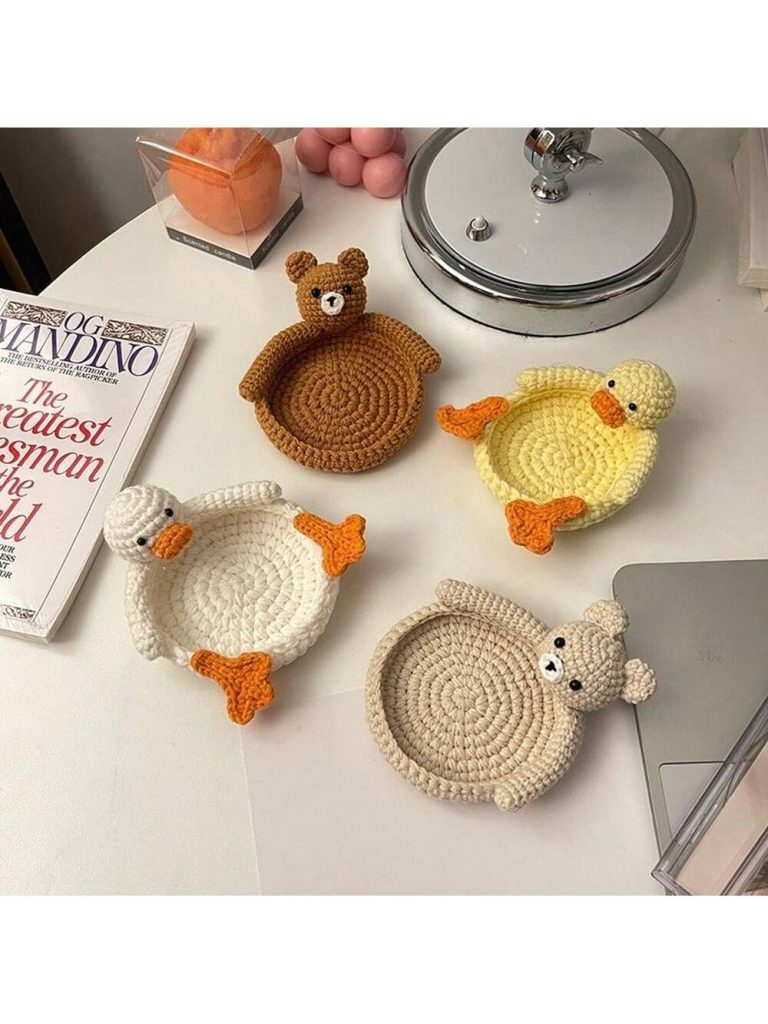
Image From Pinterest
1. Materials You’ll Need for the Gummy Bear Granny Square
Before you begin crocheting your Gummy Bear Granny Square, gather the necessary materials to ensure your project goes smoothly. Here’s what you’ll need:
Yarn: The main feature of the Gummy Bear Granny Square is its vibrant, candy-like colors. You’ll need a selection of bright yarns in colors such as red, yellow, green, blue, and orange to mimic the colors of gummy bears. Choose a medium-weight yarn (such as worsted weight) to give your square the perfect texture.
Crochet Hook: A 4mm (G-6) or 5mm (H-8) crochet hook works well with worsted-weight yarn. If you’re working with thinner or thicker yarn, adjust the hook size accordingly.
Yarn Needle: You’ll need a yarn needle to weave in the ends once you’ve completed your square. This step ensures that your square looks neat and polished.
Scissors: A good pair of scissors to trim your yarn once you’ve finished each round.
Stitch Markers: Optional, but helpful in keeping track of rounds and color changes.
Stuffing (Optional): If you’d like to make your gummy bear squares a bit more 3D, you can use light stuffing to give them some dimension, though this is entirely optional.
2. How to Crochet the Gummy Bear Granny Square – Step-by-Step
Creating the Gummy Bear Granny Square follows a simple pattern of working in the round and changing colors at specific points to create the look of a gummy bear. Here’s how to crochet it step by step:
Advertising
2.1. Start with the Centre of the Square
Begin with a Magic Ring: Start your square with a magic ring (or chain 4 and join to form a ring). This ring will be the center of your granny square.
Crochet the First Round: For the first round, use your first color (choose one of the bright colors for the gummy bear) and crochet 12 double crochet stitches into the magic ring. Close the round with a slip stitch to the first stitch of the round.
Change to a New Color: For the second round, you’ll change to a second color. Pick another bright, contrasting color to continue building the square. Use a slip stitch to join the new color and start the second round.
2.2. Building the Square
Create the Second Round: In the second round, you’ll create the corners of the square. Crochet 2 double crochet stitches in each space between the groups of double crochet from the previous round. In the corners, add 2 double crochet stitches, chain 2, and 2 more double crochet stitches to form a corner.
Continue with Additional Rounds: Continue working in rounds, adding double crochet stitches between the corners and chain-2 spaces at each corner. For each new round, change to a new color to create a multi-colored effect, just like the rainbow of gummy bear colors.
Repeat the Pattern: Repeat the process of adding double crochet stitches along the sides of the square, and adding chain-2 spaces in the corners. Keep expanding the square until you reach your desired size.
Final Round: When you’ve completed the desired size for your granny square, finish the last round with a round of single crochet or slip stitch to give the edges a neat finish.
2.3. Weaving in Ends and Finishing
Finish the Round: Once you’ve reached the desired size for your Gummy Bear Granny Square, join the last stitch with a slip stitch to the first stitch of the round.
Weave in the Ends: Use a yarn needle to weave in all the loose ends from the color changes. Be sure to do this neatly to keep your square looking clean and professional.
Optional – Add Stuffing: If you want your square to have some dimension, you can lightly stuff the center of the square or add stuffing to the edges, giving it a more 3D gummy bear shape.
3. Customizing Your Gummy Bear Granny Square
The beauty of Gummy Bear Granny Squares lies in their versatility and how easily you can customize them. Here are some ways to make your squares even more unique:
Experiment with Color Combinations: The colors of gummy bears are typically bright and bold, but feel free to experiment with different color combinations. You could use pastel versions for a softer look, or even add patterns by using two colors per round or creating stripes.
Add Decorative Elements: You can enhance the look of your gummy bear squares by adding extra details. For example, add small crochet embellishments like tiny hearts or stars inside the square, or attach buttons or beads to represent the “eyes” or “features” of the gummy bear.
Make Larger Squares: If you’d like a larger square, simply add more rounds to your design. Each round can be done in different colors, adding more variation to the square.
Use a Different Stitch Pattern: While the basic granny square stitch is used here, you can also experiment with other stitch patterns. Try using half double crochet or treble crochet for a different texture in your gummy bear squares.
Add a Border: Once you’ve finished your Gummy Bear Granny Square, you can add a border to give it a polished look. You could use a simple single crochet border or go for something more intricate, like a scalloped or picot border, to add extra flair.
4. Creative Uses for Gummy Bear Granny Squares
Now that you’ve mastered the art of creating Gummy Bear Granny Squares, the possibilities for using these fun squares are endless. Here are some creative ways to incorporate them into your crochet projects:
Create a Gummy Bear Blanket: Join multiple Gummy Bear Granny Squares together to make a bright and cheerful blanket. This is a perfect project for a baby blanket, toddler blanket, or a fun throw for your couch.
Make a Gummy Bear Pillow: Add a fun, colorful touch to your home by joining several Gummy Bear Granny Squares to create a cute pillow or cushion cover. Use a zipper or button closure for an easy removable cover.
Design a Bag or Tote: Crochet a bag or tote using Gummy Bear Granny Squares. These colorful squares will make for a cheerful, statement-making accessory. You can add a lining inside the bag for extra durability.
Decorate Your Home: Use your Gummy Bear Granny Squares to create wall hangings, table runners, or other fun home décor pieces. These squares will bring an element of playfulness and whimsy to any room.
Make a Baby Blanket or Toy: If you’re creating a blanket for a baby or small child, the Gummy Bear Granny Squares will bring a playful, eye-catching element to their nursery. You could even turn them into a plush toy or amigurumi-style plushie.
FAQ
1. How many colors should I use in my Gummy Bear Granny Square?
Typically, you should use at least 3-4 different colors to mimic the gummy bear look. However, you can use as many colors as you like, depending on your preferences and the overall look you’re aiming for.
2. Can I add more texture to the Gummy Bear Granny Square?
Yes! You can experiment with adding textured stitches, like popcorn stitches or puff stitches, to create more visual interest and dimension in your squares.
3. How do I join the Gummy Bear Granny Squares?
You can join your squares using several methods, including whip stitch, slip stitch, or join-as-you-go. The whip stitch method is simple and effective, while the join-as-you-go method creates a seamless finish.
4. How do I keep my Gummy Bear Granny Squares even in size?
To ensure your squares are uniform, be consistent with your stitch count in each round. If needed, you can block your squares to make them more uniform in size.
5. How long does it take to crochet a Gummy Bear Granny Square?
On average, it takes about 30-45 minutes to crochet one Gummy Bear Granny Square, depending on your speed and the number of colors you’re using.
6. Can I make a larger project with the Gummy Bear Granny Square?
Yes, you can! Gummy Bear Granny Squares work well for larger projects like blankets, shawls, or even garments. Simply continue making squares and join them together for your desired project.
VIDEO TUTORIAL
Conclusion
In this guide, we’ve shown you how to crochet your very own Gummy Bear Granny Squares, turning a fun candy theme into a colorful crochet design. Whether you’re making a playful blanket, a fun pillow, or any other creative project, these granny squares will bring a bright, cheerful vibe to your work. Don’t forget to experiment with different colors and stitch patterns to make your squares truly unique. We’d love


