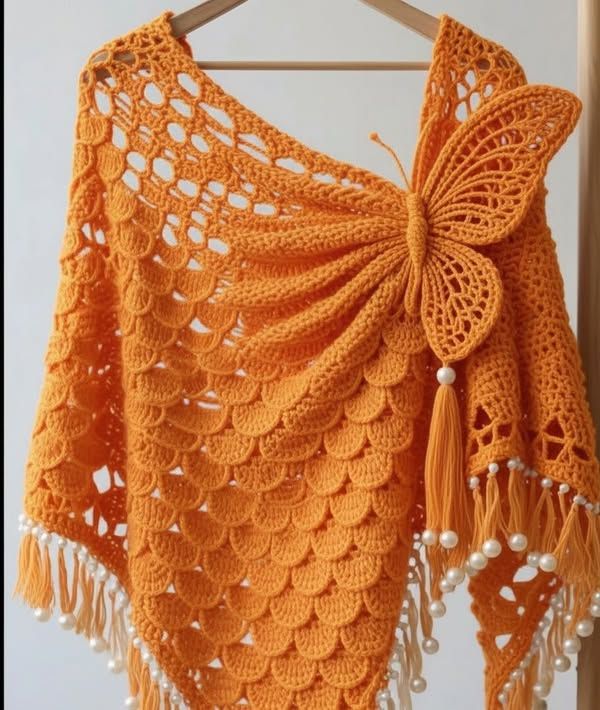
Butterfly Shawl in Crochet – Tutorial

Creating a magical touch for your home is easier than you think, especially when you combine your love for crochet with enchanting fairy-inspired designs. The Faerie Garden Wall Hanging Crochet is a delightful project that blends creativity, charm, and texture into a decorative piece that’s perfect for any room.
Whether you’re a beginner exploring new patterns or an experienced crocheter seeking something whimsical, this tutorial will guide you through every step to bring a little fairy magic to your space.
In this article, you’ll discover everything you need to know — from choosing the right yarn and tools, to following the stitches, and finally assembling your dreamy wall hanging. This project not only serves as a beautiful decoration but also as a mindful, relaxing crochet experience.
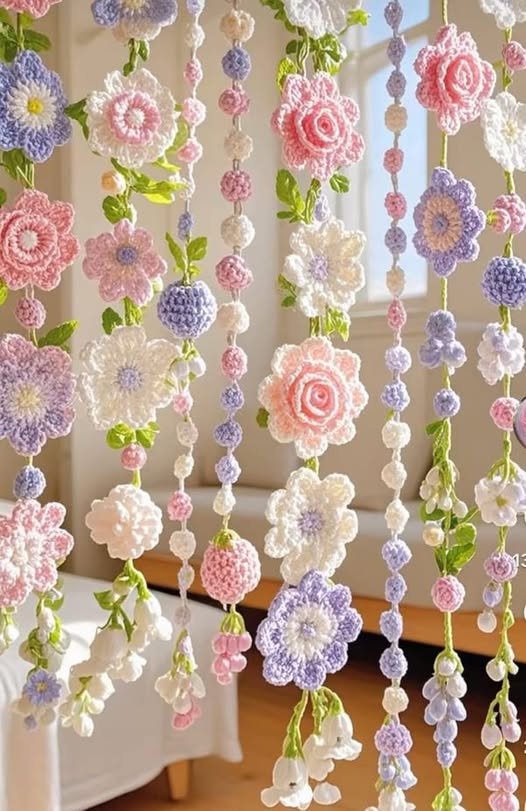
The Faerie Garden Wall Hanging isn’t just a piece of decor — it’s a story told through yarn. Each stitch represents leaves, flowers, or textures reminiscent of a magical garden, evoking the whimsical beauty of fairy tales.
Here’s why crocheters are falling in love with this pattern:
This project also serves as a wonderful way to experiment with texture and layering, making it a rewarding addition to your crochet journey.
Before starting your Faerie Garden Wall Hanging Crochet, gather all the necessary supplies. Choosing the right yarns and tools is essential for achieving the textured, whimsical look this project is known for.
Recommended Materials:
Yarn Color Ideas:
The beauty of this pattern lies in its layered elements, which you crochet separately and then attach to create depth. While specific stitch counts may vary depending on your chosen pattern, here’s the general process:
Start with your chosen background color. Work a rectangle in single crochet (SC) or half double crochet (HDC) rows until you reach your desired length and width. This will be the canvas for your fairy garden.
Using green yarn, crochet small leaf motifs. These can be made with simple chains and slip stitches, or more intricate patterns using half double crochets and double crochets for added texture.
Flowers can be made in multiple styles:
Include mushrooms, vines, or even tiny crochet butterflies to enhance the fairy theme. These details make the piece unique.
Lay out all your motifs on the base panel before sewing them on. Once satisfied with the arrangement, use a tapestry needle to secure each piece.
Attach the top edge of your base panel to the wooden dowel or branch using slip stitches or by sewing it in place. Add fringe or tassels along the bottom for extra elegance.
One of the joys of this project is its adaptability. You can adjust colors, motifs, and arrangements to suit your style or match a specific room.
Customization Ideas:
Remember — the Faerie Garden Wall Hanging Crochet is as much about creative expression as it is about following a pattern. Let your imagination guide you.
The Faerie Garden Wall Hanging Crochet – Tutorial is more than just a crochet project — it’s an opportunity to craft a piece of art that brings charm and joy into your home. Whether you’re making it for yourself or gifting it to someone special, this enchanting wall hanging is sure to brighten any space.
With the right yarns, a bit of patience, and a sprinkle of creativity, you can transform a few simple stitches into a magical garden that lasts forever. So, grab your hook and start crocheting your own little piece of fairyland today! 🌸🧚♀️