
Turtle Baby Blanket – Tutorial


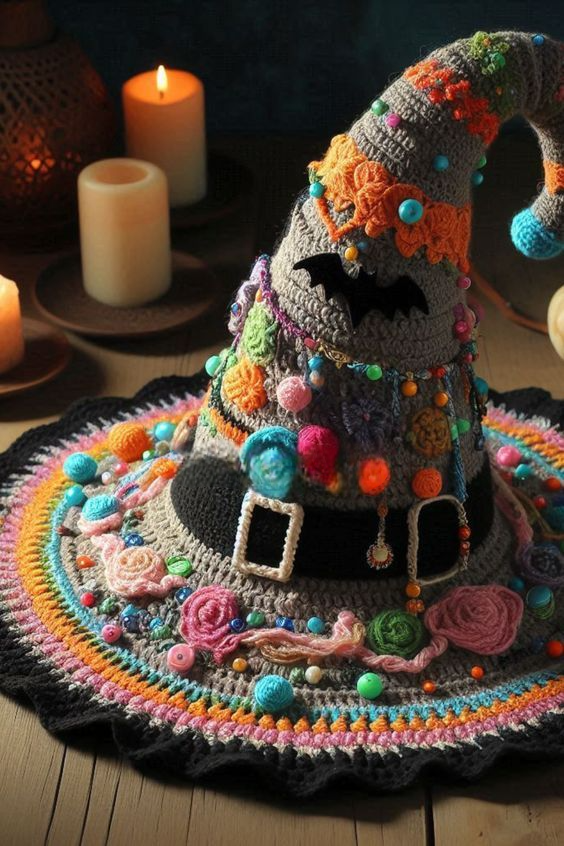
If you’re looking for a creative and festive project to make this spooky season special, the Crochet Witch Hat Pattern for Halloween Decor is a perfect choice. This handmade decoration combines the cozy charm of crochet with the magical spirit of Halloween, making it an ideal addition to your seasonal home setup. Whether you want to craft a full-sized hat for a costume or a mini version for table displays, this project will help you bring your Halloween imagination to life.
The beauty of this Crochet Witch Hat Pattern for Halloween Decor is its versatility. You can make it as elegant, eerie, or whimsical as you like, simply by choosing different yarn colors and embellishments. From classic black and purple to sparkly orange and green, your creativity will shape the personality of your witch hat. Plus, it’s a great project for using up leftover yarn, turning scraps into something magical and fun.
In this tutorial, we’ll go step by step through the process of making your own Crochet Witch Hat Pattern for Halloween Decor, from choosing materials to adding creative finishing touches. You’ll also find helpful tips to make your project sturdy, stylish, and display-ready. Whether you’re new to crochet or a seasoned crafter, this Halloween project is sure to bring a touch of handmade enchantment to your home.
To begin your Crochet Witch Hat Pattern for Halloween Decor, start by gathering the right materials. The yarn you choose will have a big impact on the final look of your hat. For a traditional witch hat, opt for worsted-weight yarn in black or dark purple. If you prefer a more playful or decorative style, use metallic or glitter yarn for extra sparkle. Cotton yarn works well for smaller decorative hats, while acrylic yarn is great for larger pieces that need structure.
Next, choose a crochet hook that matches your yarn weight. Typically, a 4mm to 5.5mm hook is perfect for medium-weight yarn. Always check the yarn label for recommendations to ensure your stitches come out even and neat. Having the right hook will help your Crochet Witch Hat Pattern for Halloween Decor hold its shape beautifully.
You’ll also need a tapestry needle for sewing in loose ends, stitch markers to keep track of rounds, and stuffing material if you plan to make a smaller decorative hat that stands on its own. For extra stiffness, you can use a light wire frame or fabric stiffener, depending on the hat’s purpose.
Color is another key aspect to think about. Traditional witch hats are black, but adding bands of orange, purple, or green can give your design a more festive Halloween touch. Don’t forget embellishments such as ribbons, buttons, or even faux spiders for added personality.
Lastly, set up a comfortable, well-lit workspace. Crocheting should be relaxing and enjoyable, and having all your materials organized before you start will make the experience even more pleasant. Once your supplies are ready, it’s time to bring your witch hat to life.
Now that you have your materials ready, it’s time to begin the Crochet Witch Hat Pattern for Halloween Decor. Start at the tip of the hat, working in the round. You’ll begin with a small magic ring and gradually increase your stitches in each round to form the pointed cone shape. This technique ensures a smooth, even structure and prevents gaps in the fabric.
As you continue crocheting, the cone will grow longer, and you’ll start to see the signature witch hat silhouette forming. Keep your tension consistent to avoid uneven shaping. Using stitch markers can help you track your increases and ensure that your Crochet Witch Hat Pattern for Halloween Decor remains symmetrical.
Once the cone reaches your desired length, you’ll start widening the base to form the brim. This is done by increasing the number of stitches more rapidly in each round. Depending on your design, you can create a wide floppy brim or a small decorative edge. Experimenting with the number of increase rounds will give your hat a unique personality.
If you’re making a decorative hat rather than a wearable one, consider adding a few rounds of single crochet with a tighter stitch at the brim’s edge. This helps it keep its shape. For extra structure, apply a fabric stiffener or insert a thin wire along the edge.
Don’t forget to switch colors if you’d like to add a band or stripe around the base of the cone. You can also crochet a separate strip and sew it on later for a neater finish. The flexibility of the Crochet Witch Hat Pattern for Halloween Decor allows you to personalize every detail.
When you’re done crocheting, weave in all loose ends neatly with a tapestry needle. Give your hat a light steam block if needed to smooth the stitches and shape it properly. You’re now ready to decorate and display your magical creation.
The real fun of the Crochet Witch Hat Pattern for Halloween Decor begins when you start decorating it. This is where you can truly let your creativity shine. There are endless ways to customize your hat, from adding color accents to embellishing it with charming Halloween details.
Start with a simple crocheted band in a contrasting color. Wrap it around the base of the cone and secure it with a stitch or small knot. You can add a crocheted buckle in gold or silver yarn for that classic witchy look. A bright orange or green ribbon can also give your Crochet Witch Hat Pattern for Halloween Decor a festive and playful vibe.
Consider adding small crocheted flowers, stars, or bats to the hat. You can easily find tiny crochet applique patterns online that match the Halloween theme. Sew them onto the hat using a tapestry needle and matching thread.
If you’re using the hat as home decor, think about where it will be displayed. For example, a mini version looks adorable on a mantelpiece or as a centerpiece surrounded by pumpkins. Larger hats can be used as part of your porch decoration or even placed on top of a Halloween wreath for an enchanting effect.
For an extra touch of magic, add beads, sequins, or small LED fairy lights around the brim. This makes your Crochet Witch Hat Pattern for Halloween Decor stand out, especially at night when the lights create a mystical glow.
Finally, remember that handmade decorations are all about personality. Whether your hat looks spooky, cute, or elegant, it reflects your own creative touch. Every stitch you make adds warmth and originality to your Halloween celebrations.
Your finished Crochet Witch Hat Pattern for Halloween Decor can serve many purposes beyond just decoration. One of the best things about this project is its versatility. Depending on its size and design, it can become a functional or purely decorative piece.
A small version makes a delightful addition to a Halloween table centerpiece or a cute accessory for dolls and plush toys. You can also turn it into a hanging ornament by attaching a loop of yarn to the top. If you’re hosting a Halloween party, these little hats make adorable handmade favors for guests.
Larger versions of the Crochet Witch Hat Pattern for Halloween Decor can be part of costumes. Simply adjust the size, add a lining for comfort, and you have a stylish handmade accessory. You can even make matching hats for family members or friends for a themed event or group costume.
Another creative idea is to use your hat as part of a Halloween photo booth setup. Place it on a pumpkin or a decorative stand, and it instantly adds charm to any photo background.
You can also sell or gift these handmade hats. Many people love receiving handcrafted holiday decor, especially when it’s as unique and detailed as a crochet witch hat. Just remember to add a personal tag or note to highlight that it’s handmade with care.
No matter how you use it, the Crochet Witch Hat Pattern for Halloween Decor brings a cozy, handmade feel to one of the most festive times of the year.
FAQ about Crochet Witch Hat Pattern for Halloween Decor
Q1: What kind of yarn should I use for the Crochet Witch Hat Pattern for Halloween Decor?
Worsted-weight acrylic or cotton yarn works best, depending on whether you want a soft or structured finish.
Q2: Can I make the witch hat larger or smaller?
Yes, you can easily resize it by adjusting your hook size and increasing or decreasing the number of rounds.
Q3: How do I make the hat stand up on its own?
You can use a light wire frame, stiff yarn, or apply a fabric stiffener to the brim and cone.
Q4: Is this project suitable for beginners?
Absolutely. The Crochet Witch Hat Pattern for Halloween Decor uses basic stitches like single crochet and double crochet, making it beginner-friendly.
Q5: Can I wash my crochet witch hat?
Yes, but it’s best to hand wash gently and reshape it while drying to maintain its form.
Conclusion
Making a Crochet Witch Hat Pattern for Halloween Decor is a fun and rewarding way to celebrate the Halloween season. From selecting materials to decorating your finished hat, every step of this project invites creativity and joy.
Whether you display it on a shelf, wear it for a costume, or gift it to a loved one, your handmade witch hat will bring a magical touch to your Halloween festivities. Now it’s your turn to try this project—share your experience and let us know your thoughts or suggestions for future patterns!
