
Guardian Angel Wings Shawl - PATTERN


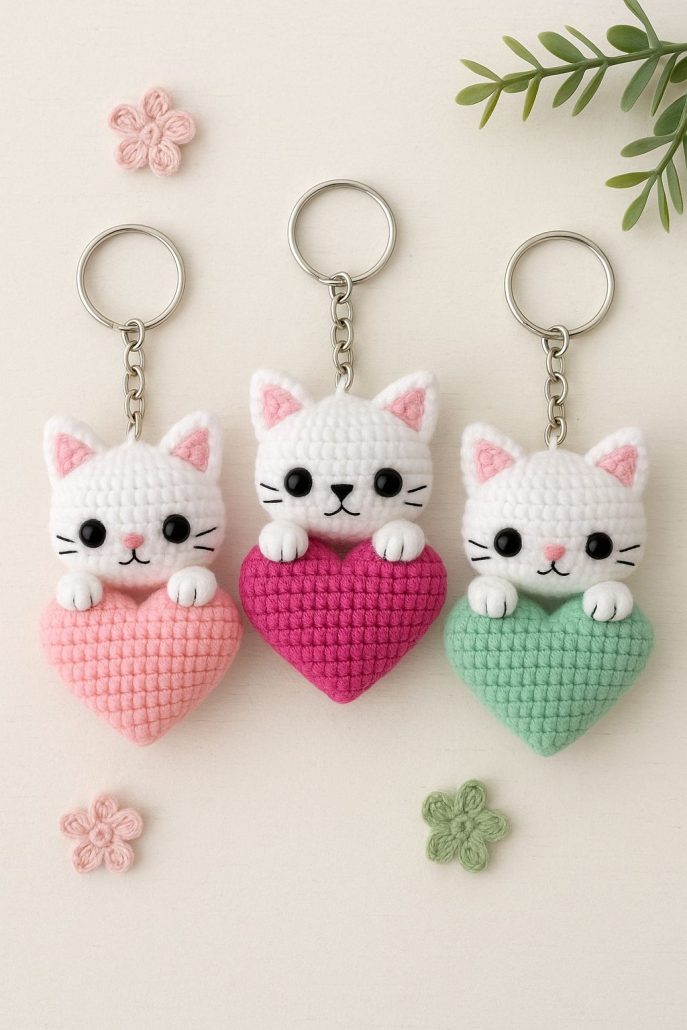
If you’re looking for an adorable handmade gift or a charming accessory for your bag, this Crochet Hello Kitty with Heart Keychain – Tutorial is the perfect project to try! Whether you’re an experienced crocheter or just starting out, this pattern brings joy, color, and personality to your craft. By following this step-by-step guide, you’ll create a cute Hello Kitty character holding a heart — a symbol of love and creativity that makes every stitch meaningful. Using your crochet skills, some yarn scraps, and a little imagination, you can make a personalized keychain that will surely make anyone smile.
The Crochet Hello Kitty with Heart Keychain – Tutorial combines classic amigurumi techniques with simple details that make the project easy to follow. It’s also a fantastic way to use leftover yarns and turn them into something beautiful and functional. These little creations are perfect for gifts, craft fairs, or just for yourself as a cheerful addition to your keyring or handbag. The pattern encourages creativity, allowing you to customize colors and details to match your personal taste.
In this tutorial, we’ll walk you through each step of the process, from gathering materials to the final touches that bring Hello Kitty’s sweet face to life. So grab your hook, your favorite yarns, and let’s crochet some happiness together!
Before starting your Crochet Hello Kitty with Heart Keychain – Tutorial, gather all the materials you’ll need. Preparation is key to ensuring your crochet project goes smoothly. You’ll need soft acrylic or cotton yarn in white, pink, red, black, and yellow — the signature colors of Hello Kitty and her heart.
A small crochet hook, usually around 2.5mm or 3mm, works perfectly for this project. You’ll also need a yarn needle for sewing parts together, some fiberfill stuffing to give shape to the Hello Kitty head and heart, and of course, a keychain ring to complete your piece. Optional accessories like a ribbon or tiny bow can add a charming finishing touch.
Make sure your yarn thickness matches your hook size. Using lightweight yarn ensures your keychain stays compact and easy to carry. It’s also advisable to keep a pair of small scissors nearby for trimming ends and a stitch marker if you’re working in continuous rounds.
Remember, using high-quality yarn will make your Crochet Hello Kitty with Heart Keychain look neater and last longer. You can even experiment with glitter yarn or pastel shades for a unique style. Keep your materials organized and within reach before you begin.
Taking the time to prepare everything beforehand will make the crocheting process more enjoyable and relaxing. Once your setup is ready, you’re all set to begin the fun part — crocheting Hello Kitty’s adorable features!
Now let’s start creating the main part of the Crochet Hello Kitty with Heart Keychain – Tutorial. The head is typically made using a magic ring technique, followed by rounds of single crochet stitches. You’ll gradually increase the stitches until you reach the desired size. The shape should be round but slightly flattened to mimic Hello Kitty’s classic face.
Use white yarn for the head and maintain even tension throughout your rounds to keep the surface smooth. After reaching the width you want, continue with a few more rounds of equal stitch count, then begin decreasing symmetrically to close the shape. Remember to stuff lightly before closing completely.
Next, you’ll add the small ears. Crochet two triangles and sew them neatly to the top corners of the head. Hello Kitty’s recognizable features — her eyes, nose, and whiskers — can be embroidered with black and yellow yarn. If you prefer, you can use tiny safety eyes for a more polished look.
The heart is crocheted separately with red yarn. It’s made by combining two small circles and shaping them into a classic heart using single and double crochets. This heart adds a lovely, sentimental touch to the design.
Once both the head and heart are ready, sew them together securely. You can adjust the position so that Hello Kitty appears to be holding the heart. Add the little bow using pink yarn to give her the final signature look.
Finally, attach the metal keychain ring to the top of Hello Kitty’s head using a sturdy loop of yarn. Your keychain base is now complete and ready for finishing details.
In this part of the Crochet Hello Kitty with Heart Keychain – Tutorial, it’s time to put all the pieces together and bring your creation to life. Begin by positioning the head, ears, and heart to make sure everything aligns perfectly. A little patience during assembly ensures a clean, professional-looking result.
Using a yarn needle, sew the parts gently but firmly. Hide any yarn tails inside the stuffed body for a neat appearance. You can also add a small dab of fabric glue to reinforce connections if desired.
Now focus on details that make Hello Kitty truly charming. Embroider her whiskers carefully on each side of the face, and make sure the eyes and nose are symmetrical. Attach the bow to one ear or near the top of her head — it’s her trademark!
If you want to personalize your Crochet Hello Kitty with Heart Keychain, consider adding small embellishments like beads, glitter yarn, or tiny charms. This makes your project unique and adds a bit of sparkle.
Once everything is in place, loop the yarn securely around the keychain ring and fasten it firmly. Tug gently to make sure it holds up well under daily use.
After checking all details, your adorable Hello Kitty keychain is ready! It’s lightweight, soft, and perfect as a gift or personal keepsake.
The Crochet Hello Kitty with Heart Keychain – Tutorial offers endless creative possibilities. You can make several keychains in different color themes for holidays or special occasions. Try pastel tones for Easter, red and green for Christmas, or pink and white for Valentine’s Day.
These handmade keychains make thoughtful gifts for friends, family members, or even teachers. They’re small tokens of affection that carry a lot of heart — quite literally! You can attach them to purses, backpacks, or even hang them as cute car mirror decorations.
If you enjoy selling your crafts, these Hello Kitty keychains are popular items at markets or online stores. Since they require minimal materials and time, they’re perfect for small-batch production.
This project also serves as an excellent practice for improving amigurumi skills, especially if you’re still learning to shape and assemble small pieces. It’s a gentle and satisfying challenge for crocheters of all levels.
You can even make themed sets — a Hello Kitty with different heart colors or matching character designs — to delight collectors and fans.
No matter how you use your finished keychain, it will always bring smiles and warmth wherever it goes.
Q1: Is this project suitable for beginners?
Yes! This Crochet Hello Kitty with Heart Keychain – Tutorial is perfect for beginners. The pattern uses basic stitches like single crochet, increase, and decrease.
Q2: What type of yarn is best for this keychain?
Soft acrylic or cotton yarn works great. Cotton gives a firm texture, while acrylic offers a slightly softer finish.
Q3: How long does it take to complete one keychain?
On average, it takes about 2–3 hours, depending on your crochet speed and experience.
Q4: Can I sell my finished Hello Kitty keychains?
Absolutely! Handmade items like this are popular at craft fairs and online stores. Just make sure to credit the pattern source when required.
Q5: How do I clean my crochet keychain?
Gently hand wash with mild soap and water. Avoid wringing to maintain the shape. Let it air dry completely before use.
The Crochet Hello Kitty with Heart Keychain – Tutorial is a delightful project that combines creativity, love, and crochet skills in one charming piece. You’ve learned how to make Hello Kitty’s iconic face, shape a lovely heart, and assemble everything into a functional accessory.
PATTERN VIDEO:
Whether you make it as a gift, for sale, or for personal joy, it’s sure to spread happiness. We hope this tutorial inspired you to keep creating and sharing your passion for crochet! Please leave a sincere opinion and suggestions — we’d love to hear your thoughts and see your beautiful creations!

