Chicken Crochet - Pattern

If you’re looking for a festive and creative holiday project, the Crochet Granny Square Christmas Tree is a perfect choice. This charming and eco-friendly decoration brings warmth and handmade beauty to your Christmas celebrations. The best part is that it’s simple enough for beginners to enjoy while offering endless opportunities for customization. In this tutorial, you’ll learn how to create your own Crochet Granny Square Christmas Tree, using your favorite colors and yarn scraps to craft something truly special. Whether you hang it on the wall, use it as a table centerpiece, or turn it into a gift, this project is a joyful way to celebrate the season.
Crocheting a Christmas tree using granny squares combines classic crochet techniques with modern creativity. It’s a fun way to repurpose leftover yarn and explore color combinations that capture the holiday spirit. Plus, it’s a relaxing project that can be completed in just a few evenings. Once finished, your handmade Christmas tree will add a cozy, homemade charm to any room, and it might even become a family keepsake for years to come.
Before we dive into the step-by-step tutorial, remember that this Crochet Granny Square Christmas Tree pattern is adaptable. You can choose the size, number of squares, and arrangement that best suits your space and style. Let’s get started and create something festive and full of love!
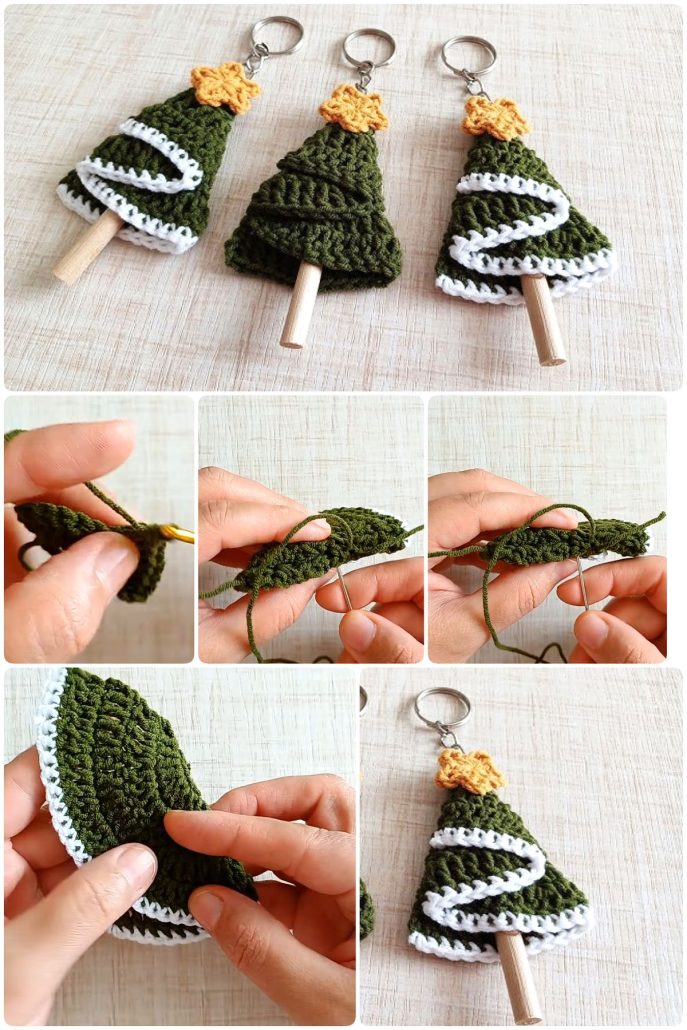
To begin making your Crochet Granny Square Christmas Tree, gather all your supplies. You’ll need several shades of green yarn for the tree, plus other colors if you want to add ornaments or a star. Acrylic yarn is ideal since it holds shape well and offers a vibrant finish. You’ll also need a crochet hook that matches your yarn weight, scissors, a yarn needle for sewing, and optional decorations like buttons, beads, or ribbons.
Next, plan how many granny squares you’ll need based on your desired tree size. A small wall-hanging tree might require about 10 squares, while a larger version could use 20 or more. Arrange the colors ahead of time to visualize your design and ensure you have enough of each yarn shade.
Remember that this pattern works beautifully with yarn scraps. Mixing different tones of green can create a lovely textured look, and adding hints of red, gold, or white brings festive contrast.
If you prefer a sturdy structure, you can line the back of your finished tree with felt or light cardboard. This step helps maintain the shape when hanging.
Keep all your tools within reach to make your crocheting process smooth and enjoyable.
Now that you’re ready, it’s time to move on to the actual crocheting process.
Start by crocheting the classic granny squares that will form your tree. Use the traditional method: create a magic ring, chain three, and then make clusters of three double crochets separated by chain spaces. Continue working in rounds until your squares reach your desired size.
Each granny square represents part of your Christmas tree, so using various shades of green adds depth and interest. For a more decorative touch, you can make one or two squares in red or gold to symbolize ornaments.
Once you’ve finished your squares, block them to ensure they’re all the same size and have neat edges. Blocking helps your final piece look professional and well-structured.
If you’re a beginner, don’t worry—granny squares are forgiving and fun to make. You can experiment with different color combinations or add a metallic yarn thread for sparkle.
After you’ve made all the necessary squares, arrange them into a triangle shape resembling a Christmas tree before sewing them together.
Use a yarn needle and whip stitch or slip stitch to join the squares, depending on your preferred finish.
With your granny squares joined, you’ll now shape and decorate your Crochet Granny Square Christmas Tree. Start by laying out your design on a flat surface. You can make a symmetrical tree with rows of squares decreasing from bottom to top or get creative with an abstract pattern.
Once assembled, you can add embellishments like small buttons for ornaments, tiny pom-poms for baubles, or even crochet mini stars to attach at the top.
Consider using a light brown yarn to crochet a small rectangle as the tree trunk. Attach it to the bottom of your tree for a complete look.
If you want your tree to stand upright, sew it onto a felt backing or stiff fabric. For hanging versions, attach a loop of yarn at the top.
You can also add a border around your entire tree using single crochet stitches to unify the design.
This decorating phase allows your creativity to shine. Make your tree as simple or as festive as you like!
After finishing your Crochet Granny Square Christmas Tree, it’s time to showcase your creation. Hang it on a wall, use it as a door decoration, or display it on your mantelpiece for a handmade holiday touch.
If you made a small version, it also works beautifully as a table centerpiece or even a gift tag on wrapped presents. You can make multiple small trees for friends and family—each one will be unique and full of love.
Store your Christmas tree carefully after the season ends. Keep it in a cool, dry place so it stays in good shape for future holidays.
This crochet project is not only decorative but also meaningful, as it brings together creativity, recycling, and festive joy.
Each time you see your handmade tree, you’ll remember the care and passion that went into making it.
Enjoy the process of sharing your work—take pictures, post them online, and inspire other crochet lovers to make their own granny square trees.
1. Can beginners make the Crochet Granny Square Christmas Tree?
Yes! This project is perfect for beginners since it mainly involves basic stitches like double crochet and chains.
2. What type of yarn is best for this pattern?
Acrylic yarn works best because it’s durable, affordable, and available in many colors.
3. How many granny squares do I need for a medium-sized tree?
You’ll typically need around 12 to 16 squares, depending on how large you want the final tree to be.
4. Can I use leftover yarn for this project?
Absolutely! Using yarn scraps is an excellent way to create colorful and eco-friendly decorations.
5. How do I hang the finished tree?
Simply attach a yarn loop at the top or sew your tree onto a piece of felt for extra support.
6. Can I make a 3D version of this tree?
Yes, by making two identical trees and sewing them together, you can stuff the inside for a 3D look.
The Crochet Granny Square Christmas Tree is a delightful project that combines creativity, sustainability, and the spirit of the holidays. It’s an easy yet impressive pattern that allows crafters to personalize their festive decorations while improving their crochet skills.
Whether you make one for your own home or as a heartfelt handmade gift, it’s sure to bring joy and warmth. I hope this tutorial inspires you to pick up your hook and start crocheting your own holiday magic. Don’t forget to leave your honest opinion and share your ideas or suggestions for future projects!