How to Make an Easter Bunny Out of Jeans

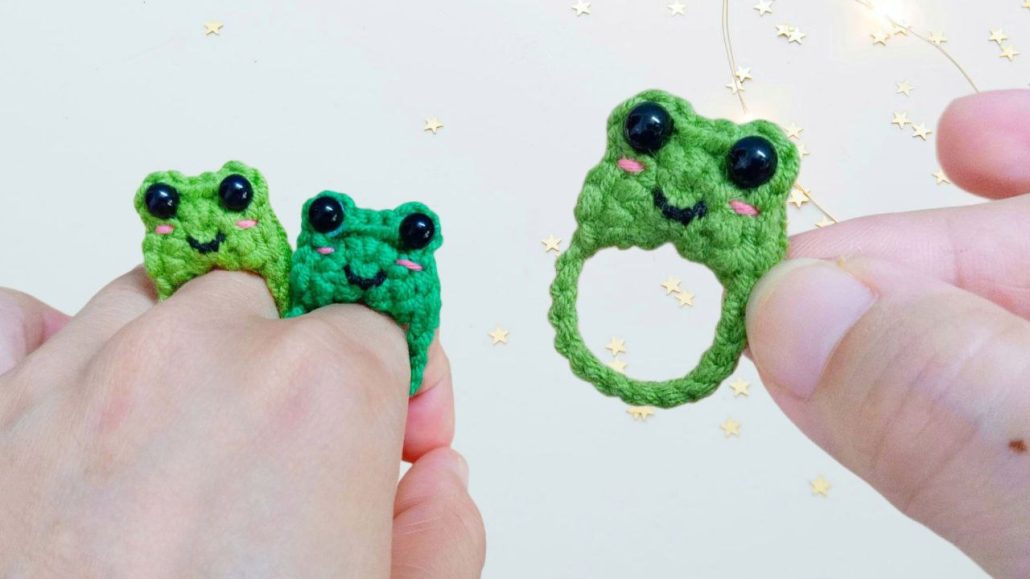
If you’re looking for a fun, quick, and adorable crochet project, this Crochet Frog Ring – TUTORIAL is perfect for you. This tiny and charming crochet accessory captures the playful spirit of a frog while allowing you to showcase your creativity and crochet skills. Whether you’re a beginner exploring small crochet crafts or an experienced crocheter looking for something new, this tutorial will guide you step-by-step to create a cute frog ring that’s both stylish and unique.
The Crochet Frog Ring – TUTORIAL focuses on simplicity and charm. Using only a small amount of yarn and a few basic stitches, you can make this cheerful little frog come to life. It’s a great way to use leftover yarn and make something eco-friendly, practical, and eye-catching. Handmade jewelry like this not only adds personality to your outfit but also makes for a thoughtful and heartfelt gift.
Get ready to bring your frog to life — one stitch at a time. With your hook and yarn in hand, let’s jump into this creative and entertaining project that’s sure to make you smile every time you wear it.
Before we begin crocheting, let’s gather all the materials you’ll need for this Crochet Frog Ring – TUTORIAL. You will need light green yarn for the frog’s body, a bit of white and black yarn (or embroidery thread) for the eyes, a small crochet hook (1.75 mm to 2.5 mm works well), a tapestry needle, and scissors.
Choosing the right yarn makes all the difference. Cotton or fine acrylic yarns are ideal because they hold their shape and give a neat finish to small projects. Since this is a mini design, you’ll only use a small amount of each color — perfect for using leftover yarn scraps from other crochet projects.
You’ll begin by crocheting the base of the ring. This can be made adjustable or fitted to your finger. Simply chain enough stitches to wrap comfortably around your finger, then join the chain into a loop with a slip stitch. Work a few rounds of single crochet stitches to create the ring band.
Once you’ve completed the base, you’ll start working on the frog’s adorable face — the heart of this tutorial. Take your time and enjoy each step; even though it’s a small project, the details make all the difference!
Now that your ring base is ready, let’s bring your frog to life! The next part of this Crochet Frog Ring – TUTORIAL is creating the face. Start by using your green yarn to crochet a small circle with the magic ring technique. This forms the frog’s head.
Work a few rounds of single crochet until the circle reaches your desired size — usually around the diameter of a small coin. Once the base is complete, fasten off and set it aside.
Next, make the eyes. Using white yarn, crochet two small circles to represent the whites of the frog’s eyes. Then, with black yarn or embroidery thread, stitch small pupils in the center of each white circle. If you prefer a 3D look, you can use small black beads or safety eyes instead.
Attach the eyes to the top of the green circle using your tapestry needle. Place them close together for a cute and expressive look. If you want to add a bit more personality, stitch a small curved smile using black thread below the eyes.
Finally, sew the frog’s face onto your ring base. Make sure it’s centered and securely fastened, especially if you plan to wear the ring regularly. Once done, you’ll already see your cheerful little frog smiling back at you!
The final steps in this Crochet Frog Ring – TUTORIAL are all about creativity and personal touches. You can make your frog look extra cute and unique by adding small details that reflect your style.
For instance, if you want your frog to have a bit more texture, lightly stuff the head with fiberfill before sewing it to the band. This gives it a rounded, plush appearance. Alternatively, keep it flat for a more delicate and lightweight design.
You can also experiment with different colors. While classic green is adorable, you could make a pink frog, a yellow one, or even a multicolored version for a whimsical twist. Crochet allows endless creativity, so don’t hesitate to let your imagination guide you.
If you enjoy making sets, consider creating matching frog-themed accessories — like earrings, bracelets, or even a necklace using the same mini frog face design. These make delightful handmade gifts or can be sold at craft fairs and online shops.
To finish your ring neatly, weave in all the yarn ends carefully and trim any excess. A clean, professional finish makes your project look polished and ready to wear or gift.
Once your Crochet Frog Ring – TUTORIAL project is complete, it’s time to show it off! This fun, handmade accessory adds a touch of charm to any outfit and is perfect for both adults and children.
Pair your frog ring with casual, everyday looks to add a pop of personality. It’s a great conversation starter and will definitely get compliments wherever you go. For younger wearers, the frog ring also makes a cute and safe accessory that sparks joy.
If you’re gifting it, consider placing it in a tiny box or a crochet pouch for a personal and thoughtful presentation. Handmade jewelry always carries a special sentiment that store-bought accessories can’t match.
To keep your crochet frog ring in good condition, store it away from moisture and direct sunlight. If it becomes dirty, gently spot-clean it with a damp cloth and mild soap. Avoid washing it in a machine or submerging it in water, as this could distort the shape.
Because it’s made from yarn, it’s lightweight and comfortable to wear. However, handle it gently to avoid pulling or stretching the stitches. With a bit of care, your crochet frog ring will stay adorable for years to come.
1. How long does it take to make the Crochet Frog Ring?
This project takes about 30 to 60 minutes, depending on your crochet speed and experience.
2. Can beginners make this pattern?
Yes! The Crochet Frog Ring – TUTORIAL is very beginner-friendly, using only simple stitches and basic shapes.
3. What yarn works best for this project?
Lightweight cotton or fine acrylic yarn works best to create a small and tidy design.
4. Can I make the ring adjustable?
Yes, you can easily make the band adjustable by using chain stitches and leaving an open end that ties or fastens with a button.
5. What other animals can I make using this method?
You can adapt this tutorial to create other cute animals like bears, cats, or pandas by simply changing colors and features.
The Crochet Frog Ring – TUTORIAL is a wonderful project that combines creativity, fun, and functionality. With just a few materials and simple stitches, you can create a charming handmade accessory that’s full of personality. Whether you make it for yourself, as a gift, or even to sell, this tiny frog ring is guaranteed to make people smile.
PATTERN VIDEO:
We hope this tutorial inspired you to pick up your hook and try something new today. Don’t forget to share your finished Crochet Frog Ring with us and leave your honest feedback and suggestions below. Your thoughts help us create even better tutorials and keep the crochet community thriving! 🧶💚🐸