
Crocheted Wreath on a Hoop


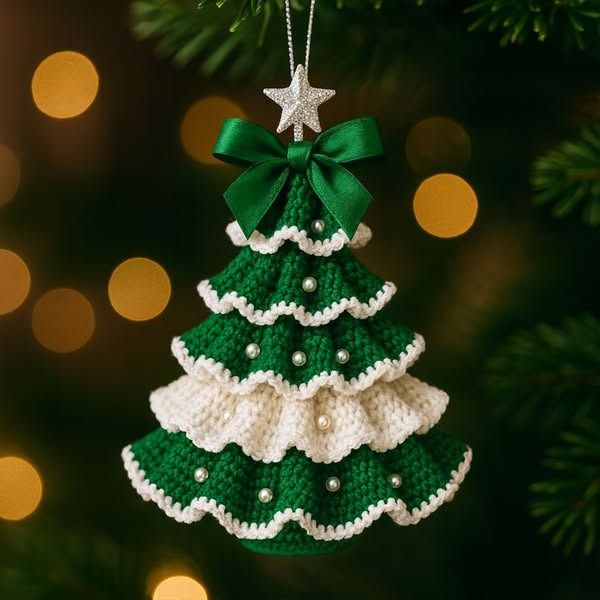
The Crochet Christmas Tree – TUTORIAL is a wonderful project for anyone who wants to combine creativity, tradition, and a touch of handmade charm for the holiday season. Crocheting your own Christmas tree décor is not only budget-friendly but also gives your home a unique and cozy touch that cannot be found in store-bought decorations. Whether you are a beginner looking for a simple project or an experienced crocheter aiming to create a festive masterpiece, this tutorial will guide you step by step.
Creating a crochet Christmas tree allows you to explore different yarn textures, sizes, and even colors. Many crafters love the classic green and red, while others experiment with metallic yarns, soft pastel shades, or even multicolored designs. This flexibility makes the project suitable for any holiday theme and style you want to create. Plus, handmade crochet trees make heartfelt gifts for friends and family, spreading the warmth of the season in a truly personal way.
In this Crochet Christmas Tree – TUTORIAL, you will not only learn how to make the basic design but also discover variations and finishing touches that can elevate your project. By the end, you’ll feel confident in your ability to bring this holiday craft to life, and you’ll have a beautiful keepsake or a collection of decorations that will shine year after year.
Before starting this Crochet Christmas Tree – TUTORIAL, gathering the right materials is essential. Using the correct yarn weight and hook size ensures that your stitches remain even and your tree holds its shape. Most crafters recommend medium-weight yarn, but lighter yarns can give a delicate look, while bulkier yarns create a sturdier piece.
You will also need a crochet hook that matches your yarn choice. A size G/6 (4.0 mm) or H/8 (5.0 mm) hook works well for most yarns, but checking the label of your yarn is always helpful. Choosing the right hook keeps your project neat and avoids loose stitches.
Additional tools include scissors, a yarn needle for weaving ends, and optional decorations such as beads, sequins, or ribbons. These extras can bring sparkle and personality to your finished tree.
Another important preparation step is creating a comfortable space for crocheting. Good lighting, a quiet environment, and a cozy chair make the process more enjoyable. This small detail often makes a big difference in your crafting experience.
Planning ahead also helps with project organization. Decide how many trees you want to make, their sizes, and where you will place them in your home. This ensures you have enough yarn and decorations before you start.
Finally, keep in mind that patience is key. Crochet projects, even small ones, are a journey. Taking your time and enjoying each stitch will help you create something special for the holiday season.
The first step in this Crochet Christmas Tree – TUTORIAL is creating the foundation chain. This chain determines the base width of your tree. A small chain produces a mini tree for ornaments, while a longer chain builds a larger tabletop decoration.
Once the chain is complete, you will begin working single crochet or double crochet stitches, depending on the desired texture. These stitches form the layered structure of the tree and give it the classic triangular shape.
The next stage is decreasing stitches at the end of each row. This technique gradually narrows your tree, creating a pointed top. Paying close attention during this step ensures symmetry and balance in your project.
After shaping the main body of the tree, you can add details such as ruffled edges to mimic branches. Many crocheters enjoy experimenting with different stitch patterns to create unique textures. Shell stitches, for example, make the tree appear fuller and more festive.
Adding a sturdy base helps your crochet Christmas tree stand upright. You can crochet a small circle or square as the tree trunk, or use a wooden dowel and secure it in a pot for a more realistic look.
To finish, weave in all ends carefully with a yarn needle. This ensures that your project looks neat and lasts for many holiday seasons. At this point, your basic crochet tree is complete, ready for decoration.
Decorating your crochet Christmas tree is where creativity truly shines. Adding small details can transform your simple project into a festive centerpiece. Popular decorations include beads that resemble ornaments, tiny bows, or even crochet stars placed at the top.
If you prefer a sparkling look, consider sewing sequins or adding metallic threads during the last rows of your project. This gives a shimmering effect that catches the holiday lights beautifully.
Another option is to use colorful yarn scraps to make miniature garlands. Wrapping these around your crochet tree creates a joyful and playful look that’s perfect for family celebrations.
Some crafters enjoy making entire sets of crochet Christmas trees in different sizes. Displaying them together on a mantel, shelf, or table creates a cozy, winter-inspired scene.
For a rustic theme, you can use neutral yarns like beige, cream, or brown and pair your trees with natural elements such as pinecones or wooden ornaments. This simple yet elegant decoration fits well into minimalist holiday décor.
Lastly, don’t forget personalization. Adding initials, favorite colors, or special details makes your crochet Christmas tree unique to your family and traditions. This personal touch adds emotional value to your handmade decoration.
One helpful tip for success in this Crochet Christmas Tree – TUTORIAL is practicing tension control. Keeping your yarn tension consistent ensures that your stitches remain even, preventing gaps or uneven edges.
Blocking is another useful technique. Gently shaping your finished tree with a bit of steam or water helps it maintain a crisp form, especially if you are making larger decorations.
Experimenting with yarn types can completely change the look of your tree. Velvet or chenille yarn gives a plush appearance, while cotton yarn results in a more defined structure. Trying out different materials is a fun way to discover new styles.
You can also adapt this pattern to create other holiday items. For example, by making smaller versions, you can design ornaments, garlands, or even keychains. Larger versions can serve as festive centerpieces.
Adding lights is a modern twist many crafters love. Small LED fairy lights can be wrapped around your crochet Christmas tree for a magical glow. Just make sure the lights are safe for use with yarn materials.
Finally, remember that there is no wrong way to decorate or adapt your crochet tree. The beauty of handmade projects lies in their uniqueness and the joy they bring to both maker and receiver.
What yarn is best for a crochet Christmas tree?
Medium-weight yarn is commonly used, but you can choose bulky yarn for sturdiness or fine yarn for delicate designs.
How long does it take to crochet a Christmas tree?
Depending on the size, most projects take between 2 to 5 hours. Beginners may need more time to get comfortable with the stitches.
Can beginners follow this Crochet Christmas Tree – TUTORIAL?
Yes, this tutorial is beginner-friendly and uses basic stitches, making it perfect for those just starting their crochet journey.
Can I wash a crochet Christmas tree?
Yes, but it’s best to hand wash gently with mild soap and let it air dry to preserve its shape and decorations.
How do I make my crochet Christmas tree stand upright?
You can crochet a flat base, insert a wooden dowel, or use a small stand to keep your tree stable.
Can I sell crochet Christmas trees made from this tutorial?
Yes, handmade crochet trees are popular at craft fairs and online shops, especially during the holiday season.
In this Crochet Christmas Tree – TUTORIAL, you learned how to gather materials, create the tree structure, decorate it, and explore creative variations. From choosing the right yarn to adding personal details, every step allows you to create something truly meaningful for the holidays. Handmade crochet trees bring warmth, charm, and creativity into your festive décor.
PATTERN VIDEO:
I would love to hear your thoughts about this project. Please share your honest opinion and suggestions in the comments—your feedback helps improve future tutorials and inspires others in their crochet journey.

