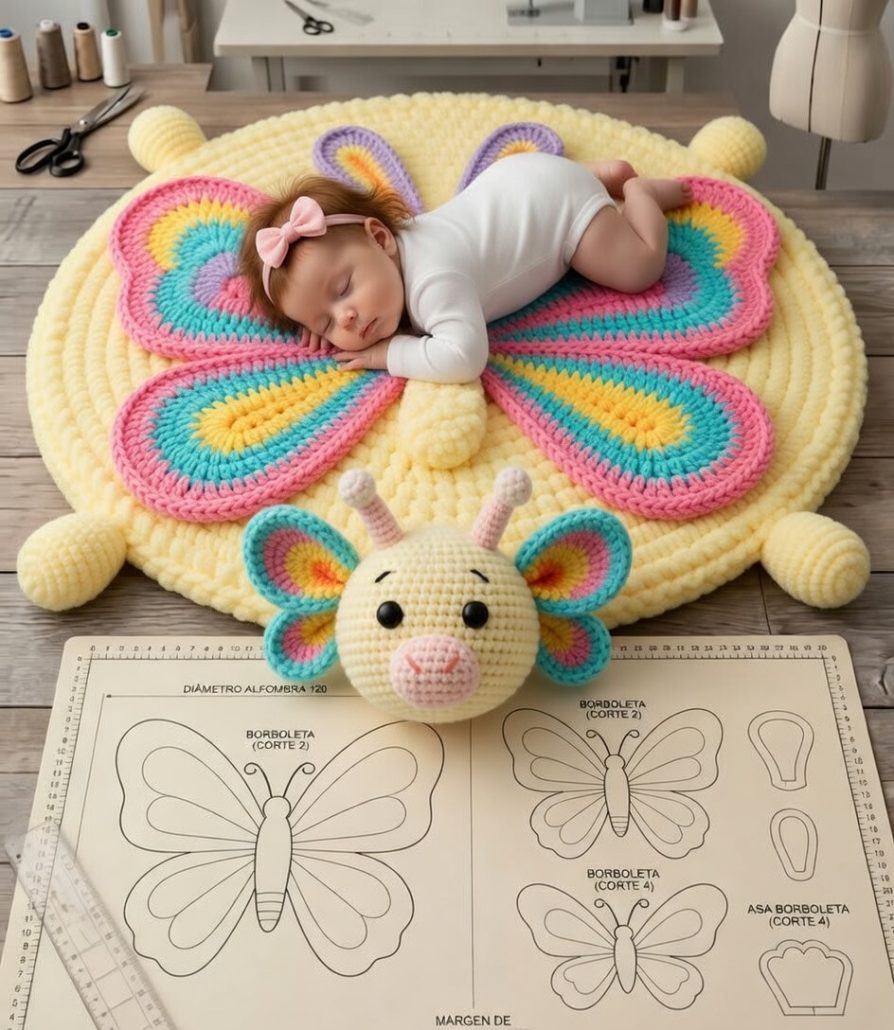
Crochet Butterfly Playmat & Toy Tutorial

The Crochet Butterfly Playmat & Toy Tutorial is a delightful crochet project designed especially for babies and young children. This charming creation combines a soft playmat shaped like a butterfly with an adorable toy element, making it perfect for playtime, tummy time, and nursery decoration.
With the Crochet Butterfly Playmat & Toy Tutorial, crocheters can explore creative shaping techniques, colorful stitch combinations, and soft textures. The butterfly design adds a playful and imaginative touch that children will love, while the comfortable mat provides a cozy space for relaxing and playing.
In this complete guide, you will learn how to create your own Crochet Butterfly Playmat & Toy Tutorial step by step. Whether you are a beginner or an experienced crocheter, this tutorial will help you craft a safe, soft, and beautifully finished handmade piece.
To begin your Crochet Butterfly Playmat & Toy Tutorial, selecting soft and baby-friendly yarn is essential. Cotton or hypoallergenic acrylic yarn works well because it is gentle and durable.
Bright and cheerful colors are perfect for creating the butterfly wings, making the playmat visually stimulating for children.
You will need a crochet hook that matches your chosen yarn weight to maintain consistent stitches.
Basic tools include scissors, a yarn needle, and stitch markers to help organize your work.
Stuffing material is needed for the toy elements and possibly the butterfly body.
Before starting your Crochet Butterfly Playmat & Toy Tutorial, review the pattern carefully and prepare all materials to ensure a smooth crafting process.
The Crochet Butterfly Playmat & Toy Tutorial usually begins with the base of the mat. Start with a magic ring or foundation chain and work outward in rounds.
Increase stitches gradually to create wide butterfly wings that form the main playmat surface.
Once the wings are complete, crochet the butterfly body separately using simple shaping techniques.
Create additional parts such as antennae and decorative wing patterns.
Next, crochet the toy element, which may be a small plush butterfly or attached sensory pieces.
Attach all components securely to complete your Crochet Butterfly Playmat & Toy Tutorial.
One of the most enjoyable aspects of the Crochet Butterfly Playmat & Toy Tutorial is customization. You can experiment with different color palettes to create vibrant butterfly wings.
Using textured stitches can add softness and visual interest to the playmat.
You can adjust the size by adding extra rounds to the wings.
Adding small sensory elements such as soft rings or textured pieces can enhance the toy aspect.
You might also personalize the design with embroidered details or appliqué shapes.
These creative options make the Crochet Butterfly Playmat & Toy Tutorial a unique and special project.
Finishing your Crochet Butterfly Playmat & Toy Tutorial properly ensures safety and durability. Begin by weaving in all loose ends securely.
Make sure all attached pieces are firmly stitched so they remain safe for babies and toddlers.
Light blocking can help shape the wings and improve the overall appearance of the mat.
This project is both decorative and functional, offering a comfortable play space for children.
The Crochet Butterfly Playmat & Toy Tutorial also makes a thoughtful handmade gift for baby showers or new parents.
Additionally, it’s a rewarding project that helps improve crochet skills such as shaping, assembly, and creative design.
Is this project suitable for beginners?
Yes, the Crochet Butterfly Playmat & Toy Tutorial can be adapted for beginners with basic crochet knowledge.
What yarn should I use?
Soft cotton or baby-friendly acrylic yarn is recommended.
How do I ensure the toy is safe for babies?
Attach all pieces securely and avoid small detachable parts.
Can I change the size of the playmat?
Yes, you can add more rounds to increase the size.
How long does it take to complete?
Depending on the size, it may take several hours to a few days.
Is this a good gift idea?
Absolutely. Handmade baby items are always meaningful and appreciated.
The Crochet Butterfly Playmat & Toy Tutorial is a beautiful and creative crochet project that combines comfort, imagination, and practicality. In this guide, you learned how to choose materials, crochet the playmat and toy elements, customize the design, and finish the project safely and professionally.
With its colorful butterfly design and soft texture, this handmade playmat creates a cozy and engaging space for babies to explore and play. It is both a functional item and a charming decorative piece for a nursery.
Now it’s your turn to try the Crochet Butterfly Playmat & Toy Tutorial. Share your honest feedback and leave your suggestions—your ideas can inspire even more creative crochet projects!