
Guardian Angel Wings Shawl - PATTERN


If you love small, quick, and joyful crochet projects, this Colorful Smiley Face Keychain will be your next favorite make.
Not only is it beginner-friendly, but it’s also a cheerful gift idea for friends, family, or even yourself. With its vibrant colors and cute expression, it’s the kind of project that will bring smiles wherever it goes.
In this tutorial, you’ll learn step-by-step how to crochet your own smiley face keychain, customize it with your favorite colors, and assemble it into a functional accessory that can brighten up your bag, keys, or even your car.
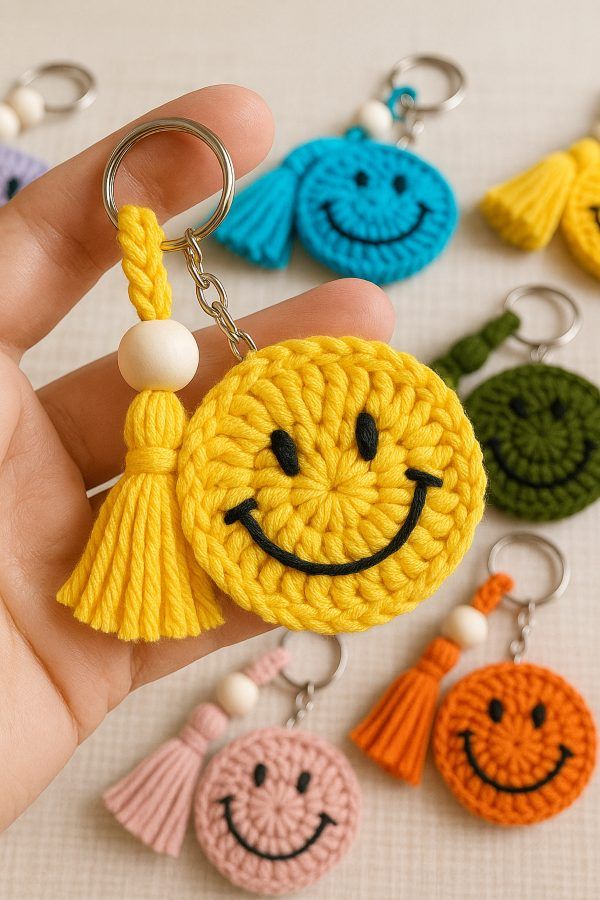
Crochet keychains are incredibly popular among crafters because they’re small, portable, and fun to make. The smiley face design has an extra layer of charm—it’s universally recognized as a symbol of happiness and positivity.
Here are a few reasons why this project stands out:
Whether you’re making it for personal use, to sell at craft fairs, or as part of a crochet gift bundle, this colorful smiley face keychain is guaranteed to be a hit.
Before we start crocheting, let’s prepare the necessary supplies. Having everything ready will make the process much smoother.
Yarn:
Tools & Accessories:
Pro Tip: If you plan on making many, you can buy a set of keychain hardware in bulk to save money.
Let’s break down the process into easy steps. If you know how to make a magic ring, single crochet (sc), slip stitch (sl st), and increase stitches, you’re already equipped to start.
Make two identical circles – one will be the front (with the face) and the other the back.
Before assembling, it’s easier to sew the eyes and mouth on the front circle while it’s still flat.
Customization Idea: Try winking eyes or heart-shaped eyes for a fun twist.
Congratulations—your Colorful Smiley Face Keychain is ready to spread joy!
One of the best parts about this project is how versatile it is. With just a few tweaks, you can create a whole set of adorable keychains.
Color Variations:
Facial Expressions:
Themed Designs:
Selling Tip: Bundle them in sets of 3–5 for craft fairs or online shops. Small items like this often sell quickly because they make great impulse purchases.
Crocheting a Colorful Smiley Face Keychain is not just a fun crafting project—it’s a creative way to bring positivity into everyday life. With minimal materials and just a short amount of time, you can create something cheerful, functional, and totally customizable.
Whether you’re a beginner looking for an easy project or an experienced crocheter seeking a quick make, this tutorial will guide you to a happy result. So, grab your yarn, hook, and imagination, and start crocheting smiles today!

