
Turtle Baby Blanket – Tutorial


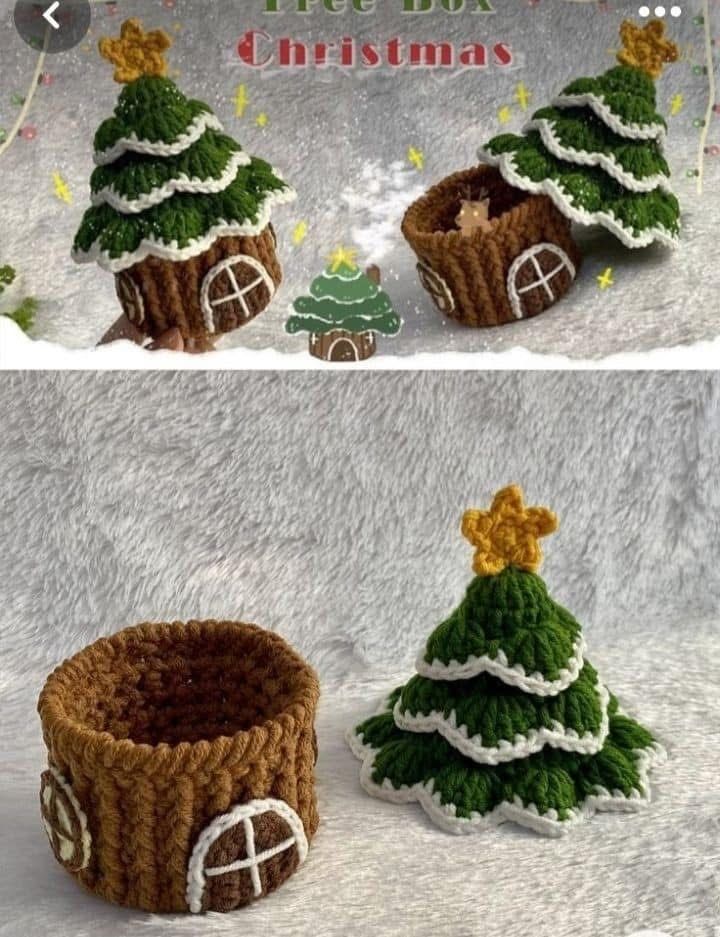
The Christmas Tree House is a magical crochet project that brings the holiday spirit to life through creativity and yarn. This cozy little creation combines the charm of a Christmas tree with the whimsy of a fairy-tale home, making it a perfect festive decoration for your living room, table centerpiece, or even as a gift for someone special. Creating the Christmas Tree House is both relaxing and joyful, allowing you to craft something unique while embracing the warmth and beauty of the Christmas season.
Whether you’re a beginner or an experienced crocheter, this tutorial will help you make a delightful miniature home that glows with charm. The Christmas Tree House can be customized with different yarn colors, textures, and decorations such as beads, buttons, or small LED lights to make it even more enchanting. Using basic crochet stitches and a little imagination, you can create an adorable piece that captures the heart of the holidays.
This project is a wonderful way to use up leftover yarn and express your creativity. Each little detail—from the roof to the tiny windows—adds personality to your Christmas Tree House. Follow this tutorial carefully, and soon you’ll have your own handmade festive masterpiece ready to display or share with loved ones.
Before starting your Christmas Tree House, gather all the essential materials. You’ll need yarn in green, brown, red, and white tones to represent the tree and house details. Acrylic or cotton yarns work best for this project because they hold their shape well. You’ll also need a crochet hook that matches your yarn weight, a yarn needle, scissors, stuffing, and optional decorative items such as beads, mini bells, or ribbons.
Make sure to use a stitch marker if you’re working in continuous rounds; this will help you keep track of each row. A hot glue gun can also come in handy for attaching embellishments after finishing the crochet work.
Before you begin, test your gauge to ensure your stitches are even and your Christmas Tree House maintains its structure once assembled. You can use a smaller hook for tighter stitches if needed.
Prepare your workspace with good lighting and all your materials within reach. Having everything ready will make your crochet time smoother and more enjoyable.
Choose yarn shades that complement your existing holiday decor—whether traditional reds and greens or a more modern palette of silver, gold, and white.
Once your materials are ready, it’s time to begin crocheting the magical base of your festive creation.
Start by creating the bottom of your Christmas Tree House, which will form the main structure of your project. Begin with a magic ring and crochet several single crochet stitches into it. Increase evenly in each round to create a circular base that will support the rest of the house.
After the base reaches your desired size, begin shaping the body by reducing the increases. Switch to green yarn as you start working upward to form the tree’s conical shape. The gradual decreases will give your tree its natural pointed structure.
Keep your tension consistent so the house maintains its shape and balance. If you want a sturdier piece, insert light stuffing as you work your way up.
To create texture, alternate between single crochet and half double crochet rows. This variation adds depth and visual interest to your Christmas Tree House.
Once you reach the top, close the opening tightly and weave in the ends. You can also add a tiny loop at the top if you plan to hang it as an ornament.
At this stage, your base tree should look like a small, cozy pine ready to be transformed into a house full of holiday cheer.
Now comes the fun part—adding personality to your Christmas Tree House with charming details. Start by crocheting small pieces like windows, doors, and a chimney. Use contrasting yarn colors to make these features stand out. For example, a red door and white window frames will create a classic Christmas look.
Attach the pieces carefully using a yarn needle or a small amount of hot glue. Make sure the placement feels balanced and natural, like a miniature storybook home nestled in a forest of holiday magic.
You can also add a base layer of snow using white yarn. Crochet a few fluffy chains or loops around the base of the tree to create the illusion of snowdrifts.
If you want your house to sparkle, sew on a few small beads or sequins that reflect light beautifully. These little touches bring your Christmas Tree House to life and make it shine under holiday lights.
Consider adding small decorations such as a crochet wreath above the door, or a miniature garland wrapping around the tree. Each addition makes your creation more special and full of charm.
The goal is to make your Christmas Tree House reflect the joy of the season—a place where creativity and Christmas spirit meet.
Once your Christmas Tree House is fully assembled, take time to refine the final details. Use a needle to hide any loose ends and ensure all pieces are securely attached. A light steam or gentle blocking can help shape the tree perfectly.
If you added stuffing, gently mold the structure to make it even and balanced. You can also place a small light inside to make it glow like a cozy holiday lantern.
This piece can be displayed in many ways—on a mantel, as a table centerpiece, or even hung on your Christmas tree. It’s also a wonderful handmade gift idea for friends or family who appreciate unique decorations.
Pair it with other crochet holiday pieces such as snowflakes, reindeer, or stars for a complete festive set. The Christmas Tree House pairs beautifully with rustic or vintage-style decor.
If you’re making multiple houses, experiment with different color schemes. A village of tiny tree houses in red, green, gold, and white will look stunning together.
Finishing your Christmas Tree House brings immense satisfaction, as every stitch reflects your holiday joy and creativity.
1. Is the Christmas Tree House pattern beginner-friendly?
Yes! The pattern uses basic crochet stitches like single crochet, double crochet, and slip stitch, making it suitable for beginners.
2. What type of yarn should I use?
Acrylic or cotton yarns are ideal since they hold shape well and are easy to work with for small details.
3. Can I make the Christmas Tree House bigger?
Absolutely! You can adjust the size by using thicker yarn and a larger hook or by adding more rounds to the base and body.
4. How do I add lights to the house?
Use a small battery-operated LED light placed inside. Avoid using electric lights to prevent heat damage to your yarn.
5. Can I wash my crochet Christmas Tree House?
Yes, but hand washing is recommended. Avoid wringing and let it air dry to maintain its shape.
6. What other decorations can I add?
You can add buttons, tiny bows, sequins, or even embroidered details like stars and snowflakes.
The Christmas Tree House is a heartwarming crochet project that celebrates the magic of the holidays. Through simple stitches and creative touches, you can transform yarn into a festive masterpiece full of personality and charm. This tutorial guides you through every step, ensuring that even beginners can create something truly special.
PATTERN VIDEO:
Whether displayed at home or given as a gift, your handmade Christmas Tree House will bring smiles and festive warmth to everyone who sees it. Let your creativity shine, and don’t forget to share your thoughts and suggestions below—your feedback inspires others to keep creating and spreading holiday cheer!