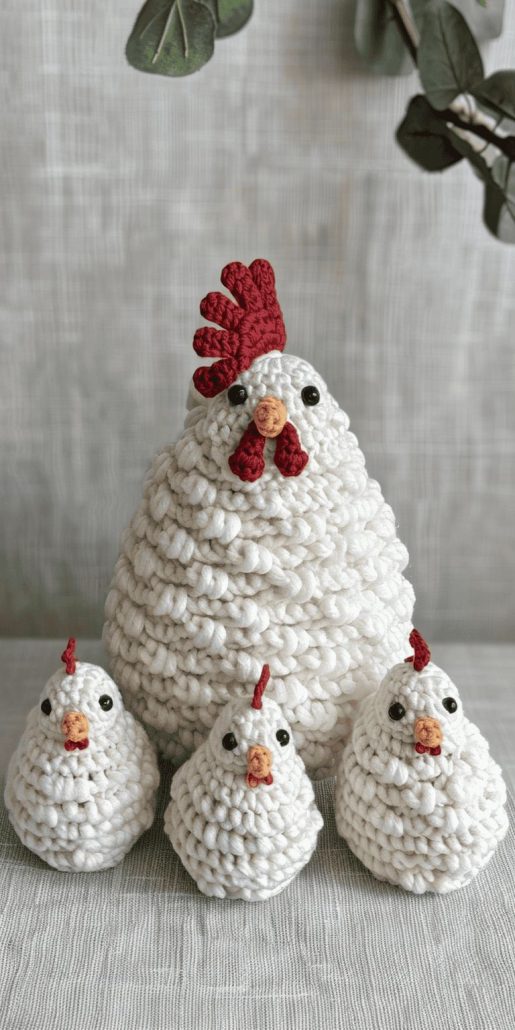
Chicken Crochet - Pattern

Chicken Crochet Pattern is a charming and versatile project that brings personality and warmth to your handmade creations. Whether you are crafting for farmhouse décor, seasonal gifts, children’s toys, or market-ready items, this delightful crochet design offers endless possibilities. From realistic barnyard-inspired hens to cute amigurumi chicks, the Chicken Crochet Pattern can be adapted to suit every style and skill level.
In this complete Chicken Crochet Pattern guide, you will learn how to construct the basic shape, choose the right materials, assemble the details, and customize your crochet chicken to match your creative vision. This project is beginner-friendly while still offering room for advanced techniques and personalization.
If you’ve been searching for a detailed and easy-to-follow Chicken Crochet Pattern, this tutorial will walk you through the essential steps, recommended tools, and expert tips to ensure professional results. Let’s explore how to transform simple yarn and stitches into an adorable crochet chicken.
The foundation of any successful Chicken Crochet Pattern starts with understanding basic amigurumi construction. Most crochet chickens are worked in continuous rounds to create a seamless, rounded body.
The body typically begins with a magic ring. From there, you increase evenly to form a sphere or oval shape, depending on the style of chicken you want to create.
After reaching the widest part of the body, you will crochet several rounds without increasing. This forms the height and structure of the chicken.
Gradual decreases are used to close the shape. If making a stuffed chicken, polyester fiberfill is inserted before fully closing the opening.
Key details such as wings, beak, comb, and tail feathers are usually crocheted separately and sewn onto the body. These small elements give personality and dimension to your finished piece.
Maintaining consistent tension is crucial. Even stitches help the stuffing remain invisible and give the chicken a polished, professional look.
Choosing the right materials plays a major role in the final outcome of your Chicken Crochet Pattern. Cotton yarn is highly recommended for its durability and stitch definition, especially for decorative items.
Acrylic yarn is another excellent option, particularly for toys or larger decorative chickens. It is soft, affordable, and widely available in many colors.
Most patterns call for a medium-weight (worsted weight) yarn, which is easy to handle and ideal for beginners. However, lighter yarns can be used for smaller amigurumi chickens.
Selecting the correct crochet hook size is essential. Typically, you will use a hook slightly smaller than recommended on the yarn label to create tight stitches.
Other necessary tools include stitch markers, a yarn needle for assembly, scissors, stuffing material, and safety eyes if making toy versions.
If crafting for small children, embroidered eyes are safer than plastic safety eyes. Always prioritize safety when making toys.
To begin the Chicken Crochet Pattern, start with a magic ring and crochet the required number of single crochet stitches into the ring. Pull tight to close the center.
Increase evenly in each round until the body reaches the desired width. Following a consistent increase pattern helps maintain a smooth shape.
Continue crocheting evenly without increases to build the height of the chicken’s body. This section determines whether your chicken appears tall and narrow or short and round.
Begin decreasing gradually to shape the top of the chicken. Before fully closing the opening, insert stuffing to achieve a firm but soft texture.
Next, crochet the wings. These are often made using simple oval shapes or small semicircles. Attach them securely to each side of the body.
Finally, crochet and attach the beak, comb, and tail feathers. These small details bring the Chicken Crochet Pattern to life and give it character.
One of the best features of the Chicken Crochet Pattern is its adaptability. You can create realistic farm-style hens using neutral tones like white, brown, and beige.
For a playful twist, try pastel shades or bright, bold colors. This makes the chicken perfect for Easter décor or children’s room decorations.
Adding textured stitches such as bobble stitches can mimic feathers and add depth to your design. This works especially well for decorative chickens.
You can also transform the basic chicken into functional items like crochet egg cozies, kitchen décor, or even plush toys.
Experiment with different yarn types to achieve varied textures. Chunky yarn creates larger statement pieces, while fine yarn produces delicate miniatures.
Finishing touches such as embroidered facial expressions or tiny crochet flowers can make each chicken unique and personalized.
Is the Chicken Crochet Pattern suitable for beginners?
Yes, most basic chicken crochet designs are beginner-friendly, especially if you are comfortable working in the round.
How long does it take to complete a crochet chicken?
A small amigurumi chicken can take 2–4 hours, depending on skill level and detail.
What type of yarn is best for a Chicken Crochet Pattern?
Cotton yarn offers excellent structure, while acrylic yarn provides softness and versatility.
How do I prevent gaps in my stitches?
Use a smaller hook than recommended and maintain consistent tension to keep stitches tight.
Can I sell items made from this pattern?
Yes, handmade chickens created from your own work are typically allowed for sale. Always respect copyright if using a specific written pattern.
How do I wash a crochet chicken?
Hand washing with mild detergent and air drying is usually recommended to maintain shape and quality.
Can I make a flat chicken instead of a stuffed one?
Absolutely. You can adapt the pattern to create flat appliqués for blankets or wall hangings.
What size can I make my crochet chicken?
Size depends on yarn weight and hook size. Thicker yarn produces larger chickens, while fine yarn results in smaller designs.
In this comprehensive Chicken Crochet Pattern guide, you learned how to build a crochet chicken from start to finish. From understanding the basic structure and selecting materials to shaping, assembling, and customizing your creation, each step contributes to a charming and professional result.
This versatile project can be adapted for décor, gifts, toys, or seasonal themes. By mastering the foundational techniques outlined here, you can confidently create unique crochet chickens that reflect your personal style.
Now we’d love to hear from you. Have you tried making a crochet chicken before? Do you prefer realistic designs or colorful, playful versions? Share your honest opinion and suggestions below — your feedback helps inspire future crochet tutorials and creative ideas!