
Turtle Baby Blanket – Tutorial


The Butterfly Fingerless Gloves are a charming and practical crochet project that brings comfort, color, and creativity together in a single pattern. Right from the first stitch, the Butterfly Fingerless Gloves design showcases how expressive crochet can be while still staying simple enough for beginners and relaxing for more advanced makers. With delicate wing-like textures and a cozy fit, this pattern is both functional and visually delightful. Many crafters love that these gloves look detailed but can actually be completed in a surprisingly short amount of time.
Working with the Butterfly Fingerless Gloves pattern is also a great opportunity to explore basic crochet techniques in a project that feels artistic and rewarding. Whether crocheting for yourself or making a thoughtful handmade gift, this pattern fits every occasion. Because it works well with different yarn weights and colors, crocheters often return to this tutorial to customize variations for each season.
In today’s article, you will learn how to create this beautiful accessory using clear steps and helpful guidance, all while following a pattern optimized for comfort, style, and durability. Let’s explore the stitches, shaping, and creative tips that turn this simple idea into a pair of elegant Butterfly Fingerless Gloves you’ll be proud to wear.
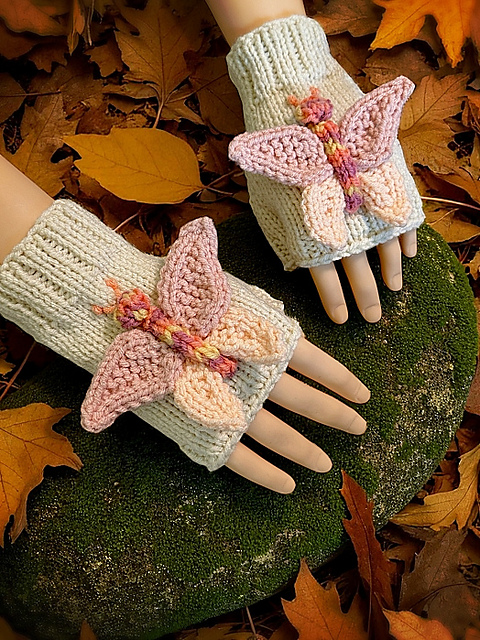
The Butterfly Fingerless Gloves pattern is built using common crochet stitches that form textured wings on the back of the hand. This decorative element is the highlight of the design, giving your gloves a unique personality. Even with its intricate appearance, the pattern remains approachable for anyone comfortable with basic crochet skills.
To begin the project, you will usually work in flat or round rows depending on the specific style you prefer. Both techniques allow the fabric to sit comfortably around the wrist and hand while keeping the thumb area accessible. The thumb opening is one of the key features that makes fingerless gloves ideal for using phones, writing, or crafting while staying warm.
Color choices greatly influence the butterfly effect. Solid colors emphasize the stitch texture, while variegated yarns create a soft gradient that resembles real butterfly wings. Many makers also experiment with adding a second color just for the wing section to enhance the design.
Another advantage of this pattern is that it is easily adjustable. Whether you want a snug fit or a relaxed one, a few extra stitches can change the sizing without altering the rest of the project. This flexibility makes the pattern suitable for adults, teens, and even children.
The pattern also supports different yarn weights, though worsted and DK are the most recommended. These yarns offer structure without becoming too stiff, ensuring that the wings lie flat while the glove stretches gently around the hand. Choosing the right yarn affects not only the look but also the overall comfort and durability.
Finally, this design is highly portable. Because each glove works up quickly and uses minimal yarn, it is the perfect project to carry in your bag and finish whenever you have a spare moment. Simple, beautiful, and satisfying—everything a crochet accessory should be.
To start your Butterfly Fingerless Gloves, gather soft yarn that provides warmth without bulk. Acrylic, cotton blends, and lightweight wool are great options depending on the climate and purpose of the gloves. For most crafters, a hook size between 4 mm and 5 mm works well with the recommended yarns.
The stitches required for this project include chain stitch, single crochet, double crochet, and occasionally puff or shell stitches for the butterfly motif. These stitches combine to create layered textures that resemble wings. If you have never used these decorative stitches before, this pattern offers an excellent opportunity to practice them.
Stitch markers can help you maintain symmetry between both gloves. While optional, they are especially useful when creating the thumb opening to ensure a consistent look and fit. Yarn needles are also necessary for weaving in the ends neatly.
For beginners, working with a light-colored yarn can improve visibility and help with identifying stitches while shaping the butterfly section. Darker yarns look beautiful in the final piece but may make the learning process harder.
Feel free to personalize the materials. For example, metallic or sparkly yarn can give your gloves a festive appearance. Softer yarns create a cozy winter feel, while cotton blends are perfect for mild weather.
Choosing quality materials increases the lifespan of your finished piece. Since fingerless gloves are often used daily, selecting durable yarn ensures your project maintains its shape and beauty for a long time.
The first step in creating your Butterfly Fingerless Gloves is measuring your hand. A correct wrist circumference helps determine the number of foundation chains needed. Once you establish your starting width, you’ll work upward toward the knuckles.
The butterfly design is usually placed on the back of the hand. To form it, you will combine special stitches positioned in a symmetrical shape. These stitches give the appearance of wings and create the main decorative element of the gloves. It’s helpful to follow a diagram or chart if you are visual.
You will then shape the thumb opening by skipping stitches or creating a separate section that leaves room for movement. This part can be adjusted based on how loose or tight you want the gloves to feel. Some crafters add a small border around the opening for reinforcement.
Finishing the top of the glove involves simple rows of single or double crochet, depending on your preferred style. Some people add a ribbed edge for extra stretch. You may also choose to add a scalloped or picot edging for a delicate finish.
After completing the main structure, take time to weave in your ends carefully. Clean finishing makes the gloves look polished and professional. For beginners, this step is as important as the stitching itself.
Once both gloves are complete, try them on and adjust if needed. You can add decorative accents like small beads, embroidery, or color stripes. The pattern allows creativity, making each pair unique even when following the same instructions.
One of the most enjoyable aspects of the Butterfly Fingerless Gloves pattern is how easily it adapts to personal style. If you prefer a dramatic look, choose bright contrasting colors for the wings. Subtle tones work beautifully for a more elegant and understated design.
You can adjust the length of the gloves by adding or reducing rows. Longer gloves provide extra warmth and a stylish sleeve effect, while shorter ones feel lightweight and casual. Small adjustments help you match the gloves to seasonal needs.
Texture changes also offer fun variations. Switching between puffs, shells, or cluster stitches adds dimension to the butterfly design. Experimenting with texture helps you learn how different stitch combinations affect the final appearance.
For a luxurious feel, try using a soft alpaca blend or premium wool. Although slightly more delicate, these yarns give the gloves a high-end look. If durability is your priority, acrylic or cotton blends remain excellent choices.
Color transitions using gradient or self-striping yarns can create organic butterfly wing patterns without needing multiple color changes. This is a great shortcut for beginners who want impressive results with minimal effort.
Finally, if gifting the gloves, consider pairing them with handmade tags, ribbons, or a small crochet flower accessory. Presenting the gloves beautifully makes the entire project feel even more thoughtful and personal.
1. Are Butterfly Fingerless Gloves suitable for beginners?
Yes, most versions of the pattern are beginner-friendly because they rely on basic stitches. The butterfly detail may require practice, but it is manageable with a clear tutorial.
2. Can I make these gloves in different sizes?
Absolutely. Adjusting the starting chain or adding rows will help you create small, medium, or large sizes easily.
3. What yarn weight works best for this pattern?
DK or worsted weight yarn is most recommended. These weights balance warmth, structure, and stitch definition.
4. How long does it take to complete one pair?
Depending on your skill level, one pair can take 2–4 hours. Experienced crocheters often finish faster.
5. Do I need to make both gloves separately?
Yes, each glove is made individually, but the pattern is simple to repeat for the second glove.
6. Can I wash crochet fingerless gloves?
Yes, but always follow the yarn label instructions. Handwashing is recommended for delicate fibers.
The Butterfly Fingerless Gloves pattern is a delightful project that blends style, comfort, and creativity into one beautiful accessory. Throughout this article, you learned how the design works, what materials are most suitable, and how to personalize your gloves for any season or occasion. With simple stitches and thoughtful shaping, this pattern becomes enjoyable for both beginners and experienced crocheters.
I hope this guide has inspired you to try the pattern and explore your own color choices and textures. If you decide to make your own Butterfly Fingerless Gloves, I would love to hear your honest opinion and suggestions. Your feedback helps make each tutorial even better for future crafters.
