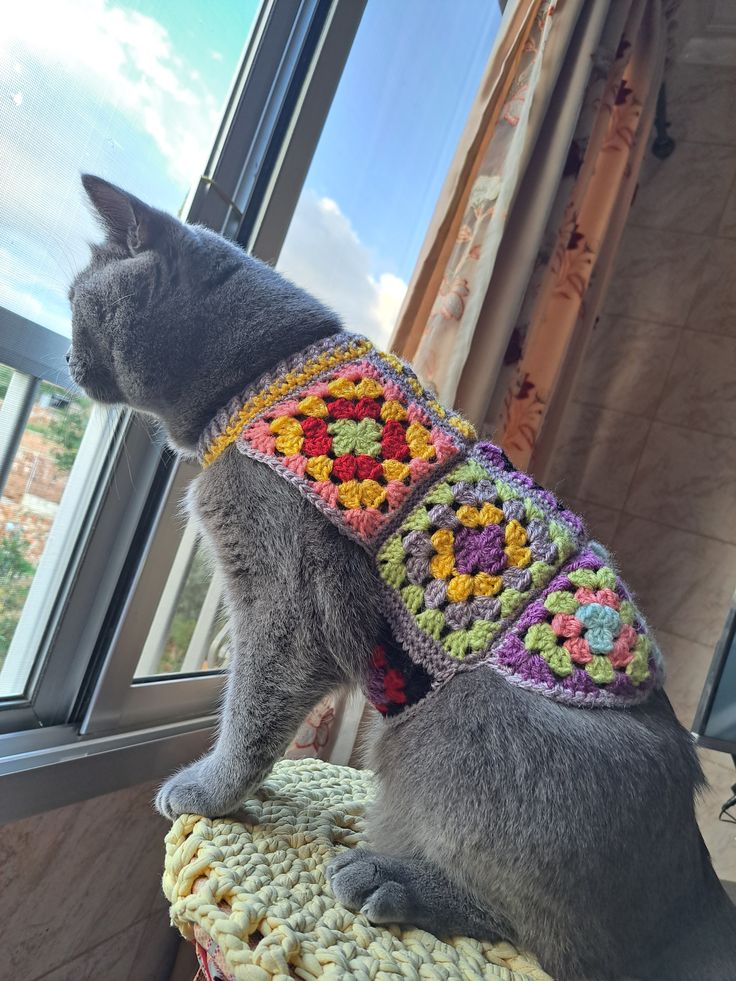
Cat Sweater - PATTERN


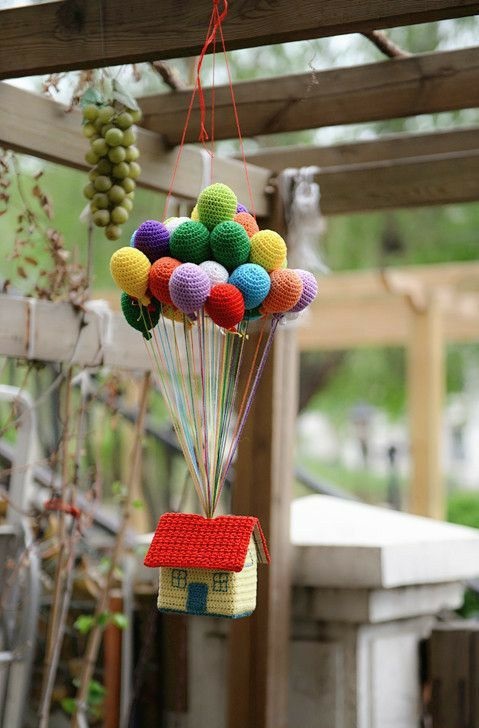
If you love creative and sustainable crochet projects, Amigurumi Rumah Balon dari Benang Sisa (Balloon House Amigurumi from Leftover Yarn) is the perfect idea for you. This project combines imagination, color, and eco-friendliness, allowing you to turn yarn scraps into something truly magical. Instead of letting leftover yarn go to waste, you can create an adorable little house lifted by colorful balloons—just like in a fairytale.
The best part about making Amigurumi Rumah Balon dari Benang Sisa is that it’s beginner-friendly, fun, and full of creative freedom. You don’t need to buy new materials; just gather your yarn leftovers, a crochet hook, and some stuffing. This project is an excellent opportunity to practice basic amigurumi techniques while making something heartwarming and unique.
In this tutorial, we’ll explore how to make the balloon house using leftover yarn, step-by-step. You’ll learn about choosing the right yarn colors, shaping the structure, adding charming details, and assembling everything into one cute display piece. Whether you’re new to crochet or an experienced crafter looking for a creative challenge, this guide will help you master Amigurumi Rumah Balon dari Benang Sisa with joy and confidence.
To start your Amigurumi Rumah Balon dari Benang Sisa, you’ll need basic amigurumi supplies: various yarn scraps, a suitable crochet hook, fiberfill stuffing, scissors, and a tapestry needle. Because this project encourages recycling, don’t worry if your yarns are of different thicknesses or textures—these variations add character and charm to the final piece.
Choosing colors is one of the most enjoyable parts of this project. Use bright, cheerful shades for the balloons to create a joyful, whimsical look. For the house, you can use neutral tones or soft pastels that complement the balloons above. Remember, this is a creative project, so feel free to mix and match as you like.
Before starting, check your leftover yarn lengths. Separate them by color or texture so you can easily decide which part of the project they’ll suit best. Smaller yarn scraps can be used for tiny details like doors, windows, or balloon strings.
You can also experiment with different yarn types—cotton, acrylic, or even wool. Mixing them will give the finished Amigurumi Rumah Balon dari Benang Sisa a textured and playful feel.
Once your materials are ready, make sure you have enough stuffing to give the balloon and house their adorable 3D shape. The amount needed will depend on the size you choose.
Lastly, prepare your workspace. Having all materials organized and within reach makes the process smoother and more enjoyable, helping you stay creative without interruptions.
The balloons are the highlight of the Amigurumi Rumah Balon dari Benang Sisa design. They represent lightness, fun, and a sense of adventure. Begin by crocheting small round shapes using bright yarn scraps. Each balloon can be a different color, giving your piece a vibrant and cheerful appearance.
Start with a magic ring and work single crochets in the round. Increase evenly until you reach the desired balloon size. Once the balloon reaches its widest point, decrease gradually to form a closed, oval shape. Leave a small tail of yarn to attach it later to the strings.
Repeat this process using different colors. You can make as many balloons as you like depending on how big or full you want your amigurumi piece to look. For variety, change the yarn thickness or hook size slightly to create balloons of varying sizes.
After making all the balloons, fill them with a bit of stuffing to maintain their shape. Avoid overfilling, as it can stretch the yarn and distort the round shape. Once filled, close them securely and hide the yarn ends.
For the strings, use thin yarn or embroidery thread. Attach one end to the bottom of each balloon and leave the other end free for connecting them to the house later. You can twist or braid several strands together for a sturdier and more decorative look.
When you finish, you’ll have a bunch of colorful little balloons ready to bring your Amigurumi Rumah Balon dari Benang Sisa to life. They’re lightweight, charming, and full of personality.
Now that your balloons are ready, it’s time to crochet the house portion of your Amigurumi Rumah Balon dari Benang Sisa. The house is typically small and cozy, acting as the perfect base for the balloon cluster above it.
Start by making a cylindrical or rectangular base, depending on your design preference. Use leftover yarn in complementary shades—this is your chance to combine soft or neutral tones with a few bright accents.
Work in continuous rounds if you want a smooth surface or join each round if you prefer a more structured look. Once the walls of the house reach your desired height, you can add features such as a roof, door, and windows using small bits of colorful yarn.
The roof can be crocheted in a cone or slanted shape, depending on the style you prefer. For extra texture, try using a different stitch pattern like half-double crochets or shell stitches. These little details give your Amigurumi Rumah Balon dari Benang Sisa a handcrafted, storybook-like charm.
After finishing the main structure, stuff the house lightly so it holds its shape. Be careful not to overfill—it should stay firm but not stiff. Sew the roof securely to the top and weave in all ends neatly.
Once your house is complete, you’ll see how your leftover yarns have transformed into something magical—a whimsical base ready to float away beneath your colorful balloon cluster.
This step brings everything together. Begin by gathering your completed balloons and your little house. Arrange the balloons above the house to see how they look together before attaching them permanently. You can decide whether to have them in a tight cluster or spread out for a playful effect.
Use the yarn strings attached to each balloon to connect them to the top of the house. Thread the ends through the roof, spacing them evenly, and secure them tightly from the inside. This gives the illusion that the house is being lifted by the balloons.
If you want extra stability, you can add a wire inside the balloon strings to keep them upright. However, this step is optional—many crafters prefer the soft, natural drape of yarn.
Take a moment to adjust the positioning and make sure everything looks balanced. The charm of Amigurumi Rumah Balon dari Benang Sisa lies in its whimsical, imperfect beauty, so don’t worry if it’s not completely symmetrical.
Once assembled, you can decorate your piece further by adding tiny embellishments—flowers, grass, or clouds made of yarn. These finishing touches make your amigurumi even more delightful.
Congratulations! You’ve now created your very own Amigurumi Rumah Balon dari Benang Sisa, a heartwarming and eco-friendly project that turns yarn leftovers into a piece of art filled with joy and imagination.
1. Can I use different yarn thicknesses for this project?
Yes! Mixing yarn thicknesses adds texture and visual interest. Just be mindful of keeping the overall balance between the balloons and the house.
2. How much leftover yarn do I need?
You can make this project with small scraps. Around 15–20 grams of yarn in total is often enough for a miniature version.
3. What’s the best stuffing to use?
Polyester fiberfill works great, but you can also use fabric scraps or old yarn bits for an eco-friendly option.
4. Can beginners make this amigurumi?
Absolutely. This project is suitable for beginners because it uses basic stitches and small shapes that are easy to manage.
5. How can I make it stand upright?
You can attach a small flat base or add a tiny bit of weight (like a pebble or bean) inside the house to help it stay balanced.
6. Can I sell my finished Amigurumi Rumah Balon dari Benang Sisa?
Yes, handmade amigurumi pieces are always loved by buyers. Just make sure your work is neat and well-finished before listing it for sale.
Making Amigurumi Rumah Balon dari Benang Sisa is a wonderful way to combine creativity, sustainability, and crochet skills. It shows how leftover yarn can be transformed into something full of life and imagination. From crafting colorful balloons to assembling the cozy little house, every step brings joy and fulfillment.
PATTERN VIDEO:
We hope this guide inspires you to try your own version and embrace the beauty of crafting with what you already have. Leave a comment below sharing your thoughts and suggestions—what colors did you choose for your balloons? Your feedback helps us continue creating inspiring crochet tutorials for everyone who loves handmade art.


