
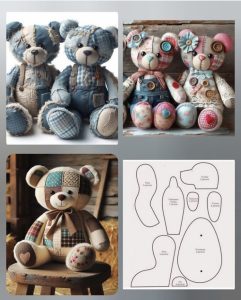
Turtle Baby Blanket – Tutorial


If you love mythical creatures and charming handmade crafts, this Amigurumi Dragon – TUTORIAL is just the magical crochet project for you. Whether you’re a seasoned crocheter or just getting started with amigurumi, creating your own tiny dragon is a fun and rewarding experience. With its wings, tail, and cute snout, this project brings fantasy to life—one stitch at a time.
This tutorial is designed to guide you step by step through the process of making a soft, squishy, and absolutely adorable amigurumi dragon. With just yarn, a hook, and a little patience, you’ll soon have your very own fire-breathing friend (minus the flames).
Let’s take a dive into the world of whimsical crochet and bring your very own amigurumi dragon to life.
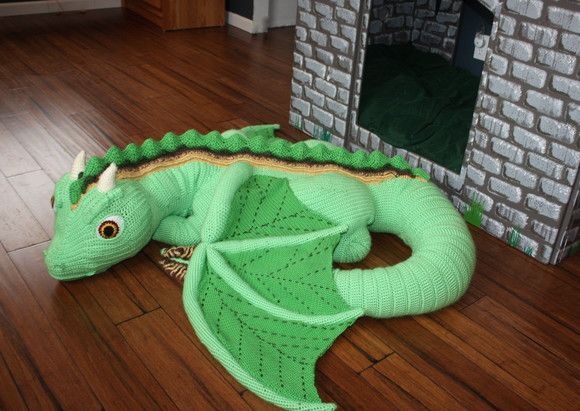
There’s something uniquely delightful about crocheting your own amigurumi dragon. This creature, beloved in myths and legends, becomes even more lovable when made with yarn and imagination.
First, dragons are timeless. Whether you’re crafting for a child, a fantasy lover, or yourself, dragons never go out of style.
Second, it’s a great skill-builder. This Amigurumi Dragon – TUTORIAL teaches you how to shape body parts, sew them together, and add detail—all essential techniques for amigurumi.
Third, it’s personal. You can choose your dragon’s colors, size, facial expression, and even pose—making each one unique.
Fourth, it’s a perfect handmade gift. These dragons are ideal for birthdays, baby showers, and fans of fantasy movies, books, or games.
Fifth, it’s a stash buster. Small yarn scraps can be used for wings, spikes, or belly accents.
Sixth, it’s pure joy. From the moment you make the first magic ring to the final stitch, you’re crafting a little creature full of personality and charm.
Once you complete your first amigurumi dragon, you may find yourself starting a whole dragon collection!
Before you begin the Amigurumi Dragon – TUTORIAL, make sure you have the right supplies and understand the key stitches used throughout the project.
Yarn:
Hook Size:
Other Supplies:
Essential Crochet Stitches:
Most of the dragon is worked in continuous rounds. Using a stitch marker to mark the beginning of each round will help you keep track.
Let’s gather our materials and start building our dragon from the tip of its tail to the tips of its wings.
This Amigurumi Dragon – TUTORIAL is broken down into body parts that you’ll assemble at the end.
Step 1: Dragon Body
Step 2: Head and Snout
Step 3: Legs and Arms
Step 4: Tail and Spikes
Step 5: Wings and Ears
Assembly Tips:
Once everything is attached and secure, give your amigurumi dragon a gentle squeeze—you’ve brought it to life!
What makes this Amigurumi Dragon – TUTORIAL truly special is how versatile and customizable it is. Here are a few creative ideas:
Color Themes
Make a fiery red dragon, a forest green guardian, or an icy blue winter dragon. You can even use variegated yarn for a multicolor effect.
Different Expressions
Add eyebrows or a small smile to change the dragon’s personality—cute, fierce, sleepy, or mischievous!
Accessories
Give your dragon a scarf, tiny wizard hat, or a treasure hoard accessory to hold in its arms.
Add Texture
Use bobble stitches for scales, or surface slip stitching to create a spine or belly ridge.
Make a Baby Dragon
Reduce the stitch counts and hook size to make a mini version or a baby companion dragon.
Holiday Themes
Make a red and green Christmas dragon, or a pink and purple Valentine’s dragon with a heart between its claws.
Every dragon you make will be a unique creation with its own story—and that’s the magic of amigurumi!
Is this a good project for beginners?
It’s beginner-friendly with a little patience! You’ll practice basic stitches and shaping, which are essential to amigurumi.
Can I make this with cotton yarn?
Yes. Cotton yarn creates a firmer, more defined shape, while acrylic is softer and stretchier—either works!
How do I avoid gaps between stitches?
Use a smaller hook size than usual to keep the stitches tight. Make sure to stuff evenly but not too firmly.
Are safety eyes safe for children?
Not recommended for children under 3. Use embroidery for eyes if gifting to a baby or toddler.
How long does it take to complete the dragon?
Depending on your skill level, around 5 to 8 hours spread over a couple of days.
Can I sell dragons made from this pattern?
Yes, if the pattern permits. Always credit the original designer if applicable, and never sell or distribute the written pattern as your own.
With this Amigurumi Dragon – TUTORIAL, you’ve learned how to create your very own magical creature from yarn. From shaping the body to attaching wings and adding personality, every step in this journey adds to the dragon’s charm and uniqueness.
This project is perfect for gifting, collecting, or just enjoying the art of creative crochet. Each dragon you make becomes a one-of-a-kind treasure, filled with warmth, joy, and a little bit of magic.
Have you tried making your own amigurumi dragon? We’d love to hear about it! Share your colors, stories, or questions in the comments—and don’t forget to leave your honest feedback and suggestions so we can continue sharing more magical tutorials like this. 🐉🧶✨

