When the warm weather arrives, it’s the perfect time to create a summer blanket that is both lightweight and cozy. A summer blanket is ideal for those days when you need something light to drape over your shoulders during cool evenings or to add a decorative touch to your home.
The key to this blanket is using soft, breathable yarn that provides just the right amount of warmth without being too heavy.
In this article, we will walk you through a beautiful and easy-to-follow crochet pattern for a summer blanket. You’ll learn everything from the materials you’ll need to the step-by-step instructions to help you create your own light and breezy summer throw. Whether you’re an experienced crocheter or just getting started, this pattern will guide you to a relaxing and enjoyable crochet project.
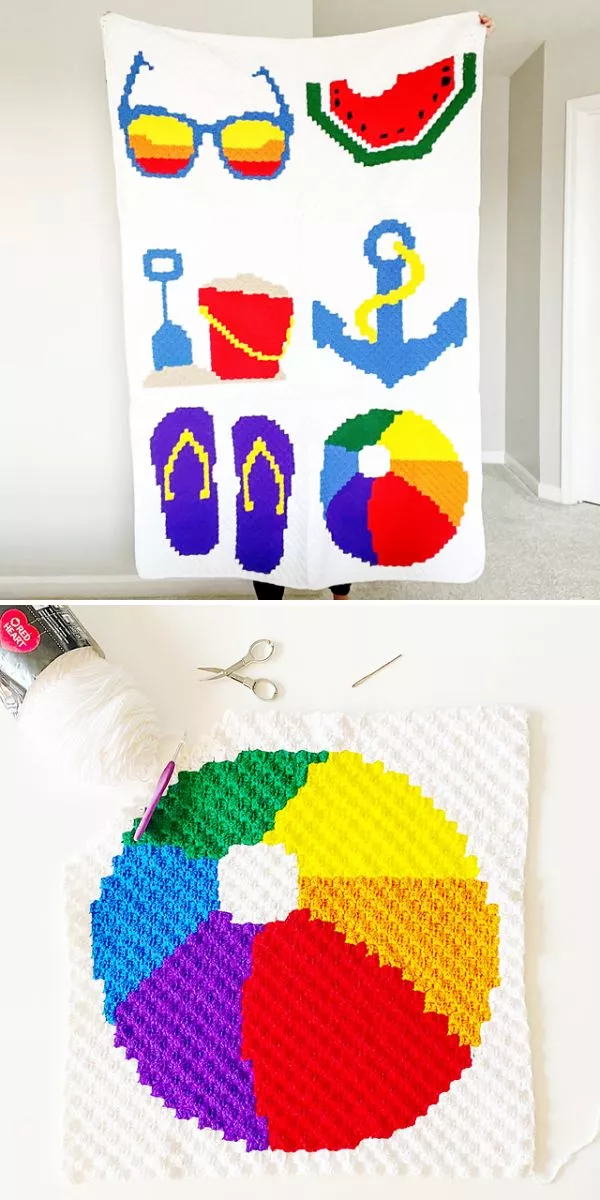
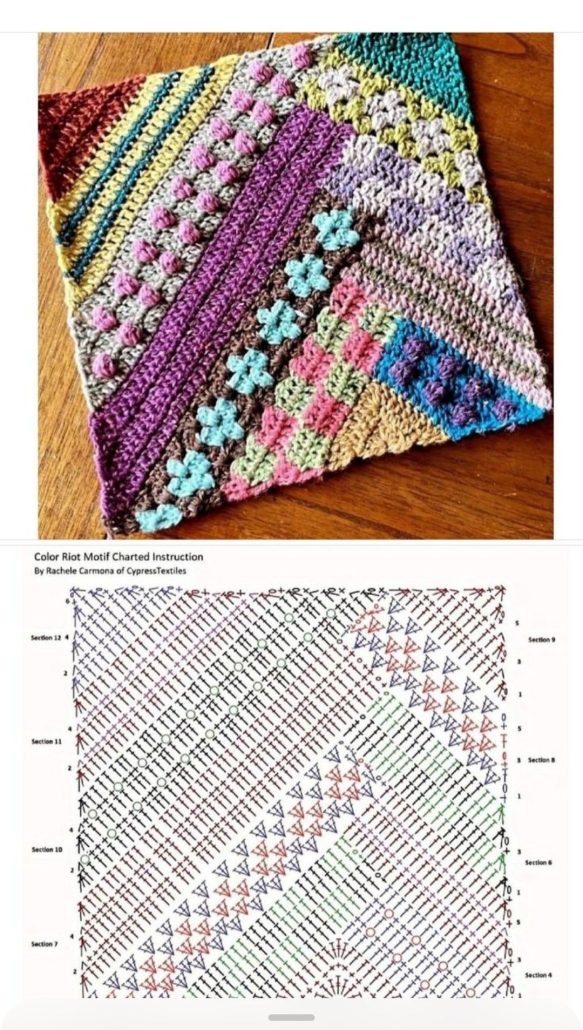
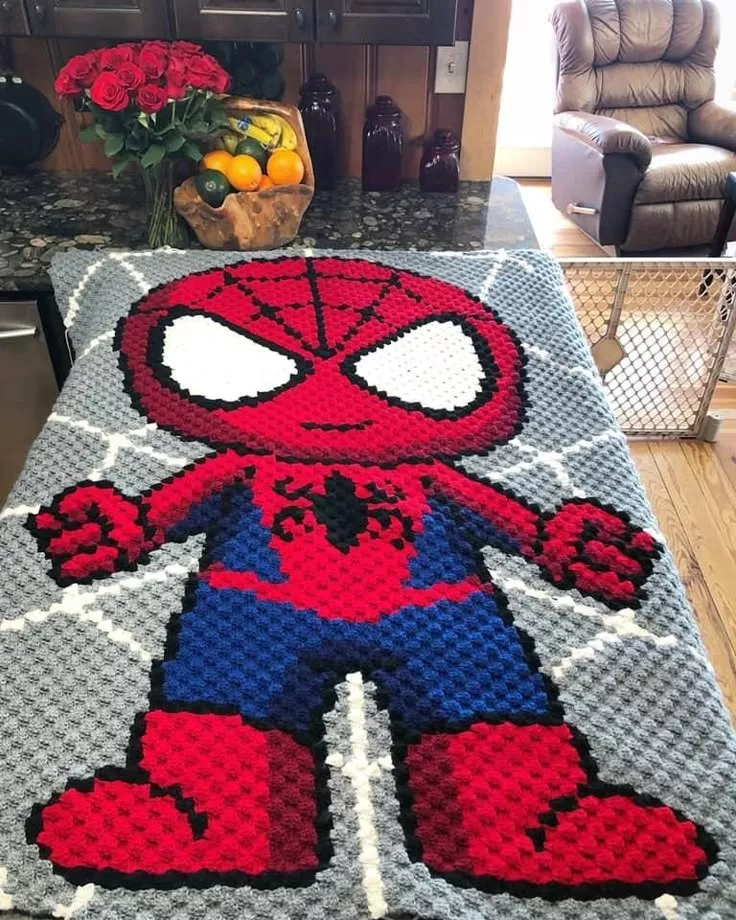
Image From Pinterest
1. Materials Needed for the Summer Blanket
Before starting your summer blanket project, it’s important to gather the right materials to ensure a smooth crochet experience.
DISCOVER MORE FREE PATTERNS HERE!
- Yarn:
- For a summer blanket, choose a lightweight, breathable yarn. Cotton yarn or cotton-blend yarns are perfect because they are soft, cool, and comfortable. A yarn with a smooth texture will help create a beautiful drape and feel perfect for warmer days.
- You can select a variety of colors for a vibrant and playful blanket, or opt for a more neutral color palette for a more understated, elegant design.
- Crochet Hook:
- The recommended hook size for a summer blanket using lightweight yarn is usually a 4mm (G-6) or 5mm (H-8) crochet hook. However, always check the yarn label for the suggested hook size and adjust if necessary.
- Yarn Needle:
- You will need a yarn needle to weave in the loose ends when you finish crocheting the blanket.
- Scissors:
- A sharp pair of scissors will come in handy for trimming the yarn once you have completed each section.
- Measuring Tape:
- A measuring tape can help you track the size of your blanket, ensuring that it meets your desired dimensions.
- Stitch Markers:
- Using stitch markers can help you keep track of your stitches, especially if you’re working on larger sections or creating repetitive patterns.
2. Step-by-Step Instructions for the Summer Blanket
This summer blanket uses simple stitches that are easy to follow, making it a perfect project for crocheters of all skill levels. The design is modern and breathable, allowing for plenty of customization with color choices.
2.1. Foundation Chain and Starting the Blanket
To begin, you’ll need to create the foundation chain, which will determine the width of your blanket. The length of the chain will depend on how wide you want the blanket to be. Below is the basic guide for starting:
- Create a Foundation Chain:
- Start by chaining a multiple of 3 plus 2 (for example, 101 chains). The total number of chains will determine the width of your blanket, so you can make it as wide or narrow as you’d like, depending on the size you desire.
- Row 1 – Single Crochet:
- Begin by working single crochets into the second chain from the hook. Continue making single crochets across the row until you reach the end. Chain 1 at the end of the row and turn your work.
- Row 2 – Double Crochet:
- For row 2, chain 3 (which counts as your first double crochet) and work double crochets into each stitch across the row. At the end of the row, turn your work.
- Row 3 – Shell Stitch:
- In row 3, make a shell stitch. A shell stitch typically consists of 5 double crochets worked into the same stitch or space. Repeat this process across the row. You can adjust the size of the shells depending on the desired look.
- Continue Following the Pattern:
- Continue alternating between rows of single crochet, double crochet, and shell stitches. This pattern creates a simple yet elegant texture and provides plenty of breathability, perfect for a summer blanket.
2.2. Changing Colors (Optional)
To make your summer blanket more colorful, you can add color changes as you work through the blanket. Here’s how you can add color:
- Finish a Row:
- At the end of a row, cut your yarn and pull through to finish off the stitch. Leave a tail long enough to weave in later.
- Join a New Color:
- To change colors, simply join a new color by inserting your hook into the first stitch of the next row and pulling the new color through. Continue crocheting with the new color for the next few rows or until you decide to change again.
- Carry Your Yarn:
- If you are using a lot of colors, you can carry your unused yarn along the edge of the blanket (for example, by crocheting over it as you go). This will reduce the number of loose ends to weave in at the end.
2.3. Finishing Your Blanket
Once you have crocheted enough rows and the blanket is at your desired length, it’s time to finish off the edges and complete your project.
- Add a Simple Border:
- For a clean and finished look, you can add a simple border around the entire blanket. A basic single crochet border works well, or you can use a scalloped edge for a more decorative finish.
- To do this, work single crochet stitches evenly around the blanket, making sure to place 3 single crochets in each corner to help the blanket maintain its shape.
- Weave in the Ends:
- After completing the blanket, use your yarn needle to weave in all the loose ends from color changes and starting/ending tails. Be sure to secure them tightly to prevent any unraveling.
- Blocking the Blanket (Optional):
- If your blanket has uneven edges or if you want to give it a more polished look, you can block it by laying it flat and gently stretching it into shape. Use a spray bottle with water and lightly dampen the fabric, then pin it to the desired shape until it dries.
3. Tips for a Successful Summer Blanket
Here are some tips to ensure that your summer blanket turns out perfectly:
- Gauge Matters:
- If you are following a specific pattern, it’s important to check your gauge to make sure that your stitches match the required measurements. You can do this by crocheting a small swatch and measuring the number of stitches per inch.
- Choose a Light Yarn:
- Since this is a summer blanket, opt for a lightweight yarn that allows air circulation and doesn’t make the blanket too warm. Cotton and cotton blends are great choices for a cool, breathable fabric.
- Don’t Overcomplicate the Design:
- The simplicity of this blanket is part of its charm. If you’re new to crochet, try not to get overwhelmed by adding too many complex designs or stitch patterns. Stick to basic stitches and enjoy the relaxing process of creating your blanket.
- Personalize Your Blanket:
- You can customize your blanket by choosing your favorite colors, adding stripes, or even making it bigger or smaller to fit your needs. Make the project your own and have fun with it!
4. FAQ
1. Can I make this blanket any size I want?
Yes! You can make your summer blanket as large or as small as you’d like. Simply adjust the number of foundation chains to make the blanket wider, and add or subtract rows to control the length.
2. What’s the best yarn for a summer blanket?
Cotton, bamboo, and cotton-blend yarns are ideal for a summer blanket. They are breathable, lightweight, and soft on the skin, making them perfect for warm weather.
3. How long does it take to crochet a summer blanket?
The time it takes depends on your crochet speed and the size of the blanket. For a medium-sized blanket, it could take anywhere from a few days to a couple of weeks, depending on how much time you dedicate to crocheting each day.
4. How do I prevent my summer blanket from getting too heavy?
To keep the blanket light and breathable, use a lightweight yarn and avoid adding too many layers of stitches. Keep the design simple and airy to achieve the right balance of warmth and comfort.
5. Can I use this pattern for other items, like scarves or shawls?
Absolutely! The same stitch patterns used for this summer blanket can be adapted to make scarves, shawls, or even pillows. Just adjust the foundation chain and the number of rows to suit your project.
PATTERN HERE
Conclusion
The summer blanket crochet pattern is a perfect project for those warm months when you want something light yet cozy. By following the simple instructions and using a breathable yarn, you can create a beautiful and functional piece that adds a touch of comfort to any space. Don’t be afraid to experiment with colors and stitch patterns to make the blanket truly your own. Enjoy the relaxing process of crocheting, and be proud of the wonderful result you’ll have at the end! Let us know your thoughts and any suggestions in the comments below! Happy crocheting!