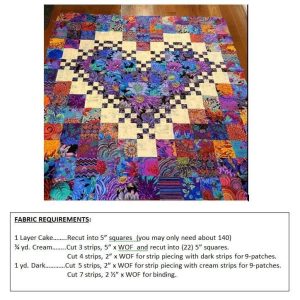
Crochet Aviator Hat – Pattern


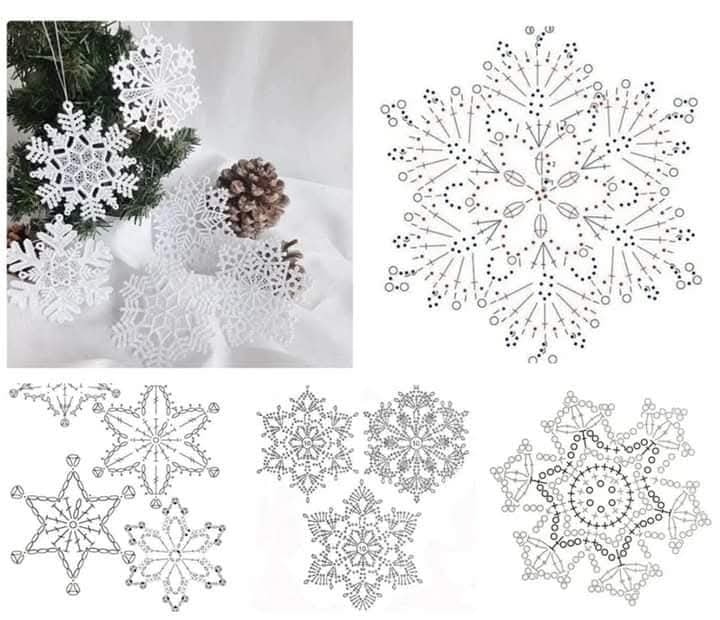
The Snowflake Ornament – PATTERN is a beautiful and festive crochet design that captures the magic of winter and the spirit of Christmas. Perfect for decorating your tree, gifting to friends, or adding a handmade touch to your holiday décor, this pattern combines elegance and simplicity. Whether you are a beginner exploring seasonal crafts or an experienced crocheter looking for a quick project, this tutorial provides everything you need to create stunning snowflake ornaments that will impress everyone. With the right yarn, hook, and a touch of creativity, your Christmas decorations will sparkle like never before.
Working on the Snowflake Ornament – PATTERN is not only fun but also relaxing. It allows you to express your creativity while making something meaningful and festive. These crochet snowflakes can be made in various sizes and colors, making them ideal for garlands, window hangings, or even gift tags. The versatility of the design ensures you can use leftover yarn scraps to make a whole collection without spending much.
Crocheting snowflakes is a timeless holiday tradition. Each piece you make carries its unique charm, just like real snowflakes—no two are exactly alike. The Snowflake Ornament – PATTERN offers an opportunity to practice precision, experiment with stitches, and bring your imagination to life. By following this guide, you’ll have delicate snowflakes ready to decorate your home or share as heartfelt handmade gifts.
To begin your Snowflake Ornament – PATTERN, gather all your materials. You’ll need lightweight cotton yarn, a crochet hook suitable for the yarn size, a tapestry needle, and some starch or fabric stiffener to hold the shape. You can also use metallic or glitter thread to add sparkle.
Choosing the right yarn is crucial. Cotton yarn gives your snowflake a crisp texture and defined stitches, while acrylic can add a soft shimmer. Experiment with different shades—classic white for a snowy feel or silver and gold for a more festive touch.
Your crochet hook size will depend on your yarn thickness, but a smaller hook (2.5mm–3mm) is usually best for detailed ornaments. This helps maintain the intricate shape of each flake.
You’ll also need scissors for trimming loose ends and blocking pins to shape your snowflakes after crocheting. Blocking ensures your ornaments stay flat and symmetrical.
Don’t forget about stiffening—this final step keeps your snowflake crisp and decorative. Use diluted white glue or commercial stiffener to preserve its form.
Lastly, prepare a clean surface to work on. Having an organized workspace makes your Snowflake Ornament – PATTERN experience much smoother and more enjoyable.
Start by making a magic ring. This will be the foundation of your snowflake. Chain a few stitches to create the first round and work double crochets evenly around. Close the ring with a slip stitch to form a small circle.
Next, build your snowflake’s arms by chaining and working picots or treble crochets to create pointed tips. The Snowflake Ornament – PATTERN typically involves repeating these steps around the center to form six symmetrical points.
After completing the first round of arms, add additional layers by working into chain spaces. This gives your snowflake depth and intricate detail.
Pay attention to stitch tension. Keeping it even ensures that your snowflake remains uniform. You can adjust your hook size if you find the stitches too tight or loose.
Once the snowflake shape is complete, fasten off your yarn and weave in all loose ends carefully. Use a tapestry needle to secure the thread invisibly.
Finally, block your snowflake. Pin it flat on a board, apply stiffener, and let it dry overnight. Once dry, your Snowflake Ornament – PATTERN will hold its delicate shape perfectly.
Your finished Snowflake Ornament – PATTERN can be used in many creative ways beyond just hanging on your Christmas tree.
Attach a loop of ribbon or thread and hang them in windows to catch the winter light. The delicate lacework creates stunning shadows and reflections.
You can also turn them into gift toppers. Add them to wrapped presents for a personal, handmade touch that your loved ones will treasure.
Try stringing several together to make a snowflake garland for your mantel or staircase. Mixing different sizes adds visual interest.
If you enjoy handmade jewelry, you can shrink the pattern using thread and a smaller hook to create festive earrings or pendants.
For table settings, scatter a few snowflakes across the table or use them as coasters for small mugs during your holiday parties.
Finally, consider selling your snowflakes online or at craft fairs. They are quick to make and always in demand during the holiday season.
Consistency is key. When making multiple snowflakes, count your stitches carefully to ensure each ornament matches in size and shape.
Experiment with different yarn textures. Metallic threads or sparkly fibers can make your snowflakes stand out even more.
Blocking is essential. Without it, the snowflake might curl or lose its shape. Always let it dry completely before removing the pins.
If you want a softer look, skip the stiffener and leave your snowflakes natural. This works well for garlands or layered decorations.
Keep your tension even throughout. Loose stitches can make the snowflake floppy, while tight stitches may distort its pattern.
Lastly, practice patience. The Snowflake Ornament – PATTERN may look simple, but the details require focus. With time, your results will become stunningly precise.
1. What yarn works best for the Snowflake Ornament – PATTERN?
Cotton yarn is the best choice because it holds shape well and provides clean stitch definition.
2. How can I stiffen my snowflake ornaments?
Use a fabric stiffener, starch spray, or diluted white glue. Pin them flat while drying to keep their shape.
3. Can beginners make this pattern easily?
Yes, the Snowflake Ornament – PATTERN is beginner-friendly with basic stitches like chains, single crochets, and picots.
4. How long does it take to crochet one snowflake?
On average, about 30–45 minutes depending on your speed and experience.
5. Can I use colored yarns for the snowflakes?
Absolutely! Try blues, silvers, or even red and green for a creative holiday twist.
6. How do I store my crochet snowflakes after Christmas?
Keep them flat between sheets of tissue paper inside a box to prevent bending or dust accumulation.
The Snowflake Ornament – PATTERN is a charming crochet project that brings the beauty of winter to your handmade crafts. It’s quick, creative, and a wonderful way to celebrate the season with love and artistry. Whether you make a few for your own tree or dozens to share, these snowflakes will add a special sparkle to your holiday memories.
Try this tutorial today and let the magic of crochet warm your winter days! Don’t forget to leave your honest opinion and share suggestions—I’d love to hear how your snowflake ornaments turned out!