Snuggle Cat Circle – PATTERN

If you’re looking for a cute, compact, and beginner-friendly crochet project, this Mini Macaroon Pouch – TUTORIAL is just the treat! Inspired by the adorable French dessert, this little pouch is perfect for holding coins, stitch markers, lip balm, or tiny treasures. Its round, colorful shape makes it a hit among crocheters who love combining beauty with practicality.
The Mini Macaroon Pouch – TUTORIAL is a fun way to use scrap yarn and learn useful techniques like working in the round, creating a flat base, and assembling small projects with zippers. This pattern is perfect for gifts, party favors, or craft fair items—and it’s so charming that once you make one, you’ll want to crochet a whole batch in your favorite “flavors.”
Let’s dive into this delightful project and create your very own crochet macaroon pouch that’s both adorable and functional!

Before starting your Mini Macaroon Pouch – TUTORIAL, gather all the necessary materials to ensure your experience is smooth and enjoyable.
You’ll need worsted weight yarn or cotton yarn in at least two colors: one for the top and bottom “shells” and one for the center “filling.” Pastel shades work wonderfully to mimic real macarons.
Use a 3.5mm or 4mm crochet hook. A smaller hook helps keep your stitches tight and neat, which is essential for the pouch to hold its shape.
You’ll also need a 2” to 3” zipper in a matching or contrasting color. Choose a high-quality zipper for smooth opening and closing.
Have a tapestry needle on hand for sewing parts together and weaving in ends. Small scissors and a stitch marker will also be useful.
For extra structure, consider inserting a small round piece of felt or lightweight interfacing between the crochet pieces before assembly.
Optional: You can line the pouch with a small circle of fabric to give it a more polished interior, though it’s not required.
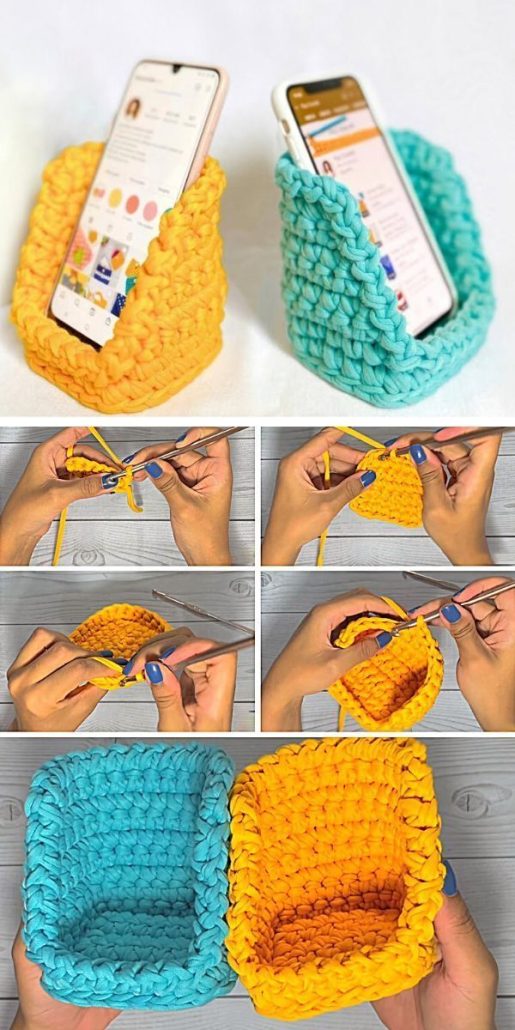
The Mini Macaroon Pouch – TUTORIAL begins with crocheting two identical circular shells—one for the top and one for the bottom.
Start with a magic ring and work 6 single crochet (SC) into the ring. Pull tight and join with a slip stitch. This forms the center of your round shell.
In the second round, increase in each stitch (12 SC). Continue working in spirals or joined rounds, increasing evenly to keep the circle flat. For example: Round 3: SC in next, inc in next (18 SC); Round 4: SC in next 2, inc (24 SC), and so on.
Stop increasing once your circle reaches the size of your chosen zipper (usually around 2.5″–3″). This is usually at Round 6 or 7 depending on your tension and yarn.
Repeat the same process to create the second shell. Remember to count your stitches so both pieces are identical.
Fasten off and weave in all loose ends with a tapestry needle. You can block the circles lightly if needed to make them lie flat and smooth.
If you want a “ruffled filling” look between the shells, crochet a round or two of loop stitches or use a fancy edging stitch in a contrast color.
Now that your two shells are ready, it’s time to bring your Mini Macaroon Pouch – TUTORIAL to life by joining them with a zipper and forming the pouch.
Begin by pinning or lightly sewing the zipper to one of the crochet circles. Align the zipper edge with the outer edge of the circle, leaving even spacing all around.
Use a whip stitch or backstitch with matching thread to hand-sew the zipper into place. A curved needle can help make this step easier.
Repeat the process with the second circle on the other side of the zipper. Once attached, test the zipper to ensure it opens and closes smoothly.
Now it’s time to stitch the circles together around the edge, forming the actual pouch. You can use a slip stitch with your yarn to join the shells, or sew them together using invisible stitching.
If you’re adding a lining or stiffener, slide it into the pouch before fully closing the seam. This helps the pouch hold its shape.
Once fully assembled, weave in any final ends and give the pouch a gentle shape by stuffing it briefly and letting it sit overnight.
Your Mini Macaroon Pouch – TUTORIAL is now complete and ready to hold your favorite tiny essentials!
What makes the Mini Macaroon Pouch – TUTORIAL so irresistible is the endless potential for customization! Make your pouch truly unique with these creative ideas.
Use different “flavor” colors for the top and bottom shells—think chocolate and mint, strawberry and cream, lemon and vanilla.
Add a small charm or beaded pull to the zipper for extra flair and easy handling. Mini tassels or pom-poms also work well.
Embroider tiny details onto the shells, like sprinkles, a cute face, or initials. This gives your pouch personality and charm.
Turn your pouch into a wearable accessory by adding a keychain ring or lobster clasp. Clip it to a backpack, tote bag, or even wear it as a necklace pouch.
Make a set of pouches in a rainbow of colors for gifting or selling at craft fairs. Package them in small boxes like real macarons for an adorable presentation.
Want something larger? Simply increase the number of rounds in your shells before attaching the zipper. This is a great way to create a version that holds earbuds, jewelry, or even small cosmetics.
Is this project beginner-friendly?
Yes! The Mini Macaroon Pouch – TUTORIAL uses basic stitches like single crochet and simple shaping techniques. The zipper is the only slightly advanced part but is easy with patience.
What size is the finished pouch?
Typically 2.5″ to 3″ in diameter, depending on your yarn and tension. Perfect for holding small items like coins, rings, or stitch markers.
Can I make it larger?
Absolutely! Just continue increasing rounds until your desired size, then follow the same construction process.
What kind of yarn works best?
Cotton yarn or sturdy worsted-weight acrylic yarn works well. Cotton holds its shape and gives a cleaner finish.
Do I need a sewing machine for the zipper?
Nope! You can easily sew the zipper in by hand using a needle and thread. A little patience goes a long way.
Can I sell pouches made from this tutorial?
Yes, feel free to sell finished products as long as the design is original or the pattern used allows for commercial use. These make great craft fair items!
The Mini Macaroon Pouch – TUTORIAL offers the perfect blend of creativity, function, and cuteness. Whether you’re crocheting one for yourself, a friend, or a market, this little pouch is as satisfying to make as it is to use. With just a bit of yarn, a zipper, and your imagination, you’ll whip up a sweet treat that’s always in style.
We’d love to hear what you thought of this tutorial! If you gave it a try, share your honest opinion, creative results, or suggestions for future patterns. Let’s keep spreading the joy of crochet—one tiny pouch at a time! 🧶💜🍬