Crochet Aviator Hat – Pattern


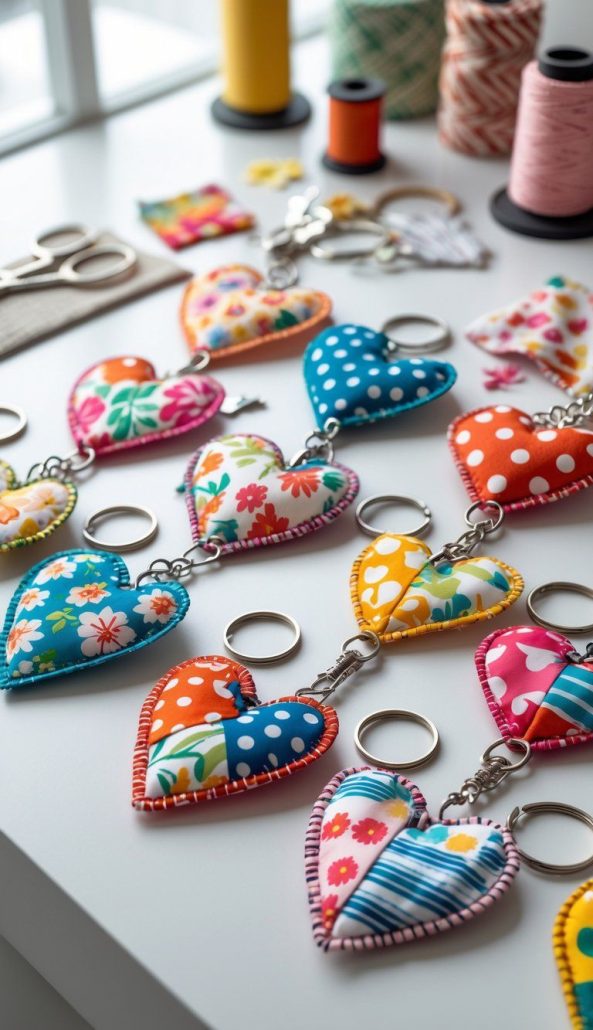
If you love creative sewing projects and want to use up your leftover fabric, this Heart Keychains Made with Scraps – TUTORIAL is the perfect guide for you. It combines creativity, sustainability, and heartfelt crafting into one delightful project. Using fabric scraps to make keychains is not only fun but also an eco-friendly way to give new life to leftover materials from your quilting or sewing projects. These small hearts are quick to make, perfect for gifts, and bring a handmade charm to your accessories.
In this tutorial, you will learn how to transform simple fabric pieces into adorable heart-shaped keychains. Each step is beginner-friendly and requires only basic sewing materials. Whether you sew by hand or with a machine, you’ll be amazed at how easy and satisfying this project can be. You’ll also find tips to personalize your creations and make each piece unique. Making these Heart Keychains Made with Scraps is also a wonderful way to practice your stitching skills while creating something meaningful and beautiful.
These mini heart keychains can be used as gifts for loved ones, Valentine’s Day tokens, wedding favors, or personal accessories to carry your creativity wherever you go. Because this project focuses on reusing fabric, it promotes sustainability in crafting. Let’s dive into this step-by-step Heart Keychains Made with Scraps – TUTORIAL and explore how you can create something special from materials you already have at home.
To begin your Heart Keychains Made with Scraps – TUTORIAL, start by collecting all the necessary supplies. You will need small pieces of fabric, ideally cotton or linen, as they are easy to work with and durable. You can also use leftover quilting fabrics, which often come in charming prints and bright colors. In addition to fabric, gather some batting or felt to give your hearts structure, thread, scissors, pins, a sewing machine (optional), and a keychain ring or clasp.
Choose your fabric scraps thoughtfully. Mixing different textures and colors can give your heart keychains a patchwork look that stands out. This is where your creativity comes into play—combine complementary or contrasting shades for a unique finish. Don’t worry if your scraps are irregularly shaped; you’ll be cutting them into hearts anyway, so uneven edges won’t matter.
Before cutting, press your fabrics with an iron to remove wrinkles and ensure clean, flat surfaces. This step helps improve accuracy and gives your finished product a professional appearance. You can also trace heart templates onto the fabric using a pencil or tailor’s chalk for more precision.
Make sure your work area is clean and well-lit. Having a designated crafting space helps keep everything organized, allowing you to focus on the creative process. It’s also helpful to have a small container to hold tiny fabric pieces, pins, and threads so that nothing gets lost while working.
If you enjoy decorative touches, consider setting aside some embellishments like ribbons, lace, or beads to personalize your hearts later. These extras can elevate your design and make each keychain one of a kind. Remember, crafting is about expressing yourself, so there’s no wrong way to make your keychains.
Once your materials are ready, you’ll be amazed at how quickly this project comes together. The key to success lies in preparation—having everything within reach will make sewing your Heart Keychains Made with Scraps smooth and enjoyable.
The next step in this Heart Keychains Made with Scraps – TUTORIAL is to cut out the heart shapes. Start by creating a simple heart template on paper or cardboard. You can make different sizes depending on your preference—smaller hearts look delicate, while larger ones make bold accessories. Use your template to trace two identical heart shapes on your fabric scraps.
When selecting fabric pieces, pay attention to the patterns and colors. Choose prints that complement each other or tell a visual story. For instance, you can use floral patterns for a romantic touch or geometric designs for a modern style. If you want your heart to have more structure, cut a piece of batting or felt in the same heart shape and place it between the fabric layers.
Once your pieces are cut, layer them together with the right sides facing out. If you prefer a softer heart, you can place the right sides together, sew around the edges, and turn it right side out before closing. Both methods create beautiful results, so feel free to choose the one that best fits your skill level and style.
Use pins to hold the layers in place. This prevents them from slipping while sewing and ensures that your stitches remain even. If you’re sewing by hand, a backstitch or blanket stitch works well for this project. For machine sewing, a simple straight stitch around the edges will do the trick.
Remember to leave a small opening if you’re turning your heart inside out. Once sewn, trim any excess fabric near the seams to reduce bulk. This step helps create smooth, rounded edges and a polished final look. After turning your heart right side out, gently press it with an iron for a neat finish.
Taking time with this stage ensures your heart keychains have clean, precise shapes. Small details make a big difference when crafting items meant to be carried and shown off, and well-cut fabric will make your finished Heart Keychains Made with Scraps stand out beautifully.
Now comes the fun part—sewing your Heart Keychains Made with Scraps together! If you haven’t done so already, place your fabric hearts together with batting in between. Sew around the edges slowly, following the heart’s curves carefully. Keep your stitches even for a professional finish.
After sewing the outline, you can lightly stuff your heart with small amounts of fiberfill if you want it to have a puffy shape. Be careful not to overstuff—it should remain soft but not bulky. Once stuffed, sew the opening closed neatly with small, tight stitches. This ensures durability and prevents the filling from escaping over time.
If you like decorative stitching, this is the perfect time to add it. Topstitch around the edge of your heart using a contrasting thread for a charming handmade look. You can even sew tiny embroidery details, initials, or patterns onto the surface to make each piece unique.
Next, attach the keychain ring or clasp. Cut a small strip of fabric or ribbon, fold it into a loop, and sew it securely to the top center of the heart. This loop will hold the ring in place and add a finished touch to your creation. Make sure your stitches are strong enough to withstand daily use.
You can also add embellishments such as buttons, beads, or small charms. These accessories not only make your heart keychains more attractive but also allow you to match them with specific themes like holidays or special occasions.
At this stage, your Heart Keychains Made with Scraps are ready to shine! They make perfect gifts, party favors, or personal accessories to attach to keys, bags, or even zippers. Each one reflects your style, creativity, and love for handmade crafts.
One of the best parts about this Heart Keychains Made with Scraps – TUTORIAL is how versatile the project can be. Once you’ve mastered the basic technique, you can explore endless creative variations to suit your personality or the season.
Try mixing different fabrics such as denim, felt, or velvet for texture contrast. You can even combine patchwork pieces to create colorful hearts that tell a visual story. Each combination of scraps adds charm and character, making no two keychains exactly alike.
Experiment with embroidery by stitching names, initials, or small motifs onto the hearts. This personal touch transforms a simple craft into a thoughtful gift. Add lace or rickrack around the edges for a vintage feel, or use metallic thread to give your keychains a festive sparkle.
Another fun idea is to create themed collections. For example, make red and pink hearts for Valentine’s Day, green and gold for St. Patrick’s Day, or blue and white for winter holidays. You can even make sets of matching hearts as stocking stuffers or wedding favors.
If you enjoy aromatherapy, consider adding a few drops of essential oil to the filling. Lavender or chamomile-scented hearts make relaxing keychains or car accessories. Just remember to use a small amount so the fragrance remains subtle.
Finally, share your creations with friends and family. Handmade gifts carry emotional value, showing the time, effort, and love you’ve poured into making something special. Crafting Heart Keychains Made with Scraps is not just about sewing—it’s about creating meaningful connections through art.
FAQ – Heart Keychains Made with Scraps
1. Can I make these heart keychains without a sewing machine?
Yes! You can easily hand-sew these keychains using a simple backstitch or blanket stitch. It may take a little longer, but the result will be just as charming.
2. What fabrics work best for heart keychains?
Cotton and linen fabrics are ideal because they’re durable and easy to sew. Quilting cottons are especially great since they come in many colorful patterns perfect for small projects.
3. How can I personalize my heart keychains?
You can add embroidery, lace, beads, or small charms. Using different fabrics and thread colors also helps customize each piece.
4. Are these suitable for beginners?
Absolutely! This Heart Keychains Made with Scraps – TUTORIAL is beginner-friendly and a great introduction to sewing small projects.
5. What can I do with these heart keychains?
They make wonderful gifts, decorative items, or even car accessories. You can also sell them at craft fairs or online as handmade items.
6. How long does it take to make one?
Most keychains take about 30–45 minutes to complete, depending on your sewing speed and the complexity of your decorations.
Conclusion
Making Heart Keychains Made with Scraps is a creative and fulfilling way to repurpose leftover fabric while spreading love and positivity through handmade art. This simple yet beautiful project encourages sustainability, imagination, and craftsmanship. By following this tutorial, you can craft unique accessories that carry personal meaning and showcase your skills.
If you enjoyed this project, please leave your honest opinion and share your suggestions in the comments. Your feedback inspires future tutorials and helps keep the crafting community growing with love and creativity.