Crochet Aviator Hat – Pattern


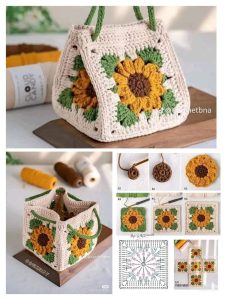
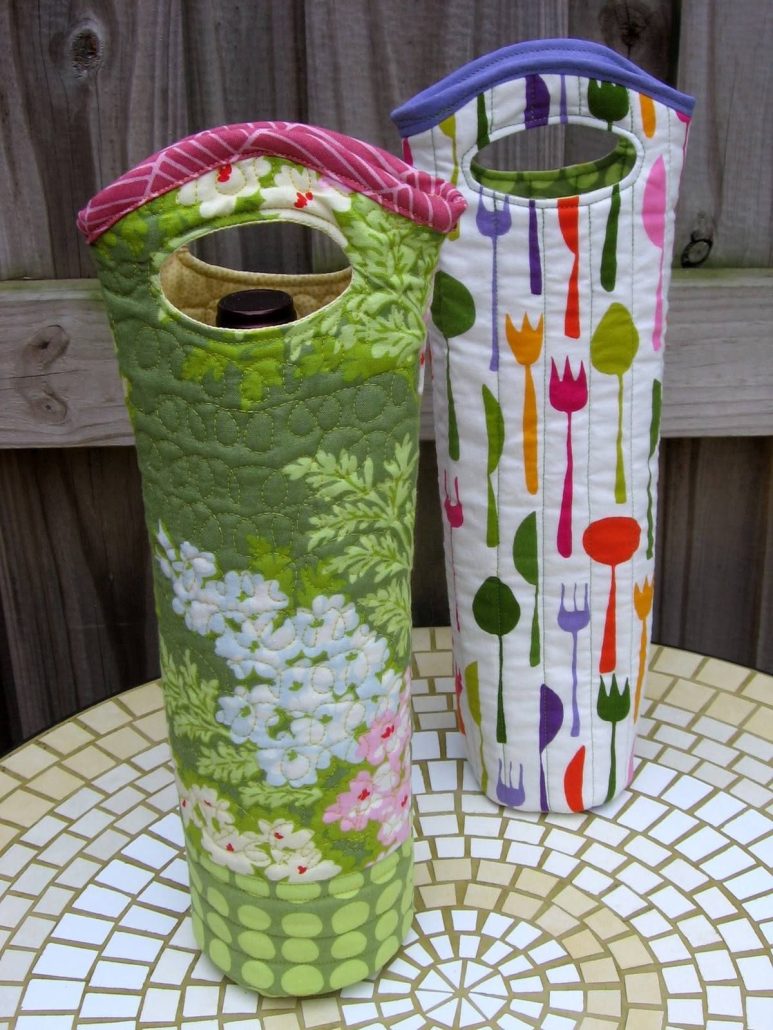
If you love practical yet beautiful sewing projects, this Fabric Bottle Holder – QUILT PATTERN is a perfect choice for your next creation. Combining functionality with charming patchwork design, this project allows you to protect and carry your bottles in a stylish, handmade way. Whether you’re quilting for fun or looking for a useful gift idea, a fabric bottle holder offers endless design possibilities using your favorite fabrics and patterns.
The best part about making a Fabric Bottle Holder – QUILT PATTERN is its simplicity and versatility. It’s an ideal project for both beginners and experienced quilters because it requires only basic stitching and quilting techniques. You can use leftover fabric scraps, repurpose old pieces, or mix various prints for a unique and eye-catching look. The end result is not only beautiful but also environmentally friendly.
In this tutorial, you’ll learn how to create your own quilted bottle holder step-by-step, from choosing fabrics to adding finishing touches. With a bit of creativity and patience, you’ll end up with a quilted accessory that’s both practical and full of personality. Let’s dive into the details and discover how to bring your Fabric Bottle Holder – QUILT PATTERN to life.
Before starting your Fabric Bottle Holder – QUILT PATTERN, gather all necessary materials. You’ll need quilting cotton, batting, lining fabric, a strap or handle, thread, scissors, pins, and a sewing machine. You can also add decorative elements such as bias tape, buttons, or embroidery for a personal touch.
When choosing fabrics, opt for medium-weight cotton or blends that are easy to quilt and can handle the shape of a bottle. Mixing complementary colors and patterns gives the project a vibrant, handcrafted appeal. Try using fabric scraps to make it more eco-friendly and cost-effective.
Select a soft lining fabric to protect the bottle and add insulation. If you plan to carry cold drinks, you might want to include an insulating layer like thermal batting.
Cut your fabrics according to the bottle size you plan to hold. Standard water bottles work well for this design, but you can easily adjust the dimensions for larger or smaller containers.
Once everything is cut, layer your fabric, batting, and lining together. Baste them using pins or clips to keep them in place before quilting.
Choosing the right color of thread is also important—neutral tones work for subtle finishes, while contrasting thread colors highlight your quilting patterns and stitches beautifully.
Now it’s time to quilt the main body of your Fabric Bottle Holder – QUILT PATTERN. This step not only strengthens your fabric but also adds texture and style. Start by drawing quilting lines using a fabric marker or chalk. You can go for straight lines, diagonal grids, or even free-motion quilting if you want a creative touch.
Begin quilting from the center outward to prevent puckering. Use a walking foot on your sewing machine to ensure even stitches and smooth movement through all layers.
As you quilt, focus on maintaining consistent stitch length and direction. The design doesn’t have to be perfect—handmade quilting adds character and charm.
Once you’ve completed quilting, trim the edges neatly to square the fabric. Check for loose threads and secure any that might unravel.
At this stage, you’ll start seeing the structure come to life. The quilted fabric will have a nice texture and thickness that makes it ideal for holding a bottle securely.
Iron the quilted piece to smooth any creases before moving on to assembling the bottle holder. This step helps everything align neatly in the following stages.
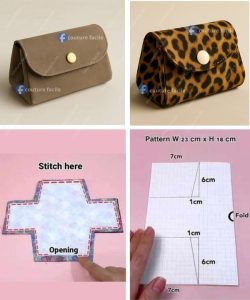
With the quilted body ready, it’s time to assemble your Fabric Bottle Holder – QUILT PATTERN. Fold the quilted rectangle lengthwise, right sides facing each other. Pin the edges carefully and sew along the side seam using a quarter-inch seam allowance.
Next, close the bottom by aligning the seam and sewing straight across. To give the holder a rounded base, you can create box corners by pinching the bottom edges and stitching across the corners. This makes it easier for the holder to stand upright.
Turn the holder right-side out and press the seams flat. Insert the lining fabric by following the same steps, then place it inside the quilted outer layer. Make sure the right sides are facing out and the edges align perfectly.
Fold the top edge inward and secure with pins. Sew around the edge to close the layers together neatly. You can also add bias tape around the top rim for a professional finish.
For the handle, use a matching or contrasting fabric strip. Fold it in half lengthwise, sew the edges, and attach it securely to the sides of your bottle holder. Reinforce the stitches for extra durability, especially if you plan to carry heavy bottles.
Once everything is sewn together, your quilted bottle holder should have a sturdy, attractive structure ready for use or gifting.
Now that your Fabric Bottle Holder – QUILT PATTERN is assembled, it’s time to personalize it. This is where creativity truly shines. You can embellish your holder with appliqué, embroidery, or fabric paint to make it one of a kind.
If you love patchwork, try combining small fabric squares to create a mosaic-style holder. This not only adds color but also allows you to use up small fabric pieces from previous projects.
For a seasonal look, choose themed fabrics—florals for spring, plaids for winter, or bright tropical prints for summer. Each version can reflect your personal style or make a thoughtful handmade gift.
Adding a drawstring closure or flap can provide extra security for your bottle. Use cords, ribbons, or Velcro depending on your preference.
If you plan to take your quilted bottle holder outdoors, consider waterproofing it with fabric spray or using water-resistant lining material.
Lastly, take a moment to admire your finished creation. Every stitch represents creativity, patience, and craftsmanship—qualities that make quilting such a rewarding hobby.
1. What type of fabric is best for a fabric bottle holder?
Quilting cotton or canvas works best because they’re durable and easy to sew. You can also use blends with a bit of stretch for added flexibility.
2. Can I make this project without a sewing machine?
Yes, hand-stitching is possible but may take longer. Use strong thread and small stitches for a sturdy finish.
3. How do I clean my quilted bottle holder?
Most fabric bottle holders can be machine-washed on a gentle cycle. Air dry to maintain the shape and texture.
4. What size should I make the bottle holder?
Measure the circumference and height of your bottle, then add a half-inch seam allowance on all sides to ensure a comfortable fit.
5. Can I make insulated versions of the bottle holder?
Yes, by using thermal batting or adding a foil-backed fabric layer, you can create an insulated holder to keep drinks cool.
6. Are quilted bottle holders good gift ideas?
Absolutely! They’re practical, stylish, and customizable. Perfect for birthdays, holidays, or eco-friendly gift exchanges.
Creating a Fabric Bottle Holder – QUILT PATTERN is a fun and rewarding project that blends beauty with functionality. You’ve learned how to select fabrics, quilt the layers, assemble the structure, and personalize the design to suit your taste. This pattern encourages creativity and sustainable crafting while producing something you can proudly use every day.
We hope this tutorial inspired you to try your own version of a quilted bottle holder. Share your thoughts and experiences in the comments—what fabrics did you choose, and how did you personalize your design? Your feedback helps keep our creative quilting community growing with new ideas and inspiration.