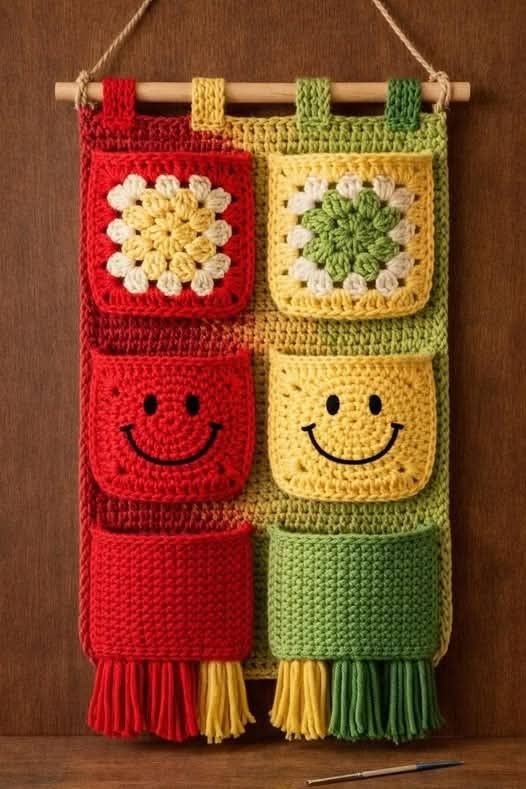
DIY Tutorial: 6-Pocket Crochet Wall Organizer

The DIY Tutorial: 6-Pocket Crochet Wall Organizer is a practical and stylish project designed to help you organize your space while showcasing your crochet skills. Whether you need a solution for storing small household items or simply want to add a handmade decorative piece to your wall, this project is both functional and visually appealing.
Creating your own DIY Tutorial: 6-Pocket Crochet Wall Organizer gives you complete control over the design. You can customize the size, colors, and texture to match your home décor. From minimalist tones to vibrant palettes, this organizer can easily become a standout feature in any room.
In this detailed guide, you will learn how to make a DIY Tutorial: 6-Pocket Crochet Wall Organizer step by step. With clear instructions and helpful tips, you’ll be able to create a durable and beautiful organizer that fits your needs perfectly.
To start your DIY Tutorial: 6-Pocket Crochet Wall Organizer, it’s important to choose the right materials. Cotton yarn is highly recommended because it is sturdy and holds its shape well, making it ideal for wall organizers.
Select colors that complement your home. You can use a single neutral shade for a modern look or mix multiple colors to create a more playful and eye-catching design.
You will need a crochet hook suitable for your yarn weight. Using the correct hook size ensures consistent stitches and a neat finish for your DIY Tutorial: 6-Pocket Crochet Wall Organizer.
Basic tools such as scissors, a yarn needle, and stitch markers are also essential. These tools will help you maintain accuracy and make the process more efficient.
For structure and hanging, a wooden dowel, rod, or sturdy stick is recommended. This will support the weight of the organizer and keep it properly aligned on the wall.
Finally, consider having a measuring tape on hand. This will help you maintain consistent sizing for each pocket and ensure a balanced final design.
The construction of the DIY Tutorial: 6-Pocket Crochet Wall Organizer begins with the base panel. This is typically crocheted in rows using simple stitches such as single crochet or half double crochet to create a firm and stable foundation.
Once the base panel is complete, you can begin working on the pockets. Each pocket is usually crocheted separately, allowing you to control the size and depth based on your needs.
After finishing the individual pockets, position them evenly on the base panel. Careful placement ensures that your organizer looks balanced and professional.
Attach each pocket securely using a yarn needle or by crocheting them directly onto the panel with slip stitches. Make sure the edges are firmly attached to support items.
Next, create a top border for added strength. This border reinforces the structure and gives your DIY Tutorial: 6-Pocket Crochet Wall Organizer a clean, finished look.
Finally, add a hanging mechanism such as loops or a rod casing. This completes the structure and prepares your organizer for display.
One of the best aspects of the DIY Tutorial: 6-Pocket Crochet Wall Organizer is the flexibility in design. You can experiment with different textures, stitch patterns, and color combinations.
For a modern aesthetic, use neutral colors like beige, gray, or white with simple stitch patterns. This creates a clean and elegant look suitable for any room.
If you prefer a more vibrant style, incorporate bold colors or stripes. This approach adds personality and makes your organizer a focal point.
You can also vary the pocket sizes. Larger pockets are perfect for notebooks or mail, while smaller ones can hold keys, accessories, or craft tools.
Adding decorative elements like buttons, tassels, or edging can enhance the overall appearance. These details make your DIY Tutorial: 6-Pocket Crochet Wall Organizer unique.
Seasonal customization is another great idea. You can create different versions of the organizer for holidays or special occasions to keep your décor fresh.
The DIY Tutorial: 6-Pocket Crochet Wall Organizer is highly functional and helps keep your space organized. It provides a convenient place to store everyday items while reducing clutter.
This organizer is ideal for various rooms, including entryways, kitchens, bedrooms, and craft spaces. Its versatility makes it a valuable addition to any home.
Another advantage is its space-saving design. By utilizing vertical space, you can free up surfaces and maintain a tidy environment.
Handmade organizers are also eco-friendly. You can use leftover yarn from previous projects, making this a sustainable and budget-friendly option.
The DIY Tutorial: 6-Pocket Crochet Wall Organizer also makes a thoughtful handmade gift. It’s practical, stylish, and suitable for many occasions.
Additionally, this project is a great way to improve your crochet skills. It allows you to practice techniques while creating something useful and attractive.
Is this project suitable for beginners?
Yes, the DIY Tutorial: 6-Pocket Crochet Wall Organizer is beginner-friendly and uses basic crochet stitches.
What type of yarn works best?
Cotton yarn is ideal because it provides durability and structure for the organizer.
Can I adjust the number of pockets?
Absolutely. You can modify the design to include more or fewer pockets based on your needs.
How do I hang the organizer?
You can use a wooden rod, dowel, or crochet loops to hang it securely on the wall.
Can the organizer hold heavy items?
It is best suited for lightweight to medium-weight items. Reinforcing the pockets can increase durability.
How long does it take to complete?
Depending on your skill level, the project can take several hours to a couple of days.
The DIY Tutorial: 6-Pocket Crochet Wall Organizer is a creative and practical project that combines organization with handmade charm. Throughout this guide, you’ve learned how to choose materials, follow step-by-step instructions, customize your design, and understand the benefits of this versatile piece.
With its functional design and endless customization possibilities, this organizer is perfect for enhancing your home while showcasing your crochet skills. Whether you’re making it for yourself or as a gift, it’s a rewarding project from start to finish.
Now it’s your turn to try the DIY Tutorial: 6-Pocket Crochet Wall Organizer. Share your honest feedback and leave your suggestions—your ideas can inspire even more creative and useful crochet projects!