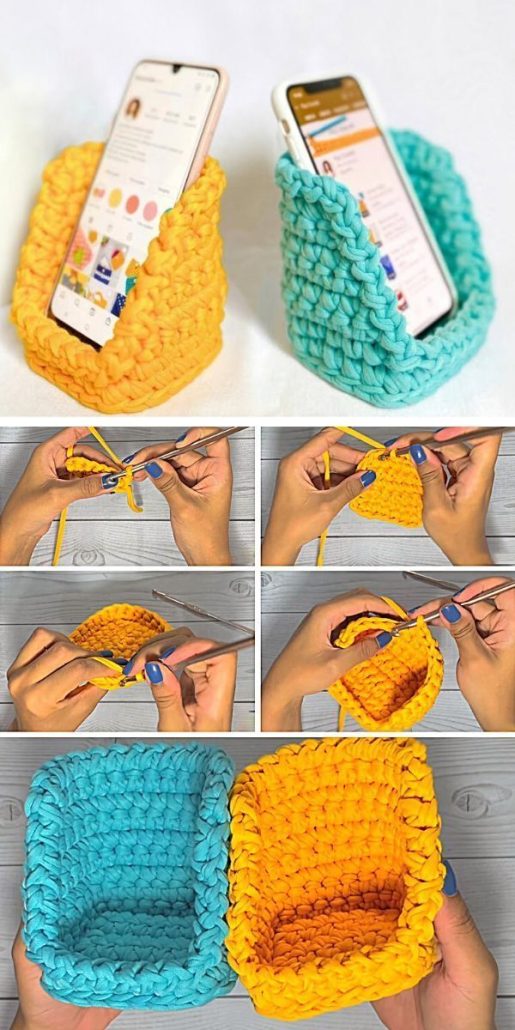
Snuggle Cat Circle – PATTERN

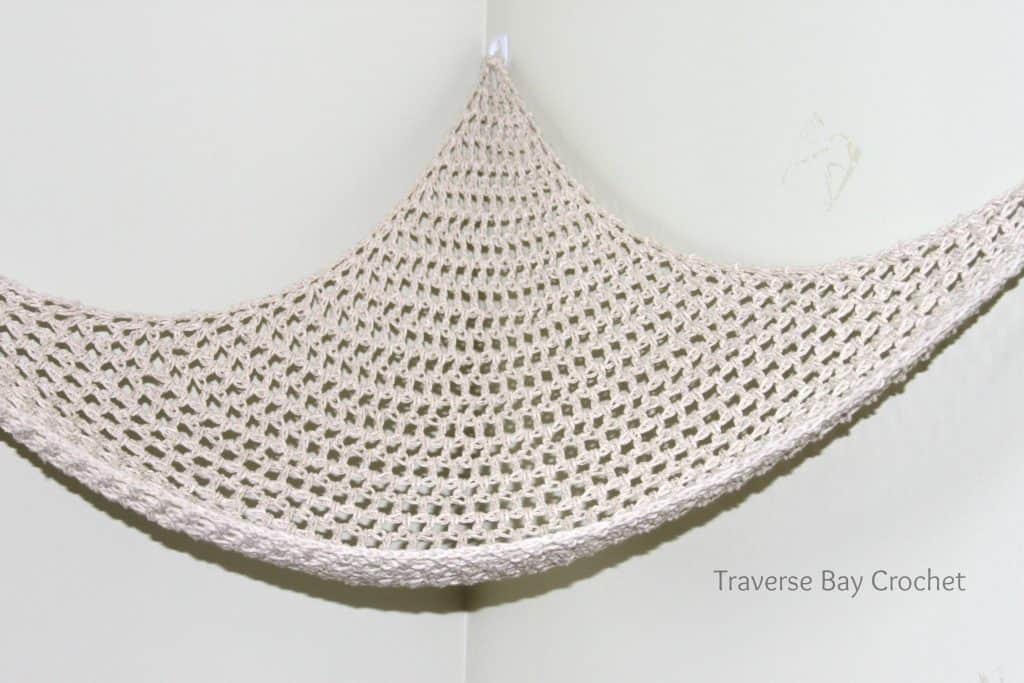
The Crochet Toy Hammock – PATTERN is a fun, practical, and stylish project perfect for organizing stuffed animals, dolls, or small toys in a creative way. Instead of letting your children’s toys pile up in a corner, this crochet hammock provides a charming storage solution that doubles as a decorative piece. It’s ideal for kids’ rooms, nurseries, or even craft spaces—keeping things tidy while adding a cozy, handmade touch to your home décor.
This pattern is easy to follow, beginner-friendly, and customizable in size and color. Whether you prefer a bright, playful look or a minimalist, neutral tone, the Crochet Toy Hammock – PATTERN allows you to showcase your creativity while keeping your space organized. You’ll only need a few basic stitches to complete it, making it a great project for beginners looking to practice and for experienced crocheters wanting a quick, satisfying make.
In this tutorial, you’ll learn how to crochet your own toy hammock, from selecting materials to hanging it perfectly on your wall. The process is relaxing, and the final result is both functional and adorable. With a few hours of work, you’ll have a handmade hammock that turns clutter into a display of love and craftsmanship.
Selecting the right materials is the first step toward making a sturdy and beautiful Crochet Toy Hammock – PATTERN. For this project, durable yarn is key since the hammock will hold several toys. Cotton yarn is an excellent choice because it’s strong, washable, and retains its shape well over time. If you want a softer finish, a cotton-acrylic blend works wonderfully too.
The size of your yarn and hook will affect the overall strength and appearance of your hammock. Medium (worsted) weight yarn paired with a 5 mm to 6 mm crochet hook offers great structure and flexibility. You can go up a size for a looser net look or down for a tighter weave.
Choose colors that complement your room décor. Soft pastels are great for nurseries, while bright rainbow shades can make the hammock stand out as a cheerful accent. You could even use leftover yarn from other projects to make a multicolored, eco-friendly version.
In addition to yarn, you’ll need three sturdy hooks or wall mounts to hang your hammock securely. Metal or heavy-duty plastic hooks work best, especially if the hammock will hold larger toys.
A measuring tape, yarn needle, and scissors will also come in handy for finishing touches like weaving in ends and ensuring symmetry. With the right supplies, your Crochet Toy Hammock – PATTERN will be durable, stylish, and long-lasting.
To begin your Crochet Toy Hammock – PATTERN, start by crocheting a foundation chain that matches the desired width of your hammock. A standard size for medium storage is around 100 chains, but you can adjust this number based on how big or small you want your hammock to be.
Once your chain is ready, work single crochets or double crochets across each row, depending on the texture you prefer. Double crochets create an open, airy structure, while single crochets result in a denser, more supportive net.
Continue working rows until the hammock reaches your desired depth. The most common shape for this pattern is a large right triangle, which fits perfectly into the corner of a room. To achieve this shape, decrease one stitch at the beginning of every row until only one stitch remains.
Keep your tension even throughout to ensure a balanced, symmetrical triangle. If you’d like a lacier design, try using a mesh stitch pattern—simply alternate between chains and skipped stitches.
When finished, your hammock should have three corners that will later serve as attachment points. Reinforce these corners with a few extra stitches to strengthen the spots that will bear the most weight.
The simplicity of this step makes it a great opportunity to relax and enjoy the rhythm of crochet, letting your hands craft something both functional and beautiful.
After completing the main crochet work, it’s time to add the finishing touches that will make your Crochet Toy Hammock – PATTERN both practical and visually appealing. Begin by weaving in all loose ends with a yarn needle to ensure a clean finish.
You can also add a border around the hammock for extra strength and style. A row of single crochets or crab stitch edging will help prevent stretching and give the edges a neat, polished appearance.
Next, prepare your wall or corner for installation. Measure the height where you want the hammock to hang—typically at or slightly above eye level for easy access. Mark the three points where the corners will be attached.
Install your hooks or wall mounts securely into the marked spots. If the hammock will hold many toys, make sure the hooks are anchored into studs or use wall anchors for extra support.
Once the hooks are in place, attach each corner of your hammock. You can tie the yarn directly to the hooks or use small metal rings for a more professional look. Adjust the tension until the hammock hangs evenly and forms a gentle scoop shape.
Step back and admire your work—a handmade hammock that’s as decorative as it is useful, adding charm and warmth to your space.
The Crochet Toy Hammock – PATTERN can be customized in countless ways to suit your style and space. You can adjust the size, color, or stitch type to match your décor or personal taste.
For a modern, minimalist look, use neutral tones like beige, gray, or white. For a whimsical design, mix bright colors or use variegated yarns that change shades as you crochet.
You can even personalize the hammock by adding decorative touches like tassels, pom-poms, or small appliqués along the edges. These details add a playful touch that kids especially love.
If you prefer a more open design, use a mesh or chain stitch pattern for a lighter feel. For heavier toys, stick to solid stitches to ensure stability and durability.
You can also crochet multiple hammocks of different sizes and hang them at varying heights for layered storage. This not only saves space but also creates a visually interesting display on the wall.
Whether you use it for toys, stuffed animals, or even yarn storage in your craft room, the Crochet Toy Hammock – PATTERN offers a creative solution that’s both functional and beautiful.
1. Is the Crochet Toy Hammock suitable for beginners?
Yes! This pattern is great for beginners. It uses simple stitches and basic shaping techniques that are easy to learn and follow.
2. What kind of yarn is best for this project?
Cotton yarn is highly recommended because it’s strong, durable, and machine-washable. A cotton blend can also work well for added flexibility.
3. How do I know what size to make the hammock?
Measure the space where you plan to hang it. For most toy storage, a hammock width between 3 and 4 feet works perfectly.
4. Can I use this pattern for other purposes?
Definitely! The same pattern can be used to make hammocks for towels, yarn balls, or even small blankets.
5. How should I hang the hammock safely?
Use sturdy wall hooks or mounts and ensure they’re properly installed into wall studs. This prevents the hammock from falling under the weight of the toys.
6. How do I clean my crochet hammock?
Most hammocks made with cotton yarn can be hand washed or machine washed on a gentle cycle. Always air dry to prevent stretching.
The Crochet Toy Hammock – PATTERN is the perfect combination of creativity, function, and charm. It’s a wonderful way to keep toys organized while adding a handmade accent to your home. With simple stitches and a few materials, you can crochet a beautiful hammock that brings order and personality to any room.
Whether you’re making it for a child’s space or your craft corner, this pattern delivers practicality and joy. Try it yourself, and don’t forget to share your honest opinion and suggestions below—your feedback inspires others to create and keeps the art of crochet alive!