
Crochet Aviator Hat – Pattern


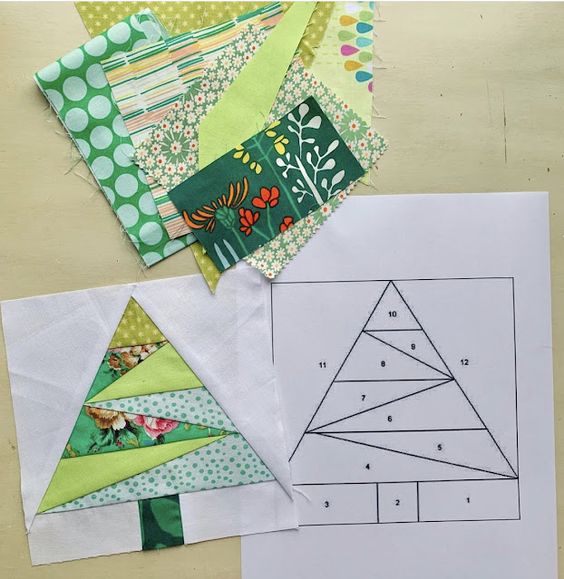
The Christmas Tree Block – TUTORIAL is a wonderful quilt project that brings the festive spirit into your sewing room. Quilters love seasonal designs, and this block is the perfect addition to holiday quilts, table runners, or wall hangings. Whether you are a beginner or an experienced quilter, this tutorial will guide you through creating a block that captures the magic of Christmas. Using scraps or carefully chosen fabrics, you can design a Christmas tree quilt block that fits beautifully into your seasonal décor.
One of the best parts of working on a Christmas Tree Block is the freedom to experiment with colors and patterns. You can use traditional green fabrics to create a classic tree look, or try unconventional holiday shades like blues, silvers, or even modern pastels. This versatility makes the project not only festive but also highly customizable. Each quilter can put their own personality into the design, making every block unique.
If you’ve been searching for a way to celebrate the season with your quilting skills, this Christmas Tree Block – TUTORIAL will inspire you. By following the step-by-step instructions, you’ll be able to craft a quilt block that looks professional, even if you are just starting your quilting journey. Let’s explore the process and creative opportunities this pattern offers.
To get started with your Christmas Tree Block, gather all the necessary supplies. Preparation is key to making your quilting project enjoyable and efficient.
First, you’ll need a selection of fabrics. Green fabrics work perfectly for the tree, but you can also use patterned prints to give texture and dimension. Background fabric in white, cream, or light tones will help the tree stand out.
Second, make sure you have a cutting tool such as a rotary cutter, along with a quilting ruler and cutting mat. These tools will help you cut your pieces with precision.
Third, prepare your sewing machine with a fresh needle and neutral thread. Accuracy in stitching will make your block look clean and polished.
Fourth, gather pins or clips to hold your fabric pieces in place before sewing. They will help keep seams straight and aligned.
Fifth, don’t forget an iron and ironing board. Pressing your seams as you go ensures that your block will lie flat and fit perfectly with other quilt blocks.
Finally, keep your favorite quilting notions close by, such as scissors, seam ripper, and marking tools. Having everything at hand makes the process smoother and more enjoyable.
Creating a Christmas Tree Block is straightforward when you follow each step carefully. This project is perfect for quilters who want a seasonal touch without committing to a large quilt.
Begin by cutting your chosen fabrics into the required shapes. Most Christmas tree blocks are built using triangles and rectangles. Accurate cutting will ensure that your block pieces fit together neatly.
Next, sew the tree sections together. Start with the smaller triangles to form the top of the tree, and work your way down to the larger base. This method gives the block a natural pyramid-like structure.
Once the tree shape is complete, add the trunk section. Typically, this is made from a small brown or neutral fabric rectangle placed at the bottom center.
After the tree and trunk are sewn, attach the background pieces around the block. These pieces frame the tree and bring the block to its final square shape.
Press all seams carefully and trim any uneven edges. Your block should now measure the correct size, ready to be included in your quilt project.
At this stage, admire your work. Even a single Christmas Tree Block can be used as a mini quilt, pot holder, or decorative pillow for the holiday season.
The beauty of the Christmas Tree Block – TUTORIAL is that it encourages creativity. You don’t have to stick to a single design—there are many variations you can try.
One option is to use patchwork within the tree itself. Instead of solid green fabric, piece together small scraps in different shades to create a textured look.
Another variation is to add embellishments. Consider sewing on buttons, beads, or small appliqué stars to decorate your Christmas tree block.
You can also experiment with backgrounds. A snowy white fabric gives a wintery feel, while dark navy fabric with star prints can create a night sky effect.
If you enjoy modern quilting, try using bold colors like teal, gold, or even pink for your tree. This can give a fresh and trendy vibe to your holiday quilt.
For those who love tradition, stick with red, green, and white fabrics to keep a classic Christmas look. Pairing these with gold accents adds a touch of elegance.
Finally, you could make multiple blocks in different styles and combine them into a quilt, table runner, or wall hanging. Each block will tell its own festive story.
After finishing your Christmas Tree Block, you might wonder how best to use it. Here are some ideas and helpful quilting tips.
Start by making several blocks to create a festive quilt top. Alternating tree blocks with plain squares can create balance and highlight the design.
If you prefer smaller projects, consider turning a single block into a quilted cushion cover. It’s a quick project that makes a wonderful holiday gift.
Another idea is to use the block in a table runner. A row of Christmas Tree Blocks adds charm and warmth to your holiday table setting.
When quilting the block, you can enhance the design by adding decorative stitches. For example, quilt lines that mimic garlands or ornaments can make the tree stand out.
Remember to square up your block before assembling it with others. This ensures that your quilt will be neat and easy to finish.
Lastly, don’t forget the joy of giving. Handmade items with Christmas themes make heartfelt gifts that friends and family will treasure for years.
Q: Is the Christmas Tree Block suitable for beginners?
A: Yes, this block is beginner-friendly. The shapes are simple, and the step-by-step tutorial makes it easy to follow.
Q: Can I use fabric scraps for the block?
A: Absolutely. Using scraps is a great way to add texture and variety while keeping the project budget-friendly.
Q: How big should my Christmas Tree Block be?
A: Block sizes vary depending on the pattern, but common sizes are 8”, 10”, or 12”. Always check the tutorial for specific measurements.
Q: Do I need special tools to make this block?
A: Standard quilting tools such as a rotary cutter, ruler, and sewing machine are sufficient. No special tools are required.
Q: What quilting designs work best with this block?
A: Simple straight-line quilting or free-motion designs like stars, swirls, or garlands complement the festive look.
Q: Can I make a whole quilt with only Christmas Tree Blocks?
A: Yes! Repeating the block creates a stunning holiday quilt, especially when paired with seasonal colors and fabrics.
The Christmas Tree Block – TUTORIAL is a delightful way to bring the holiday spirit into your quilting projects. With simple shapes, creative possibilities, and festive charm, this block is perfect for quilts, cushions, or table runners.
Whether you’re a beginner or an experienced quilter, you’ll enjoy the process of bringing this seasonal design to life. We hope this tutorial has inspired you to try your own version of the Christmas Tree Block. Share your thoughts, experiences, and suggestions in the comments—we’d love to hear your honest opinion!


