Foldable Organizer Bag - TUTORIAL


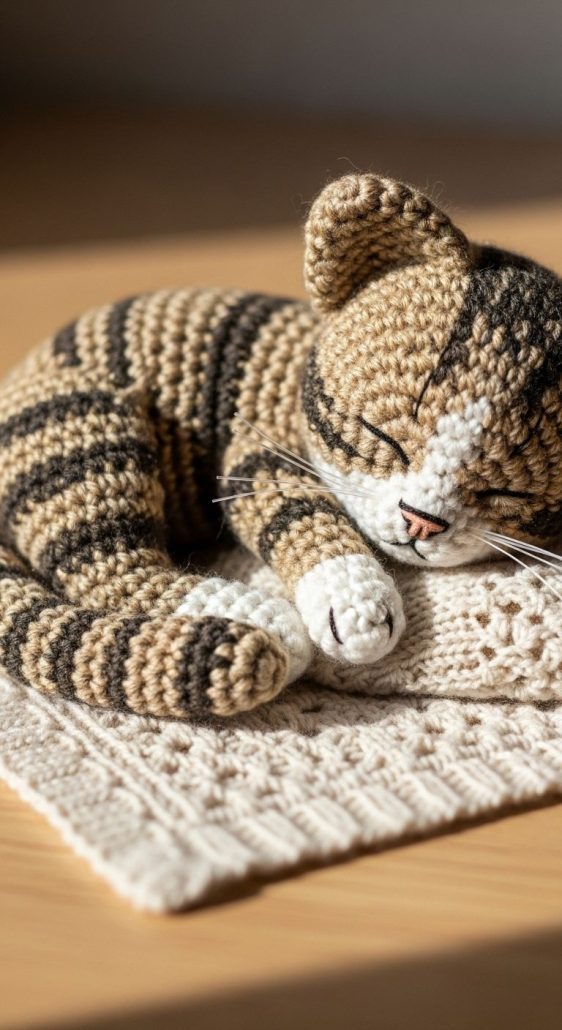
If you love handmade crafts and adorable projects, this Cat Quilt Amigurumi – TUTORIAL is perfect for you. Combining the cozy charm of quilting with the cuteness of amigurumi, this pattern allows you to create a unique, huggable cat that looks as if it’s made from tiny quilt patches. Whether you are a seasoned crafter or just starting out, this tutorial will guide you through every step in a simple and enjoyable way. The Cat Quilt Amigurumi brings together creativity, comfort, and personality, making it a must-try project for anyone who loves both crochet and quilting-inspired designs.
This pattern is not just about crafting; it’s about storytelling through fabric and yarn. Each small section of the Cat Quilt Amigurumi resembles a patch of a handmade quilt, bringing warmth and nostalgia to your creation. You can play with colors, textures, and patterns to make each cat unique. It’s a perfect gift for cat lovers, children, or anyone who appreciates handmade art.
The best part of this Cat Quilt Amigurumi – TUTORIAL is that it’s highly customizable. You can choose traditional quilt-inspired colors, soft pastels, or bright modern tones. Add details like embroidered eyes, tiny whiskers, or even a little bow tie to give your cat extra personality. Whether you plan to use it as a decorative piece or a soft toy, this project will add a handmade touch to your home and fill it with charm and creativity.
Before starting your Cat Quilt Amigurumi – TUTORIAL, gather all your materials. You’ll need different shades of yarn to mimic the patchwork look—think of various tones that blend well together, like creams, grays, pinks, and blues. A medium-weight yarn works best for stability while still keeping the soft texture that makes amigurumi adorable. You’ll also need a crochet hook suitable for your yarn, stuffing for the inside of the cat, a yarn needle for sewing pieces together, and safety eyes or embroidery thread for facial details.
Choosing the right yarn colors makes all the difference in achieving that quilted appearance. The more varied your color palette, the more “patchwork” your amigurumi will look. You can also use leftover yarn scraps from other projects, which not only adds personality but also makes this pattern environmentally friendly and budget-conscious.
Make sure to keep your workspace organized. Amigurumi involves small pieces and fine stitching, so having everything within reach will make the process smoother. A pair of sharp scissors and stitch markers will also be helpful for keeping track of your rounds.
Stuffing your amigurumi properly is crucial to give it shape. Use small amounts of fiberfill at a time, pressing it evenly into each section so your cat looks smooth and well-formed. Avoid overstuffing, which can distort the stitches or make the seams harder to close.
If you’re new to crochet or amigurumi, it might be helpful to practice basic stitches before starting. This project uses standard crochet techniques such as single crochet, increases, and decreases. Once you feel confident, you can move on to creating the actual Cat Quilt Amigurumi pieces.
By preparing your materials and understanding the basics, you’ll set yourself up for success. Every step you take from here will bring you closer to completing your charming quilted cat creation.
To begin the Cat Quilt Amigurumi – TUTORIAL, start by making the body. It’s shaped like a small, rounded tube, similar to other amigurumi animals. You’ll crochet in the round using single crochet stitches, increasing gradually to create a soft, plush shape. Use different yarn colors to give the impression of patchwork quilting—switch colors every few rows or sections for a varied, stitched look.
When shaping the body, focus on keeping your stitches tight and even. This prevents gaps between stitches and ensures the stuffing doesn’t show through. You can alternate colors randomly or follow a planned sequence to achieve a symmetrical look. Each section represents a “quilt square,” giving your cat that cozy, handmade charm.
Once the body is complete, move on to the head. The head is crocheted separately and attached later. It’s slightly oval, with room for expressive features. Again, switch yarn colors as you go to maintain the quilted effect. You can use a darker shade for the ears and lighter tones for the face for contrast.
Before closing the head, insert the safety eyes or embroider the eyes and nose. Use black or dark brown thread for the eyes and a soft pink for the nose. A few stitches for whiskers add extra cuteness. If you prefer a more artistic look, you can stitch a patch over one eye to emphasize the “quilted” style.
After completing both the head and body, sew them together securely using a yarn needle. Make sure the head sits proportionally on the body—slightly forward for a playful look or centered for a classic stance.
By this stage, your Cat Quilt Amigurumi is starting to come to life. Each color change, each stitch adds to the overall charm of your handmade cat, creating a delightful blend of crochet and quilt aesthetics.
With the main structure finished, the next step in your Cat Quilt Amigurumi – TUTORIAL is to add the smaller details: the legs, tail, and ears. These pieces bring personality and balance to your design.
Start with the legs, which are typically made in four separate parts. Crochet them in rounds using single crochet stitches, just like the body. You can alternate colors here as well—consider using different tones for each leg to emphasize the patchwork theme. Once finished, lightly stuff each leg and sew them evenly onto the bottom of the body.
Next, create the tail. The tail should be long enough to curve gently, giving your cat a sense of movement. A two-color combination works beautifully here, using stripes or small color blocks. Crochet tightly so the tail holds its shape well. You can position it upright or curled depending on the personality you want your cat to convey.
The ears are small triangles made by crocheting back and forth in rows. For added realism, you can make the inner ear in a lighter color. Sew the ears to the top of the head, tilting them slightly forward to give your cat an attentive, playful expression.
As you attach each piece, take your time to ensure symmetry and neat finishing. Using a long yarn tail and invisible stitching techniques will help the pieces blend seamlessly.
Once all the parts are attached, your cat will start to look complete—a soft, colorful, and whimsical amigurumi that resembles a handmade quilt brought to life.
Now it’s time to add the final touches that make your Cat Quilt Amigurumi – TUTORIAL unique. These finishing details transform your project from a simple crochet cat into a true work of art.
Consider adding small embroidered stitches across the color transitions to mimic real quilt seams. This simple detail reinforces the patchwork look and makes your cat even more special. You can also use embroidery thread to add small hearts, stars, or initials for personalization.
A tiny ribbon or bow around the cat’s neck gives it a charming touch. Choose a color that complements the yarn palette you used. If you’re gifting it, you can attach a tag with the recipient’s name or a sweet message.
For added texture, you can use a soft brush to gently fluff the surface of your amigurumi, giving it a cozy, fabric-like feel. This works especially well with acrylic yarns.
If you plan to display your Cat Quilt Amigurumi as décor, consider placing it in a cozy basket or alongside small handmade blankets to enhance its quilted aesthetic. It can also serve as a comforting keepsake or nursery decoration.
Finally, take a moment to admire your work. Every stitch, color change, and detail has contributed to a charming handmade piece that combines the warmth of quilting with the playfulness of amigurumi.
FAQ – Cat Quilt Amigurumi – TUTORIAL
1. Is this pattern suitable for beginners?
Yes, the Cat Quilt Amigurumi – TUTORIAL is beginner-friendly. It uses basic crochet stitches like single crochet, increases, and decreases.
2. What kind of yarn should I use?
Medium-weight yarn works best, especially if you’re combining multiple colors for the patchwork effect. Cotton or acrylic yarns are ideal choices.
3. Can I use leftover yarn scraps?
Absolutely! This pattern is perfect for using up yarn scraps, which enhances the quilted look and adds variety to your cat.
4. How do I attach the head and body securely?
Use a long yarn tail and a yarn needle. Stitch around the base of the head several times to ensure it’s firmly attached.
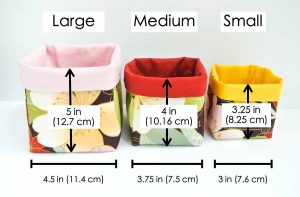
5. Can I make the cat larger or smaller?
Yes, adjusting your hook size and yarn thickness will change the overall size. A larger hook and thicker yarn make a bigger cat, and vice versa.
6. What stuffing works best for amigurumi?
Polyester fiberfill is the most common and works perfectly. It’s soft, lightweight, and holds shape well.
Conclusion
The Cat Quilt Amigurumi – TUTORIAL combines the artistry of quilting with the sweetness of amigurumi to create a heartwarming handmade project. By blending colors, textures, and simple crochet techniques, you can make a unique piece full of personality and charm.
This project is not only fun to make but also deeply satisfying, especially when you see your quilted cat come to life. We hope this tutorial inspired you to try something new and creative. Please leave your honest opinion and suggestions below—we’d love to hear how your Cat Quilt Amigurumi turned out and what personal touches you added to make it truly your own.
