Amigurumi Dentist Doll - Tutorial

Creating your own Parrot Crochet Pattern – Amigurumi is an exciting way to showcase your crocheting skills and create a vibrant, charming piece of art. Amigurumi, the Japanese art of crocheting small, stuffed creatures, allows for incredible creativity, and this parrot pattern is no exception. In this tutorial, we’ll walk you through how to crochet a detailed parrot that will make the perfect addition to your collection of amigurumi animals or serve as a unique gift for someone special.
Whether you’re a beginner or an experienced crocheter, this Parrot Crochet Pattern is simple enough to follow while still offering a fun challenge. The vibrant colors of the parrot, along with its playful design, make it a great project for enhancing your crochet skills. Let’s dive into the details of how to create this lively and colorful parrot, step by step!
Before we begin, it’s important to note that you’ll need some basic crochet supplies and knowledge of a few key techniques. We’ll go over each of these as we move through the pattern, ensuring you have all the information necessary to create your Amigurumi Parrot.
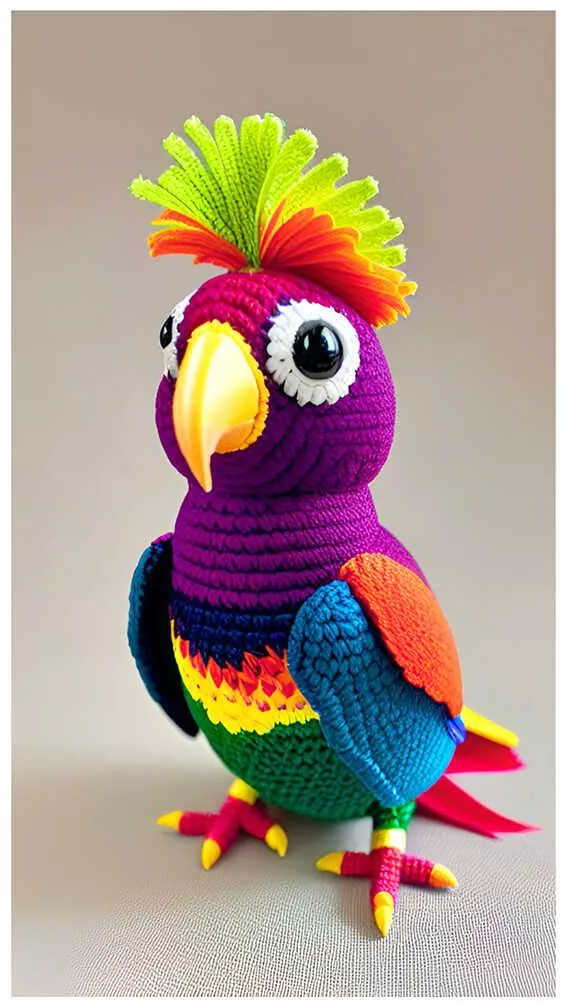
Image From Pinterest
Gathering the right materials is the first step in ensuring that your Parrot Crochet Pattern turns out beautifully. For this project, you’ll need the following supplies:
DISCOVER MORE FREE PATTERNS HERE!
For the parrot, you’ll need yarn in several vibrant colors to mimic the parrot’s feathers. You will likely need:
Opt for medium-weight (worsted weight) yarn for a sturdy, yet flexible finish. Acrylic or cotton yarn works well for amigurumi, as it holds its shape and texture.
The recommended crochet hook size for this pattern is 3.5mm (E-4). This will work well with medium-weight yarn, creating a tight stitch that ensures your parrot is firm and retains its shape.
Safety eyes are an essential part of amigurumi because they provide a secure, cute, and realistic finish for the parrot’s eyes. You’ll need two 12mm safety eyes for this pattern.
To give the parrot its cuddly, three-dimensional form, you’ll need some polyester fiberfill or another soft stuffing material. This will help the crochet work hold its shape.
A yarn needle (or tapestry needle) will be necessary for weaving in ends and sewing pieces together.
Make sure to have sharp scissors for cutting the yarn after each section is completed.
Now that you have your materials ready, we can move on to the crochet process. Let’s dive into the first step of creating the body of the Amigurumi Parrot.
The body of the parrot is a simple cylindrical shape, which forms the foundation of the whole amigurumi. Follow these steps to create the body:
Begin by creating a magic ring to start your crochet. This ring is used in amigurumi to create a tight, seamless opening that won’t leave holes in your finished work.
Now, continue to work in a spiral, increasing the number of single crochet stitches in each round to create the parrot’s round, plump body.
Stuff the body with polyester fiberfill, making sure it’s evenly packed but not overstuffed. You want it to be firm but still soft to the touch. Once the body is stuffed, fasten off the yarn and leave a long tail to sew up any gaps.
Now that the body is complete, let’s move on to the parrot’s head.
The head of the parrot is worked similarly to the body, but it’s smaller and more rounded. Follow these steps to create the head:
Before finishing the head, attach the safety eyes between rounds 7 and 8, leaving about 6 stitches between them. Afterward, crochet a small triangle shape for the beak using yellow yarn.
Stuff the head with fiberfill and sew the opening closed, fasten off the yarn, and leave a long tail for sewing.
The head is now complete! Next, let’s move on to the wings and tail.
The parrot’s wings and tail are what bring the most color and vibrancy to the amigurumi. Follow these steps to make them:
Fasten off and leave a long tail for sewing. Repeat this process for the second wing.
For the tail feathers, crochet several small rectangular shapes using red yarn. These pieces should be about 3-4 inches long, and you can crochet 3-5 pieces for the tail.
Sew the wings onto the sides of the parrot’s body, positioning them near the top. Attach the tail feathers to the bottom of the body, ensuring they fan out like a parrot’s tail.
Now, sew the head onto the top of the body and add any additional details you like, such as extra stitches for texture or embroidery for facial features.
1. What yarn is best for an Amigurumi Parrot?
Acrylic or cotton yarn works best for amigurumi. Choose medium-weight yarn (worsted weight) to ensure a firm structure.
2. How can I make my parrot more colorful?
Feel free to experiment with more colors for the wings, body, or tail. You can add bright blues, purples, or even rainbow-colored feathers!
3. How do I make sure my stitches are tight enough for amigurumi?
Use a smaller crochet hook than you would normally use for the yarn. This will help create tight stitches that keep the stuffing inside the project.
4. Can I add accessories to my parrot?
Yes, you can add accessories such as a small hat, scarf, or even a crocheted perch for your parrot to sit on.
5. What is the ideal size for this parrot?
Depending on your yarn and hook size, the completed parrot should measure about 6-8 inches tall.
In this Parrot Crochet Pattern – Amigurumi tutorial, we covered all the steps needed to create a fun and colorful crochet parrot. From creating the body and head to crocheting the wings and tail, this pattern provides a wonderful challenge for crocheters of all levels.
We hope you enjoyed this tutorial and are ready to add your own vibrant parrot to your amigurumi collection. Don’t forget to leave a comment with your thoughts or suggestions for future crochet projects! Happy crocheting!