Amigurumi Dentist Doll - Tutorial

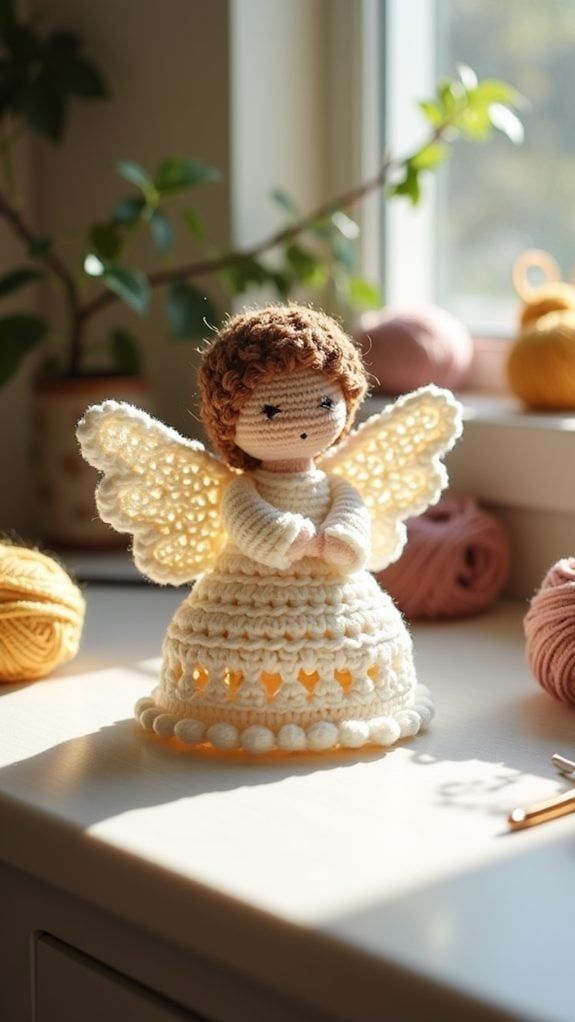
The Crochet Angel Amigurumi – Tutorial is a charming and heartfelt project perfect for the holiday season, special occasions, or simply as a meaningful handmade gift. With its delicate wings, gentle expression, and intricate details, this crochet angel captures the warmth and joy of creating something with your own hands. Whether you’re a beginner eager to expand your skills or an experienced crocheter looking for a relaxing project, this pattern offers both beauty and satisfaction.
In this guide, we’ll explore everything you need to know to bring your crochet angel to life — from the materials and tools required to step-by-step assembly tips. By following this tutorial, you’ll be able to create a timeless keepsake that can be displayed year after year, adding a personal touch to your home or as a cherished gift for loved ones.
The Crochet Angel Amigurumi – Tutorial combines traditional amigurumi techniques with creative flourishes, making it an excellent choice for crafters who want to learn new stitches or experiment with adding embellishments. By the end, you’ll have a beautiful angel that reflects both your personality and craftsmanship.
Creating your Crochet Angel Amigurumi – Tutorial starts with gathering the right materials. Choosing high-quality yarns and tools will ensure your angel looks polished and professional.
First, select a soft cotton or acrylic yarn in white or cream for the body, with additional colors for the hair, wings, or dress details. This gives you room to personalize your angel while keeping the overall look elegant.
Next, you’ll need a crochet hook suitable for your yarn weight, typically a 2.5 mm to 3.5 mm size for amigurumi projects. A smaller hook will help keep stitches tight, preventing stuffing from showing through.
Stuffing is essential for shaping the angel’s head, body, and arms. Polyester fiberfill works best, as it’s lightweight and easy to mold into shape. You’ll also need a yarn needle for sewing the parts together and weaving in ends.
Optional items like safety eyes, embroidery thread for facial details, and a small ribbon or beads for decoration can make your angel even more special. These elements allow for creativity and personalization.
Lastly, keep stitch markers handy to help track your rounds, especially if you’re working in continuous spirals. This small tool can save time and ensure symmetry in your project.
The Crochet Angel Amigurumi – Tutorial is best approached in sections, starting with the head and body before moving on to the wings and accessories. Working in stages helps maintain consistency and makes assembly easier.
Begin by crocheting the head in a continuous spiral, starting with a magic ring and gradually increasing stitches. Once the head is formed, continue directly into the body or set it aside to work separately.
The body is typically conical or cylindrical in shape, with decreases near the base to create stability. Ensure your stitches are tight and uniform for a smooth finish.
For the wings, use lighter yarn or a lacy stitch pattern to give them a delicate appearance. They can be sewn flat onto the back or shaped with wire for a more three-dimensional effect.
Arms and hair are optional but add character. The hair can be crocheted directly onto the head or attached as strands for a flowing look. Embroider eyes and a small smile to give your angel a gentle expression.
Assembly involves attaching each piece securely with a yarn needle, ensuring proportions look balanced. Adding a small ribbon around the neck or waist is a charming finishing touch.
One of the joys of the Crochet Angel Amigurumi – Tutorial is how adaptable it is to different themes and occasions. You can customize colors, textures, and embellishments to suit your needs.
For a festive Christmas version, use gold or silver thread accents on the wings or halo. Metallic yarns can also be used for a shimmering dress effect.
If creating for a baptism, christening, or memorial, choose softer tones like ivory, pale pink, or baby blue to match the event’s sentiment.
You can experiment with different wing shapes — rounded, pointed, or layered — to give your angel a unique style. Adding small embroidered stars or snowflakes to the dress can make it more detailed.
Incorporating beads, pearls, or sequins into the design can elevate the angel into a more decorative centerpiece.
Consider making a collection of angels in various sizes to display together, each representing different seasons, colors, or meanings. This can turn your crafting into a thoughtful and artistic display.
If you’re new to amigurumi, the Crochet Angel Amigurumi – Tutorial is an excellent way to practice fundamental skills. Start slow, read through the entire pattern before beginning, and gather all materials beforehand.
Make sure to maintain consistent tension throughout your work. Too loose, and the stuffing will show; too tight, and your stitches will be difficult to work into.
Use stitch markers for every round’s first stitch to avoid confusion when working in spirals. This ensures symmetrical shaping.
Don’t be afraid to redo sections if something doesn’t look right — amigurumi is very forgiving, and practice will make your work neater over time.
Experiment with inexpensive yarn before using premium materials to build confidence without the pressure of wasting supplies.
Finally, enjoy the process. Crocheting an angel is about more than the finished product; it’s about the peaceful, creative journey that comes with crafting something by hand.
Q: How long does it take to make a Crochet Angel Amigurumi?
A: Depending on skill level, it can take between 4 to 8 hours, spread over a few days, to complete the project.
Q: Can I make this pattern without safety eyes?
A: Yes, you can embroider eyes with black yarn or thread for a softer, child-friendly design.
Q: What size will the finished angel be?
A: The size varies based on yarn weight and hook size, but most are between 5 to 8 inches tall.
Q: Is this project beginner-friendly?
A: Absolutely. With patience and attention to detail, even beginners can follow the Crochet Angel Amigurumi – Tutorial successfully.
Q: Can I sell angels made from this pattern?
A: Yes, but it’s courteous to credit the original designer if the pattern is not your own creation.
Q: How can I make my angel stand up?
A: Adding a weighted base with small beads or pellets inside the bottom can help it stand upright.
The Crochet Angel Amigurumi – Tutorial offers a wonderful opportunity to create something beautiful, personal, and meaningful. Whether for the holidays, a special event, or just to brighten someone’s day, this handmade angel carries the warmth of your time and care.
I’d love to hear your thoughts — share your honest opinions and suggestions so we can keep improving and inspiring each other’s crochet journeys.