Amigurumi Dentist Doll - Tutorial

If you’re looking for a fun and charming crochet project, creating a tiny giraffe is the perfect choice! The Amigurumi Free Tiny Giraffe Pattern offers a simple yet delightful design that will bring a smile to anyone who sees it.
This mini giraffe is perfect as a gift, a decoration, or as a cute addition to your amigurumi collection. In this guide, we’ll walk you through each step of crocheting your very own tiny giraffe.
Whether you are new to amigurumi or an experienced crocheter, this pattern will be easy to follow and result in a beautiful little giraffe. Ready to get started? Let’s dive in!
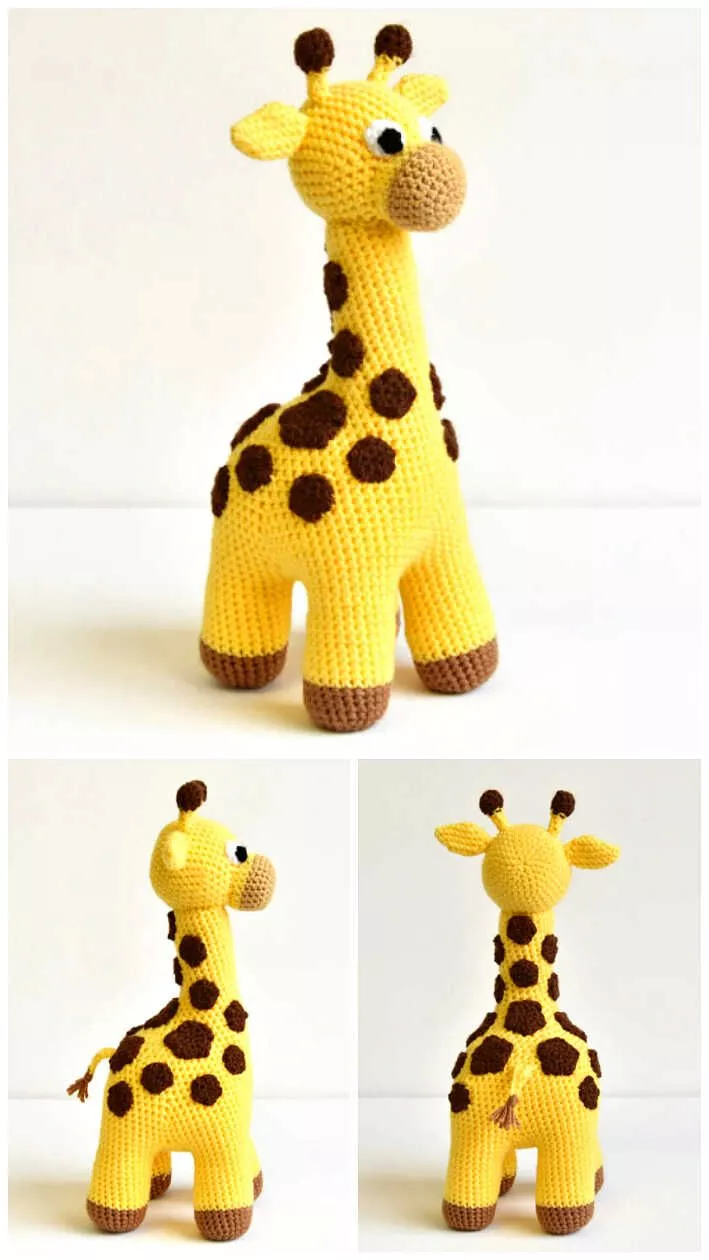
Image From Pinterest
Before you start crocheting, make sure you have the necessary materials to bring your Tiny Giraffe Amigurumi to life. Here’s what you’ll need:
DISCOVER MORE FREE PATTERNS HERE!
Now that you have all the materials ready, let’s begin crocheting!
Start by making the head of the giraffe. The head is slightly larger than the body, so begin with a magic ring and increase until you reach the desired size.
Once the head is finished, it’s time to crochet the body. The body should be slightly more elongated and smaller than the head.
Next, we’ll make the giraffe’s legs. These tiny legs are crocheted in small tubes and are an essential part of the giraffe’s structure.
To give your giraffe its cute, recognizable ears, crochet two small pieces that resemble oval shapes.
The giraffe’s tiny horns are another important detail that adds character to the amigurumi.
Finally, let’s make the giraffe’s tail, which is a simple, small piece with a tuft at the end.
If you want to make your giraffe even cuter, add spots to its body to give it that classic giraffe look.
Once all the parts are crocheted, it’s time to assemble the giraffe. Start by attaching the head to the body securely. Next, attach the legs, ears, horns, and tail to their respective spots, ensuring everything is sewn tightly. Adjust the positioning if necessary to ensure the giraffe stands up properly.
One of the most fun parts of crocheting an amigurumi project is the opportunity to customize it! Here are some ideas to make your Tiny Giraffe Amigurumi even more unique:
While a traditional giraffe is yellow with brown spots, you can mix it up by using other colors for the body, like light pink, lavender, or even a vibrant rainbow pattern. Customize the ears and horns by using contrasting colors to create a fun, playful look.
Consider giving your giraffe accessories like a tiny scarf, bow tie, or even a small flower behind its ear. Adding accessories will personalize your giraffe and give it even more character.
Make a family of giraffes by adjusting the size of the body, head, and legs. Create a larger giraffe and a smaller one to make a cute, coordinated set. You can even experiment with different color patterns for each giraffe!
To make your giraffe’s body even more interesting, use different stitches for texture. For example, you could try using a puff stitch or shell stitch to create a textured body. This will give your giraffe a more unique and intricate look.
If you prefer not to use safety eyes, you can embroider eyes instead. This will give your giraffe a more hand-crafted, vintage feel. You can also add a little smile or rosy cheeks for extra charm.
Here are some tips to help you create a perfect Tiny Giraffe Amigurumi:
For amigurumi, tight stitches are essential. This ensures that the stuffing stays inside and doesn’t show through, giving your giraffe a clean and professional appearance.
When working in continuous rounds, stitch markers are a must. They help you keep track of where each round starts and finishes, making it easier to follow the pattern and maintain an even shape.
Make sure to stuff each part of your giraffe lightly. Too much stuffing can make the body too stiff, while too little can cause the giraffe to collapse. Take your time to find the perfect balance of firmness and softness.
As you assemble your giraffe, be sure to sew each part on securely. Double-check that the legs, ears, and horns are firmly attached to avoid them coming loose over time.
Enjoy the process of crocheting and assembling your giraffe! It’s easy to rush through projects, but taking your time will allow you to add personal touches and make your tiny giraffe even more special.
The time it takes to complete your giraffe depends on your skill level and how much time you dedicate to it. On average, a tiny giraffe can be finished in a few hours or over the course of a couple of days.
Yes, you can make a larger giraffe by using thicker yarn and a larger crochet hook. You’ll need to adjust the stitch count and the number of rounds to maintain the proper proportions for a larger giraffe.
Absolutely! If you want a softer or fluffier texture, try using chenille or velvet yarn for a unique effect. Just make sure to match the yarn to the appropriate hook size for best results.
Yes! You are welcome to sell your finished giraffes, but be sure to credit the designer (if you’re using a pattern) and check for any restrictions related to the
pattern usage.
Certainly! You can adjust the position of the eyes, add a small embroidered smile, or even change the shape of the eyes to give your giraffe a unique expression.
Creating your own Tiny Giraffe Amigurumi is a fun and rewarding crochet project. With this pattern, you’ll be able to create an adorable, one-of-a-kind giraffe that will make a perfect gift or decorative piece. Feel free to customize it with different colors, accessories, or textures to make it even more special.
Let us know your thoughts! We’d love to hear your experiences, tips, and any suggestions you might have. Don’t forget to leave a comment or share your finished giraffe with us! Happy crocheting!