Amigurumi Dentist Doll - Tutorial

Crocheting an Amigurumi Cockerel is a fun and satisfying project that brings a little bit of farm charm into the world of crochet. Whether you’re an experienced crocheter or just starting out, making a rooster amigurumi will surely be a rewarding experience. This delightful little bird with its vibrant feathers, beak, and comb makes an excellent gift or decoration for any occasion.
The Amigurumi Cockerel is perfect for those looking to create a unique, cuddly version of this iconic barnyard animal.
In this article, we’ll guide you step-by-step through the process of crocheting a charming cockerel that will steal everyone’s heart.Let’s dive into creating your very own crochet rooster with this easy-to-follow guide!
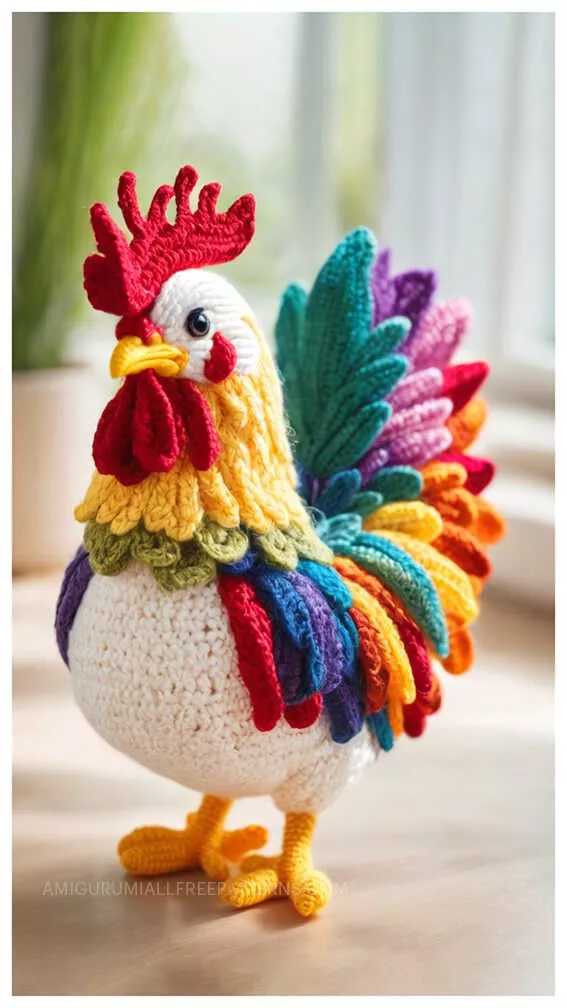
Image From Pinterest
Before beginning, it’s important to gather all the necessary materials for your Amigurumi Cockerel. With the right supplies, you’ll be able to create a beautiful, well-shaped rooster that’s ready to be displayed or gifted.
DISCOVER MORE FREE PATTERNS HERE!
Gathering these supplies beforehand will help ensure that your project moves smoothly. Now, let’s start crocheting your Amigurumi Cockerel!
Now that you have all the materials, let’s walk through the steps of making your Amigurumi Cockerel. We’ll cover each part of the bird in detail, from the head to the feet, and then assemble them all at the end.
The head is the most important feature of your cockerel, so it’s crucial to get the shape just right. Begin with a magic ring and crochet six single crochet (sc) stitches into it. Continue increasing each round, and work evenly to form the rounded shape of the rooster’s head. Once completed, stuff the head lightly and attach the safety eyes, making sure they are placed symmetrically.
Next, you’ll crochet the body of the cockerel. The body is slightly larger than the head and oval-shaped. You’ll work in continuous rounds, increasing and decreasing to get the right size. As you crochet, stuff the body with fiberfill to give it the perfect soft yet firm texture.
The cockerel’s comb is one of the most recognizable features. Using red yarn, crochet a series of small, jagged pieces to create the comb on top of the rooster’s head. Each piece should be a small triangle shape. Once you finish the comb pieces, sew them onto the top of the head, positioning them evenly.
The beak of your cockerel will be small but important for the rooster’s facial features. Using orange yarn, crochet a tiny triangle. Once it’s complete, sew it onto the front of the head, just below the eyes. The beak should point slightly downward to give the rooster an expressive look.
For the wings, crochet two small oval shapes using red or yellow yarn. These should be about half the size of the body. After finishing both wings, sew them onto the sides of the body, ensuring they are evenly placed.
The cockerel’s legs should be crocheted using orange yarn. Start by making the legs as small tubes, adding a few stitches for the toes. Make sure to stuff the legs lightly, then sew them onto the bottom of the body. These little feet will help your rooster stand tall!
Once all the parts are crocheted, it’s time to assemble the cockerel. Start by sewing the head onto the body, ensuring it is positioned securely. Then, attach the wings and the comb, ensuring they are positioned evenly. Finally, sew the beak and legs into place. After everything is attached, you’ll have a fully assembled Amigurumi Cockerel!
While the basic Amigurumi Cockerel pattern is cute on its own, there are several ways to customize your rooster to make it more unique. Here are a few ideas to help you personalize your crochet cockerel:
You can mix up the colors of your rooster’s feathers to make it more interesting. Try using different shades of red, orange, yellow, and even brown for a more realistic look. You can even create a multi-colored cockerel for a fun, whimsical twist.
Get creative by crocheting little accessories for your cockerel! Try adding a small scarf or even a tiny crown to make your rooster stand out. Accessories will give your amigurumi a fun and personalized touch.
If you want a larger or smaller cockerel, you can adjust the size by using thicker or thinner yarn and a corresponding hook size. A larger cockerel can make an impressive display piece, while a smaller one can be a charming keychain or gift.
You can add extra details to your cockerel, like small embroidered feathers or stitching around the comb for added texture. These little touches will give your cockerel a more detailed, refined look.
Why stop at just one rooster? You can create a whole family of cockerels with different sizes or color combinations. This is a fun way to create a collection that tells a story!
By customizing your Amigurumi Cockerel, you’ll create a truly unique and special crochet piece.
Here are some helpful tips for making sure your Amigurumi Cockerel turns out as cute and professional-looking as possible:
Maintaining even tension throughout the project will ensure that your stitches are tight and uniform. This is important for creating a smooth texture, especially on the head and body.
It’s easy to lose track of stitches when working in the round, so use stitch markers to help you keep track. This will ensure that your cockerel’s body remains evenly shaped and consistent.
When stuffing the body and head, be sure to stuff evenly and avoid overstuffing. Too much stuffing can make your amigurumi look stiff and unnatural, while too little stuffing may cause it to collapse.
Make sure that all parts of your cockerel are sewn on securely, especially the comb, wings, and legs. A strong, secure attachment will help your rooster stay intact and last for years.
Amigurumi projects like the Cockerel Crochet Pattern take time and patience, so don’t rush through it. Enjoy the process of crocheting and don’t be afraid to make adjustments as needed. The result will be worth the effort!
Depending on your experience and the time you spend on it, making the cockerel can take a few hours to a couple of days. Amigurumi is a fun project, so take your time and enjoy the process!
Yes, feel free to experiment with different yarn colors! You can create a more realistic rooster with browns and oranges, or go for a colorful and playful version with shades of pink, purple, or blue.
Yes, you can adjust the size by using a thicker or thinner yarn and a corresponding hook size. This will change the overall size of your cockerel to suit your needs.
Safety eyes are recommended for this project because they give your cockerel a lifelike and expressive look. However, if you prefer, you can embroider the eyes using yarn or thread.
When attaching the comb, be sure to sew it on securely, making several passes with your yarn to keep it in place. It helps to use a small amount of stuffing inside the comb pieces to keep them puffed up and full.
Crocheting an Amigurumi Cockerel is a fun
and creative project that results in a charming rooster that can brighten any space. By following the steps in this guide, you can create your own unique version of this cute and lively bird. With customization options and endless possibilities, your Amigurumi Cockerel can reflect your personal style and creativity.
We’d love to hear your thoughts! Feel free to share your finished cockerels, ask questions, or leave feedback below. Happy crocheting!