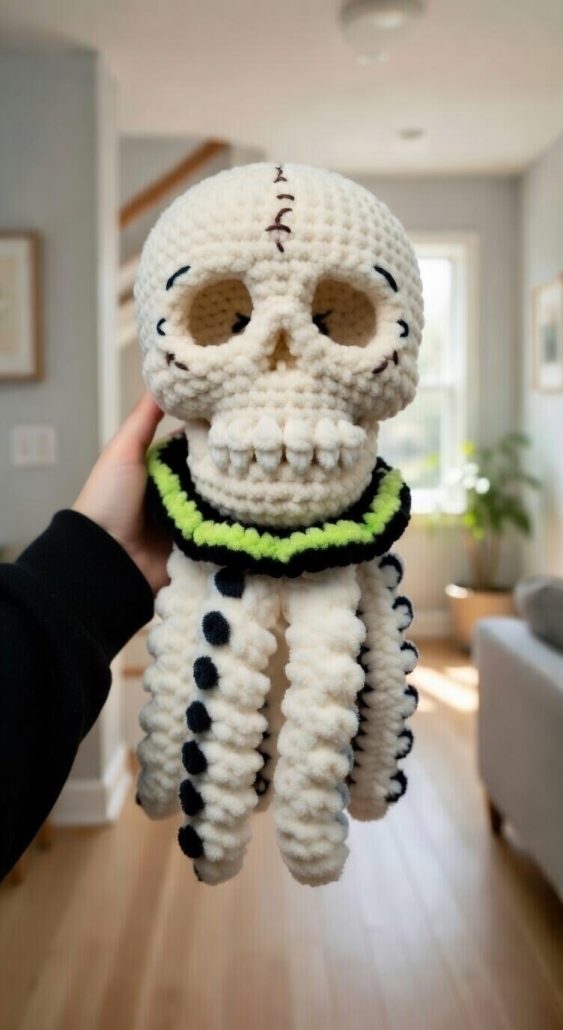
Chunky Skulltopus Crochet - Tutorial

Chunky Skulltopus Crochet Tutorial is a bold and imaginative crochet project that blends the softness of amigurumi with a striking skull-inspired design. This unique pattern has gained popularity among crafters who enjoy creating eye-catching pieces that stand out, especially for themed décor, gifts, or seasonal collections.
What makes the Chunky Skulltopus Crochet Tutorial so appealing is its combination of playful creativity and dramatic style. With its chunky yarn texture and distinctive skull features, this project transforms a classic octopus shape into something edgy, artistic, and unforgettable.
In this complete guide, you will learn everything you need to create your own Chunky Skulltopus Crochet Tutorial, including understanding the structure, selecting the best materials, following a detailed step-by-step process, and exploring creative customization ideas.
The Chunky Skulltopus Crochet Tutorial is based on amigurumi techniques but incorporates sculptural elements to form the skull design.
The main structure includes a large rounded head shaped like a skull, along with multiple tentacles that give the piece its octopus identity.
Unlike traditional amigurumi, this pattern often uses thicker yarn to create a bulky and textured appearance.
The skull features—such as eye sockets and nose cavity—are created using strategic stitch placement, shaping, or embroidery.
The tentacles are typically crocheted with spiral or textured stitches to add movement and visual interest.
Understanding how these components come together is essential for achieving a balanced and detailed final result.
Choosing the right materials is crucial for a successful Chunky Skulltopus Crochet Tutorial.
Chunky or super bulky yarn is highly recommended, as it gives the project its signature plush and oversized look.
Soft yarns like chenille or velvet are ideal for a cozy texture, while acrylic yarn offers durability and a wide range of colors.
A larger crochet hook is typically used to match the yarn weight, but maintaining tight stitches is important to keep the stuffing secure.
Polyester fiberfill is commonly used for stuffing, ensuring that the piece remains soft yet structured.
For the skull details, you can use black yarn, felt, or embroidery thread to define the facial features.
Basic tools such as stitch markers, scissors, and yarn needles will help with shaping and assembly.
Creating your own Chunky Skulltopus Crochet Tutorial becomes easier when broken into clear steps.
Start by crocheting the head using a magic ring and increasing stitches to form a rounded shape.
As you build the head, incorporate shaping techniques to define the skull structure, especially around the eye and nose areas.
Continue working in rounds until the head reaches the desired size, then begin decreasing to close the shape.
Before fully closing, add stuffing gradually to maintain an even and firm texture.
Next, create the tentacles by chaining and working multiple stitches into each chain to form curls or spirals.
Repeat this process for all tentacles, ensuring they are evenly spaced around the base of the head.
Finally, attach or refine the skull details using embroidery or appliqué techniques to complete the look.
The Chunky Skulltopus Crochet Tutorial offers endless opportunities for creativity and personalization.
You can experiment with different color schemes, such as classic black and white or vibrant neon tones for a modern twist.
Adding glow-in-the-dark yarn or accents can make your piece even more unique and perfect for themed events.
The tentacles can be customized with different textures, including bobble stitches or contrasting colors.
The Chunky Skulltopus Crochet Tutorial is ideal for seasonal décor, especially for Halloween or alternative-themed collections.
You might also create a series of skulltopus designs in different sizes for a cohesive display.
Personalizing your piece with accessories like mini hats or themed decorations can enhance its character.
Is this pattern suitable for beginners?
It is more suitable for intermediate crocheters due to the shaping and detailing involved.
How long does it take to complete?
Depending on the size and complexity, it can take several hours to a couple of days.
What yarn works best for this project?
Chunky or super bulky yarn is recommended for achieving the desired look and texture.
How do I create the skull details?
You can use embroidery, felt pieces, or strategic stitch placement to form the features.
Can I wash the finished piece?
Yes, but hand washing and air drying are recommended to preserve its shape.
Can I sell items made from this tutorial?
Yes, unique handmade items like this are popular and can be sold, especially with creative variations.
The Chunky Skulltopus Crochet Tutorial is a bold and creative crochet project that allows you to explore new techniques while creating something truly unique. In this guide, you learned how to understand the structure, choose the best materials, follow a step-by-step process, and explore customization ideas.
This pattern is perfect for crafters who want to push their creativity and produce standout handmade pieces. Whether for décor, gifts, or personal enjoyment, it offers endless possibilities.
Now it’s your turn to create your own Chunky Skulltopus Crochet Tutorial. Experiment with colors, textures, and details to make your project one of a kind. Don’t forget to leave your honest opinion and share your suggestions—your feedback helps inspire even more creative content!