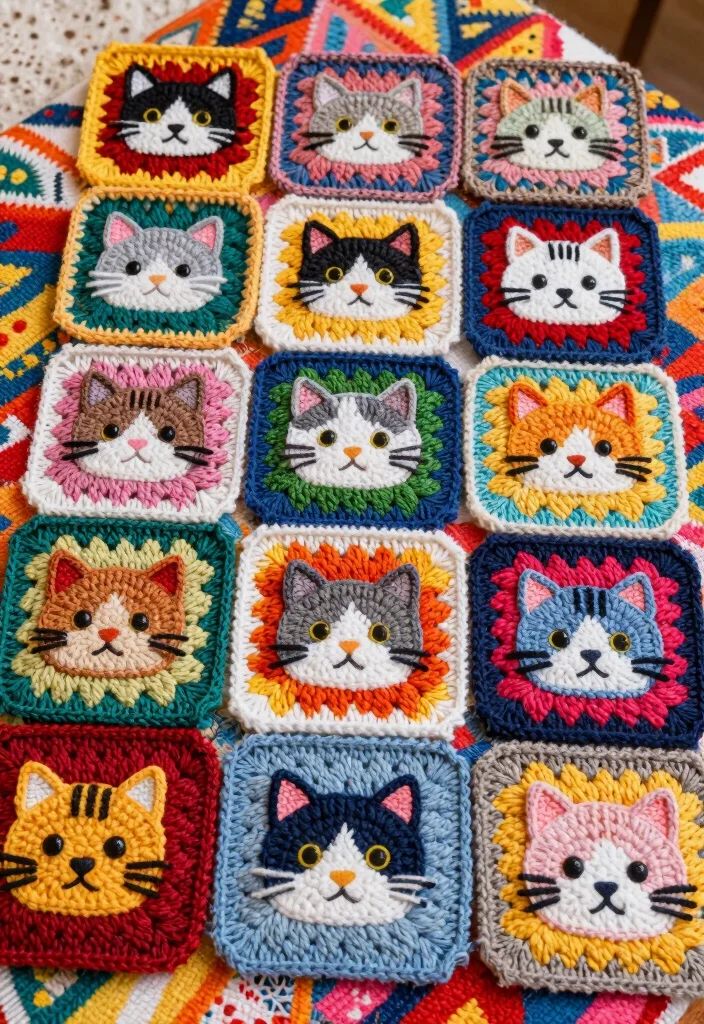
Crochet Cat Face Granny Squares - TUTORIAL

Crocheted Cat – Tutorial is one of the most محبوب and rewarding crochet projects for crafters who enjoy creating cute, handmade items full of personality. Whether you are making a gift, decorating your home, or adding a new item to your handmade shop, this pattern offers endless creative possibilities.
The beauty of a Crocheted Cat – Tutorial lies in its flexibility and charm. You can customize your cat with different colors, sizes, facial expressions, and accessories, making each piece truly unique. From small amigurumi kittens to larger decorative plush cats, this project adapts easily to your vision.
In this complete guide, you will learn everything you need to create your own Crocheted Cat – Tutorial, including materials, techniques, step-by-step instructions, and creative ideas to enhance your final result.
The Crocheted Cat – Tutorial is typically based on amigurumi techniques, which involve crocheting small, stuffed figures using tight stitches.
Most crocheted cats are worked in continuous rounds rather than rows. This helps create a smooth, seamless finish that is ideal for stuffed toys.
The basic structure includes several parts: head, body, ears, legs, tail, and facial features. Each piece is made separately and then assembled.
One key aspect of the Crocheted Cat – Tutorial is shaping. Increases and decreases are used to form curves and give the cat its distinctive shape.
Stuffing plays an important role in achieving the desired look. Proper filling ensures that the cat holds its shape without being too stiff or too soft.
Understanding these foundational elements will help you follow any variation of the pattern and even create your own designs.
Choosing the right materials is essential for achieving the best results with your Crocheted Cat – Tutorial.
Yarn selection is crucial. Cotton yarn is often preferred for amigurumi because it provides structure and clean stitch definition.
Acrylic yarn is another popular option due to its affordability and wide range of colors, making it ideal for beginners.
A smaller crochet hook is typically used to create tight stitches. This prevents stuffing from showing through the fabric.
Safety eyes or embroidery thread can be used to create facial features. Each option offers a different aesthetic style.
Polyester fiberfill is commonly used for stuffing, providing softness while maintaining shape.
Additional tools include stitch markers, yarn needles, and scissors to help with assembly and finishing.
Creating your own Crocheted Cat – Tutorial becomes simple when broken into clear steps.
Start with the head by crocheting in a magic ring and increasing stitches gradually to form a round shape.
Continue working in rounds until the desired size is reached, then begin decreasing to close the shape, leaving space for stuffing.
Next, create the body using a similar technique, adjusting the size to match the proportions of the head.
Crochet the ears, legs, and tail separately. These smaller components add character and detail to your cat.
Assemble all parts by sewing them securely onto the body. Pay attention to placement to achieve a balanced and cute appearance.
Finally, add facial features such as eyes, nose, and whiskers to bring your Crocheted Cat – Tutorial to life.
One of the most exciting aspects of the Crocheted Cat – Tutorial is the opportunity for customization.
You can experiment with different yarn colors to create realistic cats or fun, fantasy-inspired designs.
Adding accessories like scarves, bows, or tiny hats can give your cat extra personality and charm.
You might also try different sizes by adjusting yarn weight and hook size, creating anything from mini keychains to large plush toys.
The Crocheted Cat – Tutorial can be adapted into themed projects, such as holiday decorations or nursery items.
Another creative idea is to personalize your cat to resemble a real pet, making it a meaningful keepsake.
You can even turn your crocheted cat into functional items like keychains, bag charms, or decorative accents.
Is the Crocheted Cat – Tutorial suitable for beginners?
Yes, beginners can follow this tutorial if they are familiar with basic stitches and are willing to practice shaping techniques.
How long does it take to complete a crocheted cat?
It usually takes a few hours to a couple of days, depending on the size and level of detail.
What is the best yarn for amigurumi cats?
Cotton yarn is highly recommended because it provides structure and durability.
Can I wash a crocheted cat?
Yes, but it’s best to hand wash and air dry to maintain its shape and quality.
How do I make my cat look more realistic?
Use color variations, detailed embroidery, and proper shaping techniques for a more lifelike appearance.
Can I sell crocheted cats made from this tutorial?
Yes, handmade crocheted cats are popular items, especially when customized and well-crafted.
The Crocheted Cat – Tutorial is a fun, creative, and rewarding project that allows you to explore the art of amigurumi while creating something truly special. Throughout this guide, you’ve learned how to understand the structure, choose the best materials, follow a step-by-step process, and customize your design.
By mastering this pattern, you can create adorable handmade cats that can be used as gifts, decorations, or even products to sell. The possibilities are endless when you let your creativity guide you.
Now it’s your turn to start your own Crocheted Cat – Tutorial project. Try new ideas, experiment with styles, and enjoy every step of the process. Don’t forget to leave your honest opinion and share your suggestions—your feedback is incredibly important and helps inspire more creative content!