
Sewing Hearts & Nine Patch

The DIY Adorable Bunny Doll – Tutorial is the perfect project for anyone who loves crafting, sewing, or simply creating something meaningful with their own hands. Whether you are a beginner or an experienced maker, this guide will walk you through every detail in a clear and approachable way. Handmade dolls carry a special charm, and a bunny doll, in particular, brings warmth, softness, and personality to any space.
Creating your own DIY Adorable Bunny Doll – Tutorial project is not just about the final result—it’s about the relaxing and rewarding process. From selecting fabrics to stitching the final details, each step allows you to express creativity and develop new skills. Plus, handmade bunny dolls make wonderful gifts for children, friends, or even as decorative items.
In this complete DIY Adorable Bunny Doll – Tutorial, you will learn how to choose the right materials, follow a step-by-step process, customize your bunny, and ensure a professional-looking finish. By the end, you’ll have a beautiful handmade piece and the confidence to create even more projects.
To begin your DIY Adorable Bunny Doll – Tutorial, gathering the right materials is essential. Choosing quality supplies will make your doll look more polished and last longer. Basic materials include cotton fabric, stuffing, thread, scissors, and a sewing needle or machine.
Fabric selection plays a major role in the final appearance. Soft cotton or linen works best for beginners because it is easy to sew and durable. You can choose neutral tones for a classic look or pastel colors for a more playful bunny.
You will also need stuffing material such as polyester fiberfill. This helps give your bunny its shape and softness. Make sure the stuffing is evenly distributed to avoid lumps.
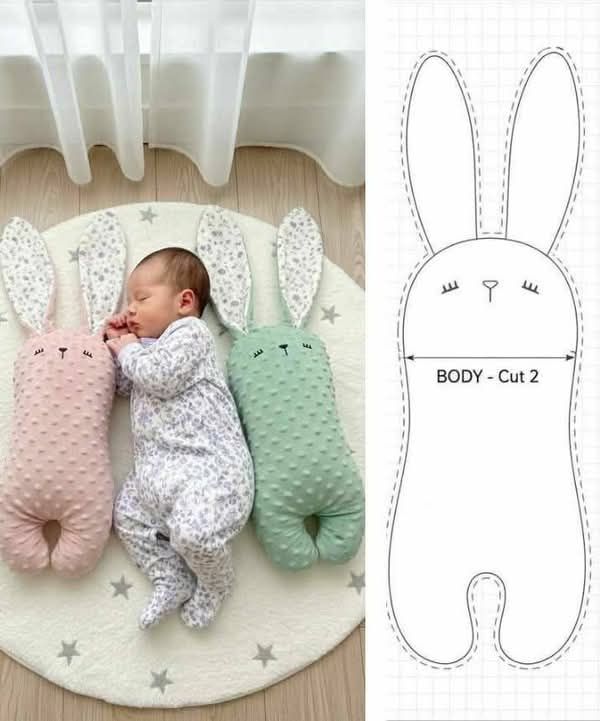
Prepare a simple pattern before cutting your fabric. You can draw a bunny shape on paper or print one. The pattern typically includes the body, ears, and arms if desired.
Before cutting, wash and iron your fabric. This step ensures the material doesn’t shrink later and makes it easier to work with. Clean fabric also gives your project a more professional finish.
Finally, organize your workspace. A clean and well-lit area helps you focus and avoid mistakes while working on your DIY Adorable Bunny Doll – Tutorial.
Start by placing your fabric pieces together with the right sides facing inward. Trace your bunny pattern onto the fabric using a fabric marker or pencil. This will guide your stitching.
Carefully cut around the pattern, leaving a small seam allowance of about 0.5 cm. This extra space ensures the seams are strong and prevents tearing.
Begin sewing along the traced lines. If you are using a sewing machine, use a straight stitch. If sewing by hand, small and even stitches will give the best result.
Leave a small opening at the bottom or side of the bunny. This gap will allow you to turn the fabric right side out and add stuffing later.
Once sewn, gently turn the bunny inside out through the opening. Use a pencil or stick to push out the corners and shape the ears properly.
Stuff the bunny evenly until it feels soft but firm. Then close the opening using an invisible stitch to complete this stage of your DIY Adorable Bunny Doll – Tutorial.
Now comes the most fun part of the DIY Adorable Bunny Doll – Tutorial—adding personality. Start by creating the face using embroidery thread. Simple eyes and a small nose can bring your bunny to life.
You can sew buttons for eyes, but for children’s toys, embroidered features are safer. Always prioritize safety depending on the intended use of your doll.
Consider adding blush to the cheeks using fabric-safe paint or even a bit of pastel powder. This gives your bunny a soft and adorable expression.
Clothing is another great way to customize your bunny. A small dress, scarf, or bow can completely change its style and make it unique.
You may also experiment with different ear styles. Some people like floppy ears, while others prefer upright ones. Both options look charming.
Personalization allows your DIY Adorable Bunny Doll – Tutorial to stand out. You can even add initials or names to make it a meaningful gift.
After completing your bunny, take time to inspect all seams. Ensure everything is secure and there are no loose threads. This step improves durability.
Trim any excess threads and smooth out the stuffing. A well-finished bunny looks more professional and lasts longer.
If needed, lightly iron your bunny on low heat, avoiding direct contact with delicate details. This helps remove wrinkles from the fabric.
For cleaning, spot cleaning is recommended. Use a damp cloth and mild soap to maintain the appearance of your handmade doll.
Store your bunny in a dry place to prevent moisture damage. Proper care will keep your creation looking new for years.
By following these finishing steps, your DIY Adorable Bunny Doll – Tutorial project will not only look beautiful but also remain in great condition over time.
1. Is this tutorial suitable for beginners?
Yes, the DIY Adorable Bunny Doll – Tutorial is designed to be beginner-friendly, with simple steps and basic sewing techniques.
2. What type of fabric is best for a bunny doll?
Cotton fabric is highly recommended because it is easy to handle, durable, and widely available.
3. Can I make this bunny without a sewing machine?
Absolutely. Hand sewing works perfectly fine, as long as you use small and consistent stitches.
4. How long does it take to complete the project?
Depending on your experience, it can take between 2 to 5 hours to complete your bunny doll.
5. Is the bunny safe for children?
Yes, but avoid small parts like buttons for very young children. Embroidered features are a safer option.
6. Can I customize the size of the bunny?
Yes, simply adjust the pattern size before cutting the fabric to create larger or smaller versions.
The DIY Adorable Bunny Doll – Tutorial is a delightful and rewarding project that combines creativity, craftsmanship, and personal expression. Throughout this guide, you learned how to select materials, sew your bunny step by step, add unique details, and apply finishing touches for a professional result.
Creating your own bunny doll is more than just a craft—it’s an experience that allows you to relax, learn, and produce something truly special. Whether you keep it for yourself or gift it to someone else, your handmade bunny will carry a personal touch that store-bought items simply can’t match.
If you enjoyed this DIY Adorable Bunny Doll – Tutorial, feel free to share your honest opinion and leave suggestions. Your feedback helps improve future tutorials and inspires even more creative ideas!


