
Sewing Hearts & Nine Patch

Sewing Machine Cover – Tutorial is a practical and decorative quilting project designed to protect your sewing machine while enhancing the look of your creative space. A handmade sewing machine cover helps keep dust away, prevents scratches, and adds a personal touch to your sewing room. This tutorial focuses on combining functionality with style, making it an excellent project for quilters who enjoy creating useful items with beautiful fabric.
The Sewing Machine Cover – Tutorial is loved by quilters of all experience levels because it can be customized to fit any machine size and décor style. From simple, clean designs to more detailed quilted patterns, this project allows for creativity while remaining approachable. It is also a great way to use favorite fabrics or showcase special quilting techniques.
In this article, you will learn everything about the Sewing Machine Cover – Tutorial, including how the cover is designed, how to choose fabrics, step-by-step construction guidance, creative customization ideas, and care tips. By the end of this guide, you will feel confident making a sewing machine cover that is both protective and visually appealing.
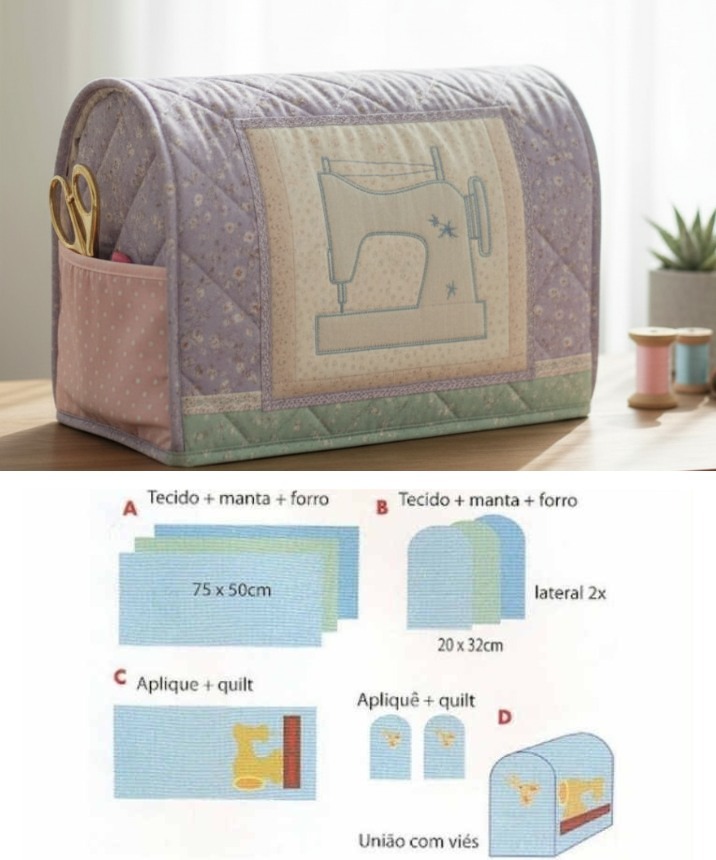
The Sewing Machine Cover – Tutorial is designed to fit over the sewing machine snugly while allowing easy removal.
Most covers follow a box-style or fitted shape to accommodate the machine’s form.
The design typically includes a front panel, side panels, and a top section.
Some covers include pockets for storing accessories.
The structure balances protection with ease of use.
A well-designed cover helps keep your machine clean and ready for sewing.
Choosing the right materials is essential for a successful Sewing Machine Cover – Tutorial.
Cotton quilting fabric is the most popular choice due to durability and ease of handling.
Batting or foam interfacing adds padding and structure.
Lining fabric gives the inside a clean, finished look.
Coordinating fabrics allow for creative expression.
Accurate measurements ensure a proper fit for your specific machine.
Quality materials result in a long-lasting and professional-looking cover.
The Sewing Machine Cover – Tutorial begins with measuring your sewing machine carefully.
Fabric pieces are cut based on height, width, and depth measurements.
The quilted panels are assembled first, if quilting is included.
Side panels are attached to the top section with precise seam allowances.
Corners are shaped to fit neatly around the machine.
The lining is added last, creating a clean interior finish.
Pressing seams throughout ensures a polished result.
One of the best features of the Sewing Machine Cover – Tutorial is its flexibility.
You can add exterior pockets for tools and notions.
Decorative quilting enhances texture and visual interest.
Personalized fabric choices make the cover unique.
This cover is perfect for sewing rooms, studios, or travel.
For care, gentle washing is recommended to protect quilting.
Allow the cover to air dry to maintain shape.
Storing it flat helps prevent creasing.
Is the Sewing Machine Cover – Tutorial beginner-friendly?
Yes, it is suitable for confident beginners with basic sewing skills.
Do I need a specific pattern for my machine model?
No, this tutorial can be adapted to any sewing machine size.
What batting thickness works best?
Light to medium batting provides good protection without bulk.
Can I add pockets to the cover?
Yes, pockets are a popular and useful addition.
How long does it take to make a sewing machine cover?
Most covers can be completed in one day.
Is this project suitable for gifts?
Absolutely, it makes a thoughtful and practical handmade gift.
This Sewing Machine Cover – Tutorial article covered the design concept, fabric and material selection, construction process, customization options, and care instructions. You now have a clear understanding of how to create a functional and stylish sewing machine cover that protects your equipment and enhances your creative space.
The Sewing Machine Cover – Tutorial is a rewarding quilt project that combines practicality with creativity, making it a valuable addition to any sewing room.
PATTERN VIDEO:
We invite you to leave your honest opinion and share your suggestions. Your feedback helps improve future quilt tutorials and inspires new creative and functional quilting projects.


