
Sewing Hearts & Nine Patch

Bubble Basket Tutorial is a creative and functional quilt-based project that brings texture, charm, and practicality together in one beautiful handmade piece. This basket-style pattern is especially loved for its rounded, “bubble-like” appearance, which adds softness and visual interest while still being sturdy enough for everyday use.
The Bubble Basket Tutorial is perfect for quilters who enjoy making useful home accessories while exploring three-dimensional quilting techniques. These baskets can be used for organizing sewing supplies, storing toys, holding toiletries, or decorating shelves and craft rooms. The combination of quilting and structure makes this project both fun and highly rewarding.
In this article, you will learn everything you need to know about the Bubble Basket Tutorial, including how the pattern works, fabric and material choices, step-by-step construction, customization ideas, and care tips. This guide is suitable for confident beginners and experienced quilters who want to expand their skills beyond flat quilt projects.
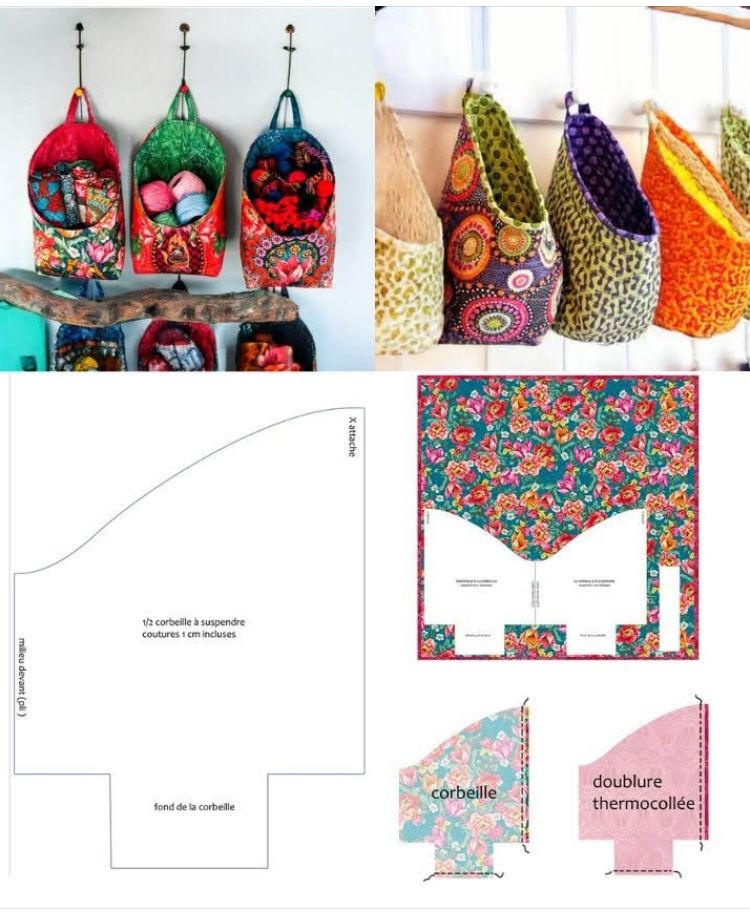
The Bubble Basket Tutorial is designed to create a soft yet structured fabric basket using quilted panels.
Its signature “bubble” effect usually comes from curved seams, gathered fabric, or quilted texture.
The basket is typically made from multiple panels that are sewn together to form a rounded shape.
Batting or foam stabilizer is used to help the basket stand upright.
Despite its three-dimensional look, the pattern follows clear and logical construction steps.
Overall, the Bubble Basket Tutorial focuses on combining texture, shape, and functionality.
Fabric choice plays a major role in the final look of the Bubble Basket Tutorial.
Quilting cotton is commonly used for both the exterior and lining due to its durability and ease of sewing.
Using contrasting fabrics for the inside and outside adds depth and personality.
Scrap fabrics work well, making this an excellent stash-busting project.
Batting, foam interfacing, or stabilizer provides the necessary structure for the basket.
Additional materials include thread, pins, scissors, and a sewing machine for smooth assembly.
The Bubble Basket Tutorial usually begins with cutting fabric panels and stabilizer accurately.
The exterior fabric is often quilted first to create texture and strength.
Once quilted, panels are sewn together carefully, aligning curves and edges.
The lining is constructed separately and then joined to the exterior basket.
Turning the basket right side out reveals the rounded, bubble-like shape.
Final topstitching secures the lining and gives the basket a clean, finished look.
One of the most enjoyable parts of the Bubble Basket Tutorial is customization.
You can adjust the size of the basket by changing panel dimensions.
Color choices range from soft neutrals to bold, playful prints.
Adding handles, labels, or decorative stitching enhances functionality and style.
These baskets are ideal for organizing craft supplies, nursery items, or household essentials.
For care, spot cleaning or gentle hand washing is recommended.
Allow the basket to air dry fully and reshape if necessary.
Is the Bubble Basket Tutorial suitable for beginners?
It is best for confident beginners familiar with basic quilting and sewing.
How long does it take to make a bubble basket?
Most baskets can be completed in a few hours.
What stabilizer works best for this project?
Foam stabilizer or thick batting provides excellent structure.
Can I make the basket larger or smaller?
Yes, resizing the pattern is simple by adjusting panel sizes.
Are bubble baskets sturdy enough for daily use?
Yes, when properly stabilized, they are very durable.
Can these baskets be used as gifts?
Absolutely, they make practical and beautiful handmade gifts.
This Bubble Basket Tutorial article covered the pattern structure, fabric and material choices, construction process, customization ideas, and care tips. You now have a clear understanding of how to create a stylish and functional quilted basket with a unique bubble texture.
The Bubble Basket Tutorial is a wonderful project that blends creativity, organization, and craftsmanship into one handmade piece.
PATTERN VIDEO:
We invite you to leave your honest opinion and share your suggestions. Your feedback helps improve future quilt tutorials and inspires new ideas for practical and decorative quilted projects.


