
Sewing Hearts & Nine Patch

Super Scrappy Star – TUTORIAL is a vibrant and creative quilting project that celebrates color, texture, and the beauty of fabric scraps. This pattern is especially loved by quilters who enjoy turning leftover pieces into something bold, dynamic, and visually striking. Each block feels unique, making every quilt one of a kind.
The Super Scrappy Star – TUTORIAL is perfect for quilters who want a project that feels playful yet well-structured. By combining star shapes with a scrappy approach, this pattern offers freedom in fabric choices while still maintaining a cohesive and balanced design. It works beautifully for full quilts, throws, table toppers, and even wall hangings.
In this article, you will find a complete guide to the Super Scrappy Star – TUTORIAL, covering how the pattern works, fabric selection, construction steps, customization ideas, and care tips. This tutorial is suitable for confident beginners and experienced quilters who love expressive, scrap-friendly designs.
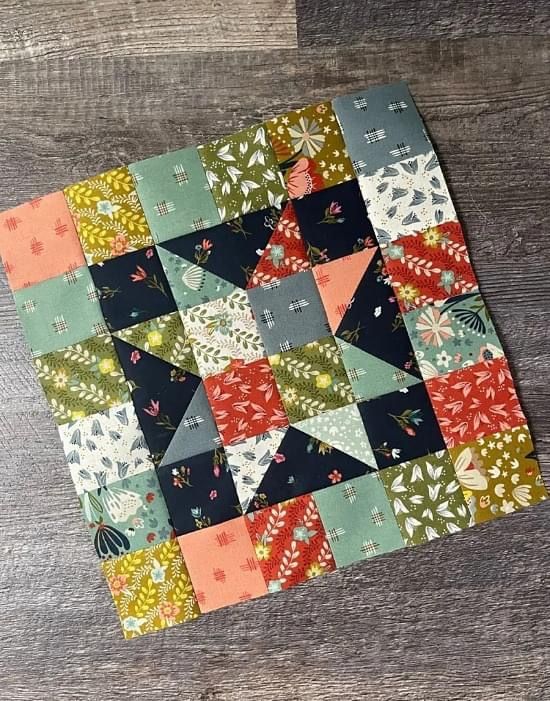
The Super Scrappy Star – TUTORIAL is built around a classic star block concept enhanced with a scrappy layout.
Instead of using uniform fabrics, this pattern encourages mixing different colors, prints, and textures.
Each star point is typically made from a different fabric, creating a lively and energetic look.
Despite the scrappy appearance, the block follows a clear structure that keeps everything aligned.
The center of the star often acts as a visual anchor, helping balance the surrounding fabrics.
Overall, the Super Scrappy Star – TUTORIAL blends creativity with traditional quilt block geometry.
Fabric selection is where the Super Scrappy Star – TUTORIAL truly shines.
Scraps from previous projects are ideal, making this pattern both economical and sustainable.
Using a variety of colors helps highlight the star shape and adds visual interest.
Quilting cotton is recommended because it presses well and maintains consistent block size.
Before sewing, fabrics should be pressed and trimmed accurately to ensure clean points.
Organizing scraps by color or value can make the construction process smoother and more enjoyable.
The Super Scrappy Star – TUTORIAL usually begins with cutting pieces for star points, background sections, and the center block.
Many patterns use half-square triangles or flying geese units to form the star points.
Each unit is sewn carefully, pressed, and trimmed for accuracy.
The star units are then assembled into rows, maintaining proper alignment.
Once rows are joined, the full block is pressed and squared to its final size.
Consistent seam allowances are key to achieving sharp stars and flat blocks.
One of the greatest advantages of the Super Scrappy Star – TUTORIAL is its flexibility in layout.
Blocks can be arranged randomly for a playful look or organized by color for a more structured design.
Background fabrics can be consistent or scrappy as well, depending on your style.
Borders and sashing can help frame the stars and give the quilt a finished appearance.
This pattern works well for quilts of any size, from baby quilts to large bed quilts.
For care, gentle washing and air drying help preserve fabric color and seam strength.
Is the Super Scrappy Star – TUTORIAL beginner-friendly?
Yes, it is suitable for confident beginners familiar with basic piecing.
How many scraps do I need for this pattern?
The pattern is very flexible and works with a wide range of scrap sizes.
Do the stars need to match exactly?
No, variation is part of the charm of a scrappy quilt.
Can I use precut fabric?
Yes, charm squares and strips can work well with this design.
What size quilt can I make?
Any size, depending on the number of blocks you create.
Is this pattern good for stash busting?
Absolutely, it is ideal for using leftover fabrics.
This Super Scrappy Star – TUTORIAL article explored the structure of the pattern, fabric preparation, construction steps, layout ideas, and care tips. You now have a clear understanding of how to transform fabric scraps into stunning star blocks.
The Super Scrappy Star – TUTORIAL is a joyful and rewarding quilting project that encourages creativity while producing a beautiful finished quilt.
We invite you to leave your honest opinion and share your suggestions. Your feedback helps improve future tutorials and inspires new quilting ideas for our creative community.


