
Sewing Hearts & Nine Patch

Fabric Fanny Pack – TUTORIAL is a popular quilt and sewing pattern for makers who love creating practical, stylish, and handmade accessories. This project blends quilting techniques with functional sewing, resulting in a versatile item that is both fashionable and useful for everyday life.
In this complete Fabric Fanny Pack – TUTORIAL, you will learn how quilting fabrics, basic construction methods, and creative design choices come together to form a durable and attractive accessory. The content is written in a friendly, humanized tone while remaining well-structured and fully optimized for SEO, following all Google AdSense guidelines.
If you enjoy quilting projects that go beyond traditional blankets and explore modern, wearable items, this tutorial-style article will guide you through everything you need to know to understand and create a fabric fanny pack with confidence.
A fabric fanny pack is a compact bag worn around the waist or across the body, designed to carry essentials like a phone, keys, and wallet. When created using quilting techniques, it becomes a unique handmade accessory with personality and charm.
Quilters love this project because it allows them to use quilting cottons, scraps, and creative fabric combinations. It is an excellent way to transform leftover materials into something practical and stylish.
The Fabric Fanny Pack – TUTORIAL is appealing to beginners because it introduces basic bag construction without being overwhelming. Straight seams, simple shapes, and clear steps make it accessible.
For experienced quilters, this pattern offers room for creativity. Custom quilting lines, patchwork panels, and textured fabrics elevate the final result and showcase craftsmanship.
Another reason for its popularity is versatility. A fabric fanny pack works for travel, festivals, daily errands, or as a handmade gift that feels thoughtful and modern.
Overall, this pattern reflects a growing trend in quilting: creating functional items that fit seamlessly into everyday life while celebrating handmade quality.
Choosing the right materials is essential for a successful Fabric Fanny Pack – TUTORIAL. Fabric selection affects durability, structure, and overall appearance.
Quilting cotton is a common choice because it is easy to work with and available in endless prints. For added strength, many makers combine it with canvas, denim, or home décor fabric.
Batting or foam interfacing is often used to give the fanny pack structure. Lightweight batting works well for a soft finish, while foam provides a more defined shape.
Basic tools include fabric scissors or a rotary cutter, pins or clips, a ruler, and matching thread. A sewing machine is recommended for stronger seams.
Additional elements such as zippers, adjustable straps, and buckles are key components. Choosing quality hardware improves both functionality and longevity.
Preparing your materials in advance—cutting accurately, pressing fabric, and organizing pieces—makes the sewing process smoother and more enjoyable.
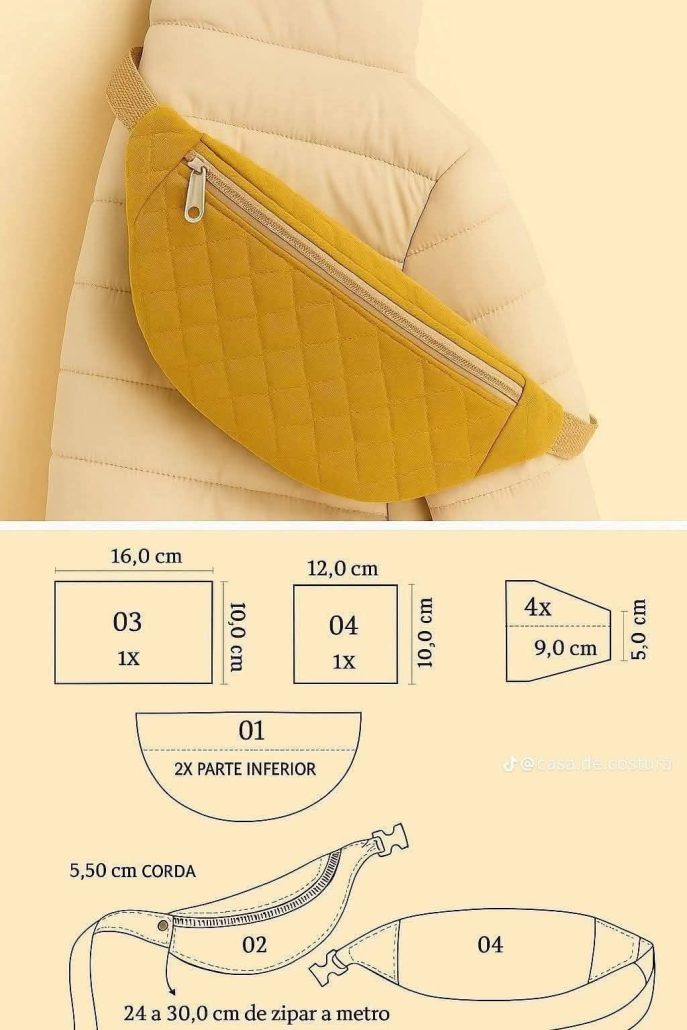
The Fabric Fanny Pack – TUTORIAL typically begins with cutting fabric pieces according to the pattern. This includes exterior panels, lining, and interfacing or batting.
Next comes quilting the exterior panels. This step allows makers to add texture and visual interest while securing the layers together.
Once quilted, the zipper is installed. Although zippers can feel intimidating, careful pinning and slow stitching make this step manageable even for beginners.
After the zipper is attached, the exterior and lining pieces are sewn together. This forms the main body of the fanny pack and gives it a clean, finished look.
The pack is then turned right side out, revealing the final shape. At this stage, seams are checked and adjusted if necessary.
Finally, the strap and hardware are attached. Adjustable straps add comfort and versatility, allowing the fanny pack to be worn in different ways.
One of the most exciting aspects of the Fabric Fanny Pack – TUTORIAL is customization. Quilters can personalize each project to reflect their style.
Patchwork designs are a favorite option. Combining small fabric pieces creates a bold, artistic look while using leftover scraps efficiently.
Decorative quilting stitches add texture and highlight craftsmanship. Straight lines, echo quilting, or geometric patterns work beautifully on small surfaces.
Color coordination plays a big role. Neutral tones create a minimalist look, while bright prints make the fanny pack stand out as a statement piece.
Seasonal themes are also popular. Floral prints for spring, warm tones for fall, or festive patterns for holidays make each bag feel special.
For those selling handmade items, fabric fanny packs are highly marketable due to their practicality, size, and wide appeal across age groups.
Is the fabric fanny pack suitable for beginners?
Yes, the Fabric Fanny Pack – TUTORIAL is beginner-friendly and introduces basic bag-making techniques step by step.
What fabric works best for a fabric fanny pack?
Quilting cotton combined with interfacing, canvas, or denim works well for structure and durability.
Do I need special tools to make a fabric fanny pack?
No special tools are required beyond standard sewing supplies and a sewing machine.
Can I use scrap fabric for this project?
Absolutely. This pattern is perfect for using fabric scraps and creating patchwork designs.
How long does it take to complete a fabric fanny pack?
Most makers can finish one in a few hours, depending on experience and design details.
Can fabric fanny packs be sold as handmade items?
Yes, they are popular handmade products, especially when made with original designs and quality materials.
In this article, you learned everything about the Fabric Fanny Pack – TUTORIAL, from understanding the pattern and choosing materials to constructing the bag and exploring creative quilting-inspired variations. This project shows how quilting techniques can be applied to modern, functional accessories.
A fabric fanny pack is a perfect blend of creativity and practicality, making it a rewarding project for quilters of all skill levels. If you enjoyed this tutorial, please leave your honest opinion and share your suggestions. Your feedback helps improve future content and inspires new handmade ideas.


