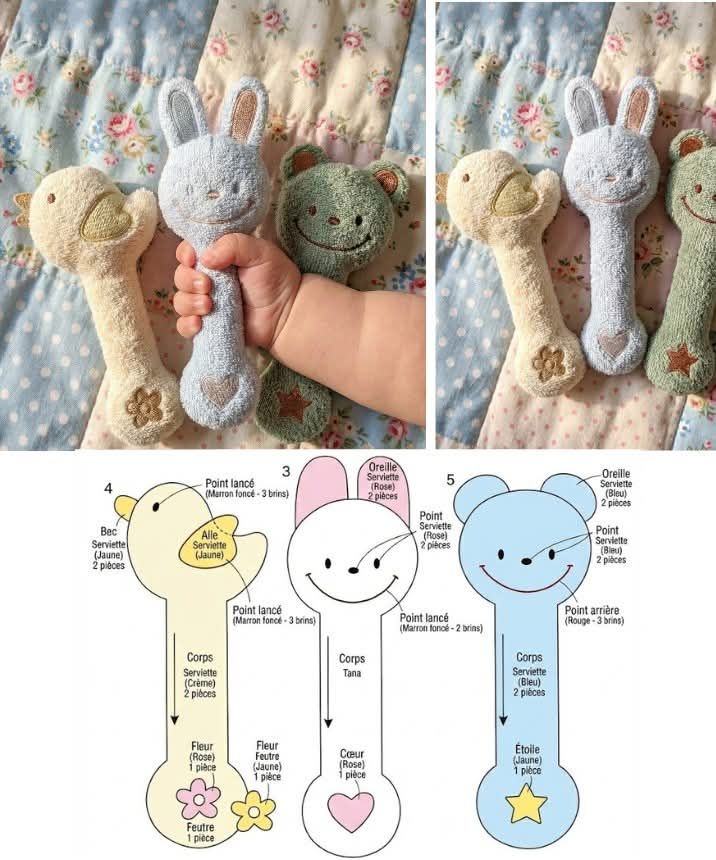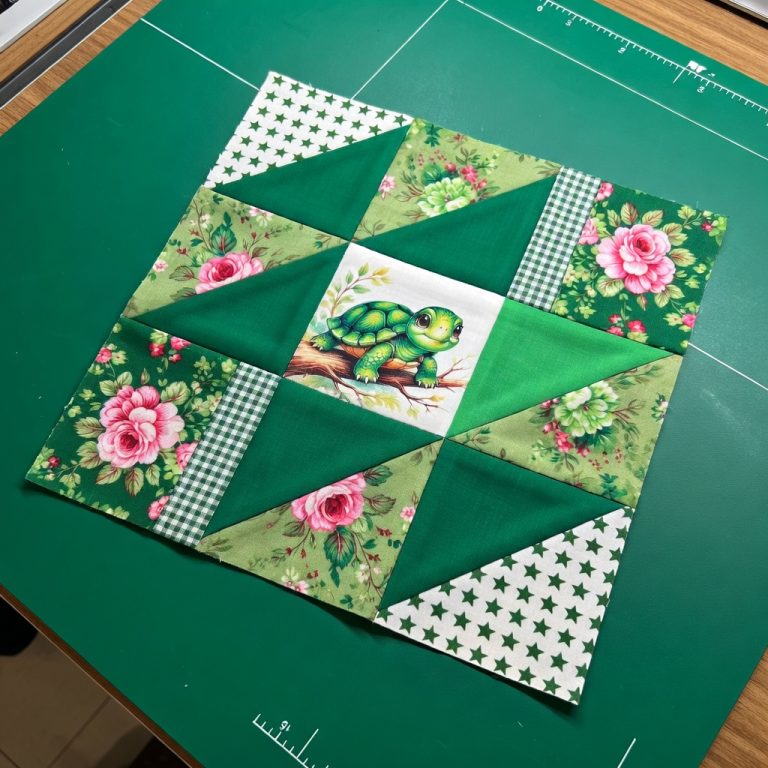
DIY - 9-Patch “Turtle Star” Quilt Block Tutorial

Cat Case – TUTORIAL is a creative and practical quilt project that combines functionality with a playful design. This tutorial is perfect for quilters who enjoy making useful items while adding a touch of personality to their handmade creations. The Cat Case is often used as a fabric storage pouch, sewing organizer, or small carry case, making it both decorative and highly functional.
The charm of the Cat Case – TUTORIAL lies in its unique cat-inspired shape and details. Quilters love this pattern because it allows them to experiment with colors, prints, and expressions while still following a structured and achievable process. It is a wonderful way to turn quilting skills into a fun accessory that appeals to cat lovers of all ages.
Another reason the Cat Case – TUTORIAL is so popular is its versatility. The finished case can be used for storing quilting tools, makeup, stationery, or small personal items. With the right fabric choices and finishing touches, this project can easily be customized for gifts, craft fairs, or personal use.
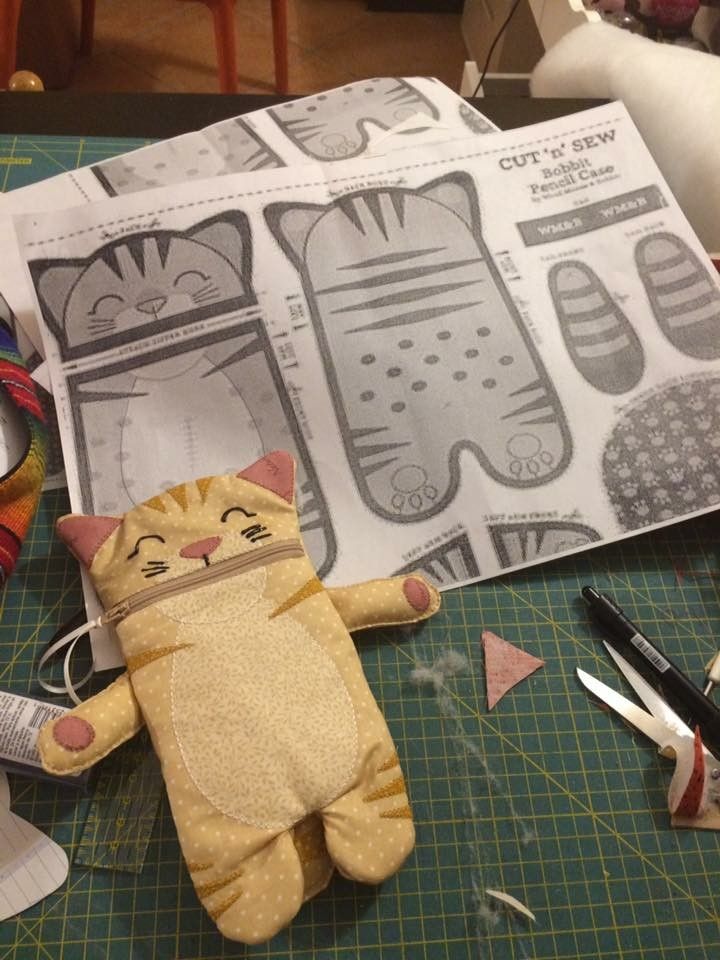
The Cat Case – TUTORIAL is a quilted project designed to create a small case or pouch shaped like a cat. It typically features pointed ears, a rounded body, and decorative elements such as eyes, whiskers, or a tail.
This tutorial focuses on combining basic quilting techniques with simple shaping to achieve a recognizable and charming cat silhouette. The result is a case that is both sturdy and visually appealing.
One of the highlights of the Cat Case – TUTORIAL is its approachable construction. While the finished piece looks detailed, the steps rely on straight seams, basic curves, and careful assembly.
The pattern is ideal for using leftover fabric scraps. This makes it a budget-friendly and eco-conscious quilting project.
The Cat Case – TUTORIAL also encourages creativity. Each maker can give their cat case a unique personality by changing facial expressions, fabric colors, or embellishments.
Overall, this project blends quilting fundamentals with playful design, making it enjoyable for both beginners and experienced quilters.
Choosing the right materials is essential for success with the Cat Case – TUTORIAL. Quilting cotton is the most common fabric choice due to its durability and ease of sewing.
Fusible interfacing or batting is often used to give the case structure and stability. This helps the finished cat case hold its shape during use.
Color selection plays a major role in the final look. Solid fabrics create a clean and modern style, while prints add character and whimsy.
Accurate cutting is especially important for this project. Symmetry helps ensure that the cat’s ears and body align properly.
Additional materials may include a zipper, button, or snap closure, depending on the tutorial variation being used.
Preparing all pieces in advance, including pressing fabrics and organizing components, makes the assembly process smoother and more enjoyable.
The construction of the Cat Case – TUTORIAL usually begins with cutting the main body pieces. These pieces form the front and back of the case.
Next, the ear shapes are assembled and attached. This step is key to achieving the recognizable cat silhouette.
Facial details are then added. These can be appliquéd, embroidered, or stitched directly onto the fabric.
Once the decorative elements are complete, the quilt sandwich is formed by layering the outer fabric, batting, and lining.
Quilting the layers together adds texture and strength. Simple straight-line quilting works well for this project.
The final steps involve assembling the case, inserting the closure, and finishing the edges. At this point, the Cat Case – TUTORIAL comes together into a polished and functional item.
The Cat Case – TUTORIAL produces a versatile item that can be used in many ways. It works well as a sewing kit holder, makeup pouch, or travel accessory.
In quilting rooms, this case is perfect for storing small tools like scissors, clips, or thread spools.
As a gift, the Cat Case – TUTORIAL is especially meaningful. Handmade and playful, it appeals to cat lovers and craft enthusiasts alike.
Caring for the cat case is simple. Gentle washing with mild detergent helps maintain fabric quality.
Air drying or low-heat drying is recommended to protect the shape and quilting stitches.
With proper care, a project made from the Cat Case – TUTORIAL can remain functional and beautiful for many years.
Is the Cat Case – TUTORIAL suitable for beginners?
Yes, confident beginners can successfully complete this project with basic sewing skills.
What size is the finished cat case?
Sizes vary depending on the tutorial, but most are compact and easy to carry.
Can I customize the cat’s face and colors?
Absolutely. Customization is one of the most enjoyable parts of this project.
Does this project require a zipper?
Some versions include a zipper, while others use buttons or snaps.
Is the Cat Case – TUTORIAL good for scrap fabrics?
Yes, it is an excellent project for using fabric leftovers.
Can this case be washed?
Yes, gentle washing is safe when proper materials are used.
The Cat Case – TUTORIAL is a fun and practical quilt project that allows quilters to blend creativity with everyday usefulness. In this article, we explored what the cat case is, how to prepare materials, step-by-step construction, and ideas for use and care.
PATTERN VIDEO:
This tutorial is perfect for anyone looking to create a playful yet functional quilted accessory. If you enjoyed this guide, please leave your honest opinion and share your suggestions or experiences. Your feedback is always appreciated and helps inspire future quilting tutorials.