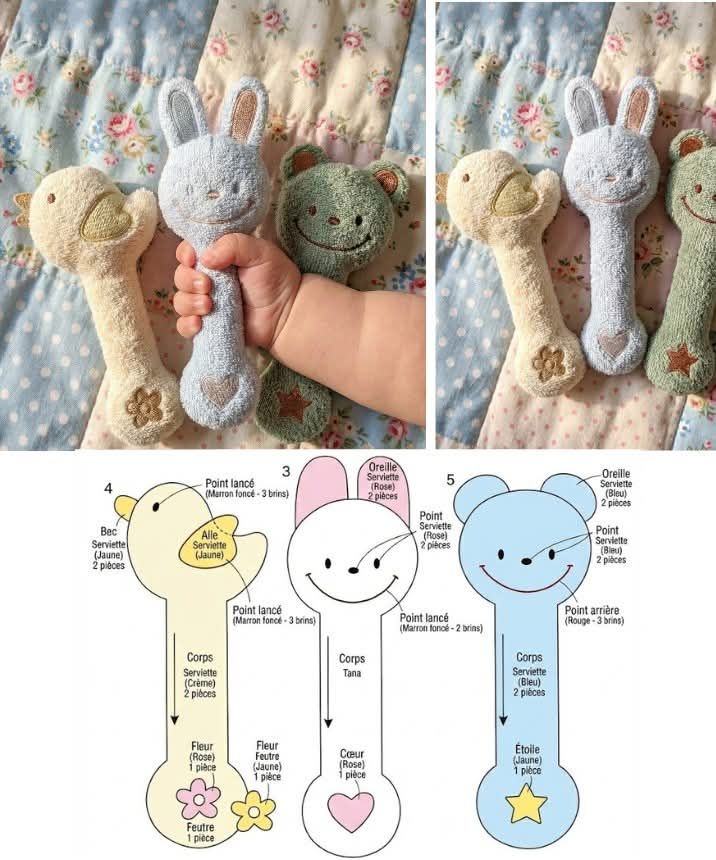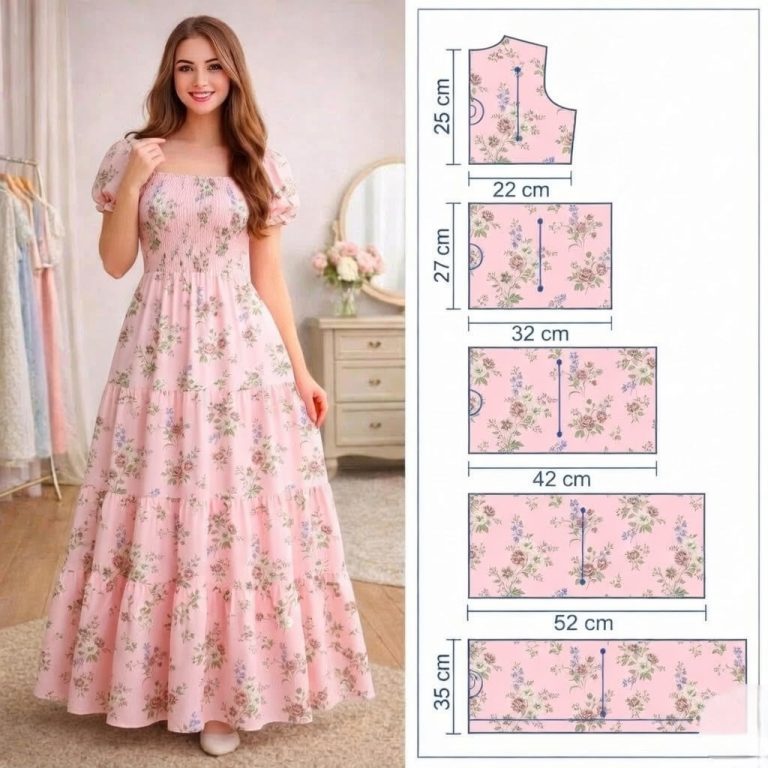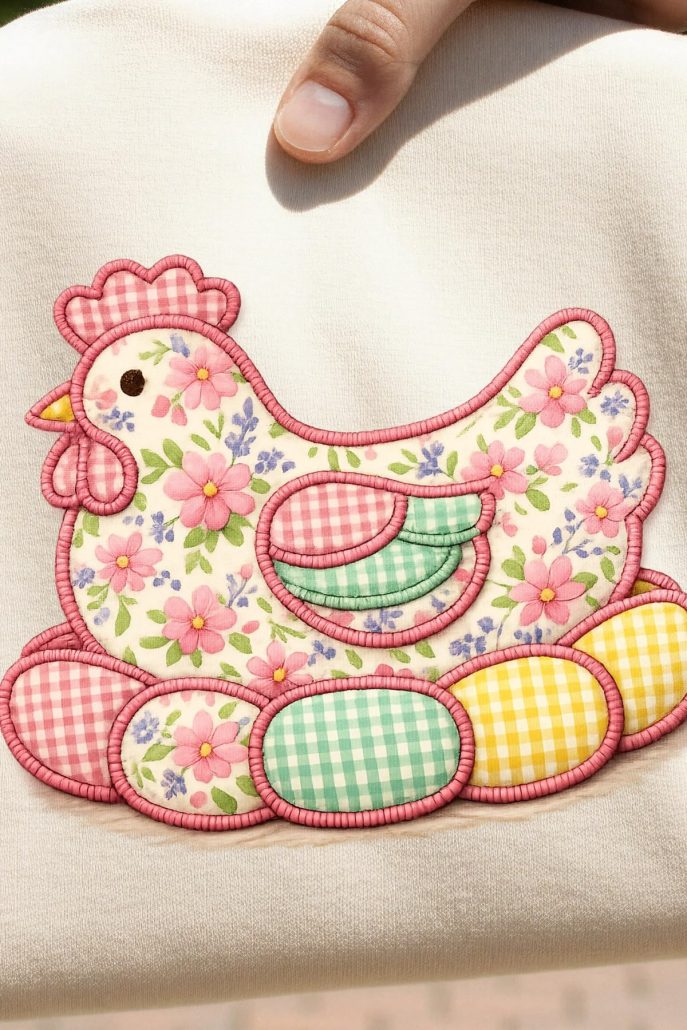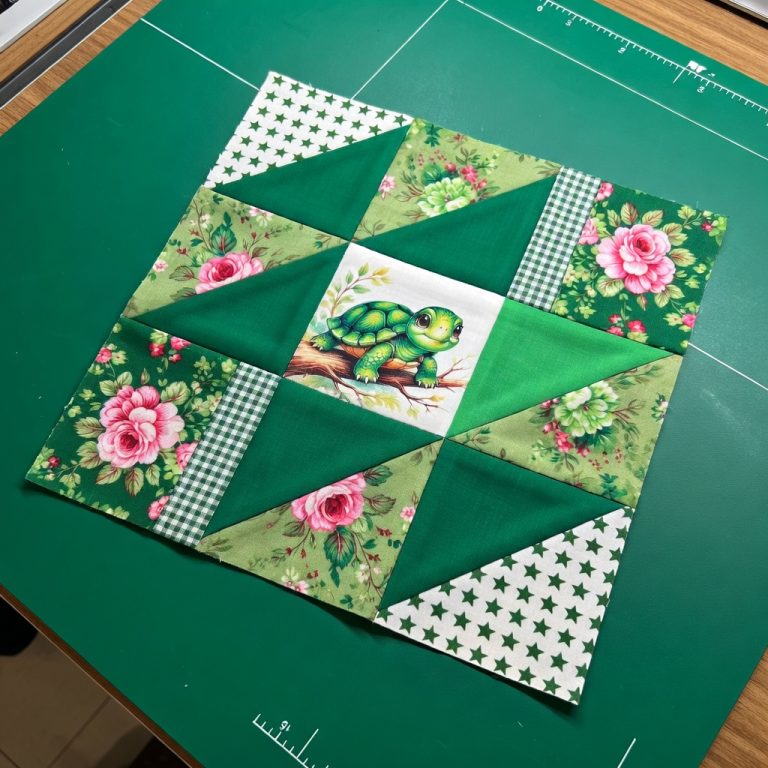
DIY - 9-Patch “Turtle Star” Quilt Block Tutorial

The Diamond Tile Block – Tutorial is a wonderful resource for anyone who wants to explore a classic quilting design that blends symmetry, clean lines, and visual movement. Right from the first stitch, the Diamond Tile Block – Tutorial introduces quilters to a pattern that is timeless, elegant, and surprisingly beginner-friendly. Its geometric layout creates a tile-like effect, making it a versatile block that can be used in quilts, table runners, cushions, wall hangings, and more.
Many quilters appreciate how the Diamond Tile Block – Tutorial highlights fabric selection and color placement. Each diamond-shaped unit has the potential to transform the mood of the block depending on the tones and textures you choose. Whether you prefer soft pastels, vibrant contrasts, or modern monochromes, this block adapts beautifully to your creative vision.
Before getting into the step-by-step sections of this guide, it’s helpful to understand how the construction process works. This block is built from simple components that come together like a puzzle, making it ideal for beginners but also enjoyable for advanced quilters who want something relaxing and visually impactful. With careful cutting and consistent seam allowances, you will achieve clean diamonds with sharp angles and perfect alignment.

The structure of the Diamond Tile Block – Tutorial revolves around the center diamond, surrounded by strategically placed pieces that create a tiled appearance. Understanding this basic composition ensures your block stays balanced and visually harmonious. Most layout variations use squares, rectangles, and half-square triangles, all arranged to form a striking diamond motif.
Color contrast plays an essential role in the layout. You can create bold designs by combining dark and light fabrics or achieve a softer style using similar tones. The placement of these colors determines how dramatic the diamond effect appears, allowing you to customize the aesthetic to your preference.
A well-planned layout also helps with sewing accuracy. Because diamond shapes rely heavily on visual symmetry, careful alignment ensures the block maintains its sharp, clean look. Preparing all your pieces before sewing helps prevent mistakes and keeps the pattern cohesive.
One inspiration many quilters follow is choosing one fabric as the “star” of the block. This fabric becomes the primary diamond color, surrounded by supporting shades that enhance the overall theme. Solids, small prints, or textured fabrics all work beautifully depending on the look you want.
Beginner quilters benefit from practicing color mock-ups before cutting. Simply placing fabric swatches together helps you visualize how the final block will look. This step can significantly improve the outcome and boosts confidence as you begin sewing.
Once you have a clear understanding of the layout and color flow, the block becomes much easier to assemble. Planning is truly half the creative process, and the Diamond Tile Block – Tutorial offers plenty of opportunities to experiment and personalize your quilt.
Accurate cutting is essential for the Diamond Tile Block – Tutorial, ensuring all components fit together smoothly. Begin by choosing high-quality cotton fabrics, which provide crisp edges and are easier to sew. A rotary cutter, cutting mat, and acrylic rulers are your main tools for achieving professional-looking pieces.
The block typically requires squares and half-square triangles. Many quilters prefer the “two-at-a-time” or “four-at-a-time” HST method to speed up the process and create uniform pieces. Whichever method you choose, maintaining accuracy in measurements helps preserve the clean geometry of the diamonds.
Labeling your pieces is another helpful step. Because the block uses repeated shapes, marking each set prevents confusion when assembling the layout. Sticky notes, small pins, or fabric markers can make this process smoother.
Grain direction also matters. Cutting along the correct grain helps stabilize your fabric and reduces the chance of stretching, which is important when sewing angled seams. This contributes to maintaining the sharp points characteristic of the Diamond Tile design.
If you are using patterned fabrics, consider how the print will appear in the finished block. Some quilters enjoy aligning patterns to enhance symmetry, while others prefer a more organic look. Both approaches work beautifully depending on the overall quilt vision.
Once all your pieces are cut, arrange them on a flat surface following the layout diagram. This simple step allows you to preview the block and adjust colors or fabric placements before sewing anything together.
Sewing the Diamond Tile Block – Tutorial is a rewarding experience once you have all your pieces prepared. Start by assembling smaller units such as pairs of squares or half-square triangles. Consistent seam allowances—usually ¼ inch—are essential to maintain proper sizing throughout the block.
Pressing plays a significant role in assembly. After each seam, press your pieces carefully to keep them flat and aligned. Some quilters prefer pressing seams to the side, while others favor pressing open. Both methods work well as long as the fabric sits smoothly.
As you join the units, work methodically. Start from the center diamond area and build outward, adding each row or section step by step. This ensures the block develops evenly and reduces the chance of distortion.
Pinning helps keep angled seams aligned. When working with diamond points, even a slight shift can affect the final look. Using fine pins or clips ensures precision and reduces fabric movement while sewing.
Once the block is fully assembled, take a moment to check its size. Small adjustments can be made by trimming edges slightly if needed, but aim to stay as close as possible to the original measurement for easy quilt assembly.
Finally, give the completed block a gentle press. This final touch enhances the crisp lines and helps the diamond motif stand out beautifully.
The versatility of the Diamond Tile Block – Tutorial truly shines when incorporated into larger projects. Whether you want a full quilt, table runner, cushion cover, or decorative wall piece, this block adapts perfectly due to its balanced, geometric design.
A quilt made entirely of Diamond Tile blocks creates a beautiful repeating pattern. By alternating colors or rotating blocks, you can introduce movement and dynamic visual effects across your project.
Another creative option is to use the block as a central motif. Many quilters design quilts where the Diamond Tile sits in the center, surrounded by simpler blocks or sashing. This draws attention to the intricate diamond shape and adds elegance to the overall layout.
The block also makes stunning small projects. Coordinated colors and clean lines make it ideal for tote bags, mini quilts, placemats, and seasonal decorations.
If you enjoy experimenting, consider enlarging or reducing the block size. Because the construction is modular, scaling the block allows you to adapt it to any project, from tiny patchwork pieces to oversized quilt panels.
Ultimately, the block’s adaptability makes it a favorite among both beginners and advanced quilters. Whether you prefer traditional fabrics or modern prints, the Diamond Tile structure provides endless opportunities for creativity.
1. Is the Diamond Tile Block good for beginners?
Yes! While it looks intricate, the block uses simple units like squares and half-square triangles, making it accessible for beginners who follow the steps carefully.
2. What size should my finished block be?
Sizes vary depending on the tutorial, but most patterns result in blocks between 10 and 12 inches. Always follow the specific measurements provided in your instructions.
3. Do I need special tools to make this block?
A rotary cutter, mat, and ruler are recommended for accuracy. Standard sewing supplies and a sewing machine with a ¼-inch foot also help achieve precise seams.
4. Can I use scraps to make the Diamond Tile Block?
Absolutely! This pattern is scrap-friendly, especially if you enjoy combining contrasting or coordinated colors.
5. How important is pressing during assembly?
Very important. Proper pressing keeps seams neat, points sharp, and the block flat, which ensures a professional finish.
6. Can I mix prints and solids in the block?
Yes, mixing prints and solids creates beautiful depth and contrast. Just be sure the diamond shape remains visible with your fabric choices.
The Diamond Tile Block – Tutorial is a captivating and versatile quilting pattern that allows makers of all skill levels to enjoy creating a design that is both elegant and dynamic. Throughout this article, you learned how to plan your layout, cut your pieces accurately, assemble the block with precision, and incorporate it into larger quilting projects.
If you enjoyed this guide, please consider leaving a sincere comment sharing your opinion and any suggestions for future tutorials. Your feedback helps improve the quality of future patterns and inspires new creative ideas!