DIY - Denim Patchwork & Appliqué Pocket Box Tutorial

Starting your cozy winter project with a Crochet Aviator Hat – Pattern is one of the most enjoyable ways to mix creativity with functionality. This timeless hat style, inspired by vintage aviator helmets, is both warm and charming, making it a favorite among crocheters who love practical accessories with personality. The Crochet Aviator Hat – Pattern works beautifully for children, adults, and even themed photo shoots. Throughout this article, you’ll learn how this pattern works, how to adapt it, and best tips to create a handmade hat you’ll love wearing or gifting.
The term Crochet Aviator Hat – Pattern has become widely searched because makers appreciate how quick, fun, and customizable this project is. Whether you are making it with faux fur trim, soft wool yarn, or cotton for mild weather, the pattern adapts beautifully. This article will walk you through essential techniques, styling ideas, and construction tips for achieving a polished look that fits confidently and comfortably.
If you’re looking to expand your crochet skills with a project that doesn’t feel overwhelming, the Crochet Aviator Hat – Pattern is an excellent option. Beginners can follow it with ease, and more advanced crocheters can enrich it with details like earflap borders, decorative buttons, and textured stitches. Let’s now explore everything you need to know to bring this cozy design to life.
The Crochet Aviator Hat – Pattern begins with the basic structure of a traditional winter hat, typically crocheted from the crown downward. This ensures a snug yet comfortable fit and allows you to easily adjust the sizing as you go. Most patterns use simple stitches, making the construction straightforward even for those stepping into hat-making for the first time.
When learning this pattern, you’ll notice that the signature look of an aviator hat comes from its earflaps. These flaps give the piece not only its iconic style but also essential warmth. Yarn choice can make a huge difference, too. Soft bulky yarns create a plush, cozy finish, while medium-weight yarns give the hat a more flexible and lightweight feel.
Another key point in the Crochet Aviator Hat – Pattern is shaping. Increasing stitches at the crown is what gives your hat its round form. This step might seem intimidating at first, but it becomes predictable once you learn the rhythm of the increases. You’ll find it satisfying to watch the hat grow as the circle widens and transitions into a downward stitch pattern.
Stitch consistency is helpful but not critical for this project, which is why it’s such a great beginner-friendly pattern. Even if a few stitches are loose or tight, the finished result often still looks wonderful thanks to the design’s forgiving nature. Earflaps and borders hide small imperfections, making this a confidence-building project for new crocheters.
The last part of understanding the structure involves recognizing how optional additions like buttons, faux fur trim, or contrasting edges can elevate the design. Many crocheters love making multiple hats using the same Crochet Aviator Hat – Pattern but with different embellishments each time.
Finally, once you master the hat’s foundation, you can scale it for any size—baby, toddler, teen, or adult. This adaptability is one of the reasons the “Crochet Aviator Hat – Pattern” remains a beloved project among handmade winter accessories.
To begin the Crochet Aviator Hat – Pattern, the most important step is selecting the right materials. A soft, warm yarn is ideal, particularly for winter wear. Bulky and medium-weight yarns are the most commonly used because they create a solid structure that holds the aviator shape well. Look for yarns made of wool, acrylic, or blends that offer both warmth and durability.
Hooks can vary depending on your yarn choice, but a size between 5.0 mm and 7.0 mm is typical. Using a hook that complements your yarn weight will help maintain the correct stitch tension throughout the hat. If your gauge tends to be tight, choose a slightly larger hook to keep the fabric soft and flexible.
The stitches used in this pattern are simple and perfect for improving basic crochet skills. Most versions include single crochet, half double crochet, and sometimes double crochet for decorative trims. Even beginners can follow these stitches easily, which is another reason the Crochet Aviator Hat – Pattern is so popular among new crocheters.
Earflaps are made separately after completing the base of the hat. They are typically shaped using simple decreases, giving them a natural curve that hugs the ear. Working them directly onto the hat ensures they blend seamlessly into the rest of the design.
You may also want additional elements like buttons or decorative patches. These accent pieces give personality to your finished hat, allowing you to customize it for children, themed costumes, or even whimsical adult gifts. Craft stores also sell faux fur lining strips that can be stitched along the edges to create an authentic aviator style.
Finally, don’t forget essential tools like scissors, a yarn needle for sewing ends, and stitch markers to keep track of rounds. Having these tools ready helps maintain consistency and makes the entire process smoother as you follow the Crochet Aviator Hat – Pattern.
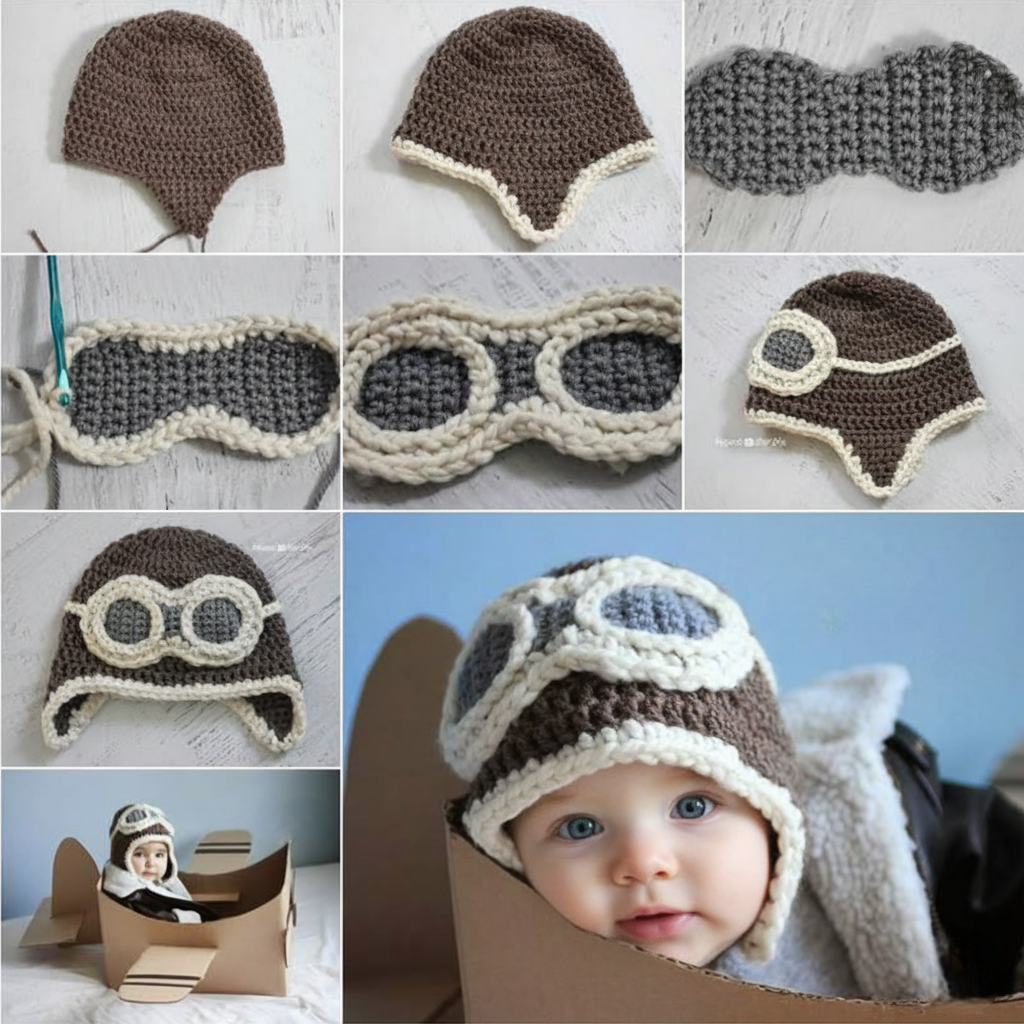
When you start working on the Crochet Aviator Hat – Pattern, begin with the crown. This typically involves making a magic ring or chain circle. From there, increase stitches evenly in each round until the base circle reaches the appropriate width for your chosen size. Each round adds structure and sets the foundation for the entire project.
Once your crown is complete, the next phase is working evenly around without increases to form the body of the hat. This part requires repetition, but it’s wonderfully relaxing. As you build height, the hat naturally begins to take its shape. You can stop earlier for a snug fit or continue for a more slouchy aviator style.
After achieving the desired height, it’s time to add the earflaps. These are worked directly into the hat, starting with a predetermined number of stitches. As you crochet each row, you’ll use decreases to shape the flap gracefully. Repeat this process on both sides of the hat to maintain symmetry and balance.
Bordering the earflaps gives your hat a clean, professional look. This can be done using single crochet stitches around all edges or by incorporating a contrasting color for added personality. Many crafters enjoy using faux fur or fuzzy yarn to highlight the aviator theme more strongly.
Once the hat and earflaps are complete, you may choose to add chin ties. These ties can be braided yarn strands, crocheted cords, or even decorative buttons for a no-tie finish. Personalizing your Crochet Aviator Hat – Pattern this way adds charm and functionality.
Finishing touches include weaving in all loose ends carefully and adding any decorations you prefer. A well-finished hat is durable, comfortable, and beautiful. That’s the joy of creating your own accessories using the Crochet Aviator Hat – Pattern.
One of the most exciting aspects of the Crochet Aviator Hat – Pattern is how easy it is to personalize. Using different yarn textures can dramatically change the look. Chunky roving yarn adds volume, while lightweight cotton makes it suitable for transitional seasons or indoor wear.
Color combinations also allow for creative expression. You can make neutral, classic aviator hats using earthy tones and faux fur edges or go bold with bright colors for children and festive occasions. The flexibility of the pattern ensures the final result always looks intentional and stylish.
Adding decorative buttons creates a signature aviator helmet appearance. Choose wooden buttons for a rustic finish or metallic buttons for a more authentic aviation feel. Positioning them where the earflaps meet the hat gives the accessory a beautifully detailed look.
If you enjoy textured stitches, try incorporating ribbing or waffle stitch sections into your hat. This adds dimension and thickness without complicating the Crochet Aviator Hat – Pattern too much. Simple stitch swaps can make your creation stand out.
Another variation includes lining the inside with fleece fabric for extra warmth. This is especially useful for winter climates. Sewing the lining inside is simple and enhances comfort, especially for babies and toddlers with sensitive skin.
Lastly, if you’re making the hat for gifting, consider adding a handmade tag or label. It adds a professional finish and communicates the love put into crafting your Crochet Aviator Hat – Pattern project.
1. Is the Crochet Aviator Hat – Pattern suitable for beginners?
Yes, the pattern is very beginner-friendly because it uses basic stitches and simple shaping techniques.
2. What type of yarn works best for this project?
Medium and bulky weight yarns are ideal, especially soft wool or acrylic blends for warmth and durability.
3. How long does it take to finish the hat?
Most crocheters complete the hat within a few hours, depending on experience and yarn weight.
4. Can I adjust the size easily?
Absolutely. Adjusting the number of increases at the crown and the number of rounds in the body lets you customize any size.
5. Do I have to add earflaps?
Earflaps are part of the aviator look, but you can omit them if you want a simple beanie style.
6. Are decorations like buttons necessary?
No, they’re optional, but they add a fun and classic aviator touch to your finished hat.
The Crochet Aviator Hat – Pattern is a delightful and accessible project that blends creativity, comfort, and style. By following the steps in this article, you can easily create a hat that’s warm, charming, and uniquely yours.
Whether crafting for yourself, a loved one, or as a thoughtful handmade gift, this pattern provides endless possibilities for customization and expression. If you enjoyed this tutorial, feel free to leave your honest opinion and share suggestions for future crochet projects—you help the creative community grow with every comment!